Saturday, October 27, 2018
BOO Bags Packed and Ready . . .
Here are photos of some of the treat bags I made for friends and gals at work for Halloween:
Each bag is decorated similarly but in different colours. Made some treat holders for inside -
The above photo shows some Hatagories that hold Tootsie Pops and then this holder holds the Cadbury Screme Egg for Halloween:
Plus some of the holders I made that hold the Ferrero Rocher candies:
also:
as well as a treat holder from Paper Pumpkin, a Matchbook holder that holds a Fun Size bag of M&Ms and other candies. Made a ghost pin for each recipient to wear on Halloween. Here are photos of some of the bags:
Also had dropped off a treat bag for my PIC (stamping Partner In Crime). In her bag I put the candy treat holders and also a Frantic Stamper Halloween die as well as a package of Christmas themed washi tapes for her holiday projects ahead.... Hoping she enjoys her treat bag! BOO to you!
Sunday, October 21, 2018
BOO Day Cards
Forgot to take photos of the first batch of Halloween cards but remembered for the last batch -- Happy to say for the ghost cards I was able to use the new-to-me Stampin Up Banners die set I picked up earlier this week for $5.00 for the set. The ghost die is from Simon Says Stamp:
These next cards I used various dies for - the spooky house and tree card uses a die set from Fun Stampers Journey and the graveyard scene card uses a die and stamp set from Taylored Expressions. It is also their trees background stamp:
Craft room is a mess but at least the BOO Day cards are in the mail.... already started working on the Thanksgiving projects so hoping to finish those up this week or at least by the end of next week. Then starting all the Christmas cards and such ... busy crafting time of the year but lots of fun so hoping everything goes as planned.... But for now BOO to you!
Monday, October 15, 2018
Halloween Hatagories Revisited
This post is the last of the Halloween Treat Holders I made for this year -- decided to revisit the Halloween Hatagories since I had not made them for a few years. Here is a photo of the original Hatagories:
This photo shows some of the Tootsie Pop Halloween Hatagories I made for this year:
Finished the treat holders with matchbook treat holders that hold the Fun Size M&Ms:
Used one sheet of orange card stock to make four of the matchbook holders. Here is the pattern for those:
One sheet of 8 1/2" x 11" card stock. With the 8 1/2" side of the card stock at the top of the score board you need to score this at 3/4", 4 1/2", and 5". Once it is scored take this to the trimmer with the 11" edge at the top of your trimmer. Cut this piece every 2 3/4" until you have four pieces. Using the bone folder crease your scored lines. Add printed card stock to the front of the holder and decorate.
Leave this open. Put the candy bag inside and staple this at the bottom to hold your bag in place. Tuck the decorated front piece behind the stapled piece to close your holder. I added various washi tapes across the bottom front of the holder over the staple. Easy holders to put together.
The pattern for the witch hat Tootsie Pop Holder can be found here:
http://svgcuts.com/blog/free-designs/page/14/
You need to fussy cut out each holder and be sure to use thicker card stock so it will stand up and the top of the hat will keep it's shape.
Saturday, October 13, 2018
More Watering Cans and gift bag fronts
Finished the Thanksgiving small kraft treat bags I am making and finished my watering cans. For the front of the kraft gift bags I wanted to use some of my fall holiday printed card stocks so each bag is different. I painted the watering cans to match the printed card stocks. Also at the bottom of each bag is a strip - I bought a package of these strips on sale at Hobby Lobby and they are meant to be put together to make garland out of paper rings - here is what they look like flat:
For my bags I used the dotted strips. Here are the bags:
and:
Used the technique Ida had shown on her video to make the watering cans but after I dabbed on the acrylic black craft paint I did not have a kit for the patina so I just dabbed more paints on the die cut watering cans until I got the looks I wanted. The pumpkins are buttons that I removed the shanks from and the leaves are from Hobby Lobby. "thankful" is from a die set from the stash that I cut out of various foiled card stocks stacked onto card board "thankful" words using Stick It Sheet to give the words dimension. BIG thanks to Ida for sharing her idea to make the watering cans into embellishments for my holiday treat bags. Added sequins from the stash to the bag fronts.
Sunday, October 7, 2018
So... what do you get? ? ?
So..... what do you get when you have Halloween, Fall/Thanksgiving, and Christmas cards and projects all started and in process at the same time????
ONE MESSY CRAFT ROOM!!! grrrrrrrr.... but having fun so guess it is worth it.... This next post is something I just finished that I had no idea I was going to be working on.... stumbled across this while I was looking around for Thanksgiving treat bags - - I am making treat holders for Thanksgiving and already using scarecrows and also pumpkins..... Had wanted to work on the kraft bags I bought to hold the treat holders and was not sure how I would decorate them --- so I stumbled across a video on Youtube and that was it.....
The video is by Ida at Created to Create on Youtube. She has lots of videos with great ideas and simple projects and once I saw her watering cans that was it - I have the Sizzix Watering Can die she used as well as the word die set she used but not the product she used for her patina finish on her watering can. Used what I had on hand for my watering can but did make a run to Hobby Lobby for the crystals she used for the water coming out of the watering can spout. Also -- the theme for my Thanksgiving treats and treat bag is rustic so my watering can is a darker colour than Ida's but it will work well for my bags. I am also using my watering cans as an embellishment to tie onto the gift bag handle as a tag:
Here is the link to her video with all the how to's for her project:
https://www.youtube.com/watch?v=C9su9MnuO8Y&t=583s
To begin with I have chipboard in the craft room but it is very thin so I measured the watering can die and cut two pieces of the chipboard a bit larger than the die. Using liquid glue I put the two chip boards together to make it thicker. Set it aside to dry. For my watering can I decided I wanted the bow on the can to match the card stock I used for the back of my watering can so I used a bow die from my stash and cut out a bow. Put it together using glue dots. Die cut out a watering can from the same printed card stock for the back of the watering can.
Using the dryer vent foil tape by 3M Ida uses I cut two pieces of the foil tape for the front of the chipboard piece. Peeled off the backing and put them onto the chipboard smoothing them out with my finger:
Die cut out the watering can:
The foil tape side of the watering can will be the front watering can for the project. As Ida had suggested I used black acrylic craft paint and I dabbed the paint onto the foiled piece using a tissue - dab it on - do not rub it on or it will come off the foiled finish - here is the watering can with just the black paint on it:
On my finished watering can you will see I used scrap printed card stock for the band on the front of the can so I did not use the foil covered band piece that the die cut out with my original die cuts. Once the black paint was put on and dried I added various craft paints I had on hand - a rust, a brown, then gold Perfect Pearls, (used a thin paint brush for the Perfect Pearls), then rust paint, and then rust Perfect Pearls, letting it all dry in between. It does not take long for drying since you are using so little paints. I wanted my can to be rusty looking and have a gritty texture but in this photo you can still see the silver foil tape under all the layers of paint and Perfect Pearls:
The messier you apply your layers the better the finish will look. After my last layer was added I set the piece aside to dry and I worked on the "thankful" greeting. Die cut the die from scrap rust textured card stock. Wanted it to be dimensional so also cut this out of the top tab to a kleenex box:
Before I die cut the two "thankful" words from the rust card stock I put Stick It Sheet behind this piece so when I cut out the words they had adhesive on the back of them and then I put them on the kleenex box words. Wanted to add sparkle to the word so I used a clear Wink of Stella over the word to add sparkle:
This photo shows the printed card stock I used for my band on the can that I put the "thankful" word on top of. It also shows the bow with a gold crystal in the center of that. For the pumpkins and leaves below the band on the watering can I used pumpkin buttons I had in my stash:
Used wire cutters to snip off the button shank on the back of the button to make the pumpkins flat:
I also used a green marker from SU for the leaf and stem part of the pumpkin to add colour. I was happy that I had the "fill" shapes from Hobby Lobby that Ida uses on her watering cans so I used three of those leaf pieces under my pumpkin on my watering can:
I used a hot glue gun to add the leaves and pumpkin to the watering can front. This is a better list of how I assembled this watering can tag:
Die cut the chipboard covered in silver foil tape
Die cut one watering can from printed card stock for back of project
Dab on the paints to the watering can foil tape covered front and also added Perfect Pearls
Die cut the band in printed card stock and one layer of chipboard - adhered them together with glue
Die cut and assembled bow
Die cut "thankful" and put Wink of Stella on that.
Put "thankful" on die cut band piece using liquid glue
Cut off pumpkin button back and used green marker for leaf/stem part
Get out three foil leaves from "fill" bag
Used scissors and snipped off three crystal pieces for "water"
Put red sticky tape on back of spout and put the three crystal pieces on that
Covered the printed back watering can piece with liquid glue and put it on the watering can back
Using glue I put the word/band piece onto the watering can front
Used hot glue for the leaves and pumpkin
Put bow on front using glue dots
Added gold crystal to center of bow
Used small circle punch for can handle to tie on my twine to hang onto gift bag handle
Easy project to make and have a few more to put together but am sure each one will be different - once they are all done I will post a photo to show how they all turned out. I just made one to begin with because I was not sure if I would like how it would turn out since I do not have the products Ida uses for her patina on her watering cans. Here is another photo that shows the printed paid card stock on the back and how it covers everything up and gives it a more finished look:
Here is a photo of the crystal garland I picked up at Hobby Lobby and I bought the small one:
Cute idea of hers to use the crystals to mimic water - adds movement to the project:
Happy me their holiday items were on sale so I did not have to pay full price .... which left me with my 40% coupon from their weekly flyer..... last time I stopped at this Hobby Lobby the paper crafting aisle was bare of dies and such.... was not a happy crafter.... first they discontinue carrying their brand products - Paper Studios -- no dies or embossing folders -- and then I walk down a bare aisle with products gone, etc... Since I was there anyways for the crystals trim I again stopped at the paper crafting aisle and am HAPPY to say they sell Crafter's Companion dies now ..... I bought the Red Nose Reindeer die to add him to the craft room. They had other dies as well but only bought the reindeer but am happy the aisle was filled up again and that they are carrying this new brand to them. I am hoping that continues..... Always nice to have a store to shop that does not carrying the same old, same old that all other stores carry . . .
A BIG thank you to Ida for sharing her watering can idea on her video and all her how-to's. I am glad I will have something else to add to my Thanksgiving treat bags besides a scarecrow or just more pumpkins! Ida has great ideas and lots of videos to choose from depending on what you are making. Glad I stumbled across her Fall videos while looking for something else as I had never seen any of her work before. Am sure I will be watching more of her videos for future projects.
Here is another photo to show the watering can die by Sizzix for Tim Holtz:

Friday, September 28, 2018
Autumn Tissue Card
Loll Thompson shows the how to for the Embossed Tissue Technique card on YouTube and in the past I have made other cards using this technique. Here is a Christmas card I made following the how to's for this technique:
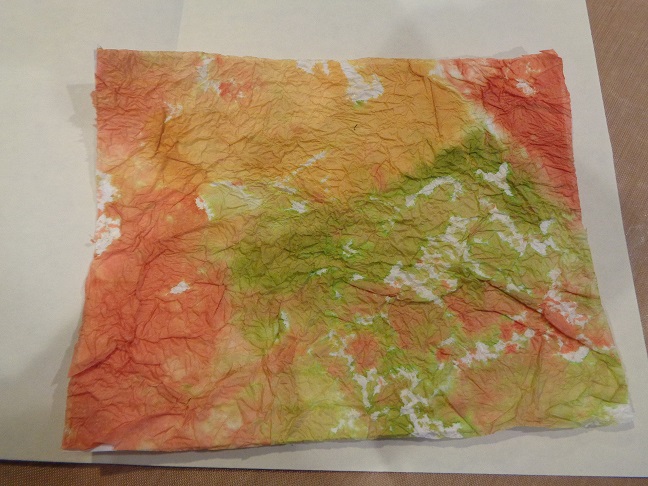
Wanted to make a fall card using this technique so I cut two pieces of white/GP card stock larger than what I needed. Set those aside. Cut two pieces of white tissue paper - from the dollar store - a bit larger than my two white pieces. Using three Stampin Up ink pads I put ink onto my craft mat next to each other. Used a fine mister and misted water onto the the inks. Using a palette knife I blended the water and inks together. With that done I laid my white tissue pieces into the inks with the shiny side of my tissue paper down onto the inks.
Carefully pulled this off the craft mat and put it on a cookie rack to dry. Wiped off the craft mat, reapplied my inks, misted them and laid my second tissue into the inks. Put this on the cookie rack to dry while I cleaned off the craft mat. The tissue is thin and does not take long to dry. Once my two pieces were dry I crumpled them up in my hands and this gives the tissue pieces dimension.
Used TomBow glue and covered one of the white/GP pieces with that. Carefully opened one tissue and laid it onto the white/GP piece. Gently pressed the flattened tissue onto the white piece but was careful to leave crinkles and wrinkles on the tissue. Did this with both white pieces and let these dry. Here is a photo of one of the tissue pieces glued to the white/GP piece and dry:
With these pieces being used for Autumn in the fall colours I wanted to use gold embossing powder on the tissue pieces. I used a Stamping Buddy all over the tissue piece and then rubbed the VersaMark ink pad over the crinkles on the tissue pieces with a light touch so that the VersaMark was not smeared all over the background of this piece. With that done I covered the tissue piece with gold embossing powder and heat set that --- but I thought the gold was too dark and made the piece look "flat" and not the look I wanted:
Off to Plan B -- for the second piece I did everything in the same order but for my embossing powder on this piece I used the Jeweled Gold embossing powder by Stampendous and here is a photo to show the sparkle and shine this embossing powder gave the tissue piece:
Here is the finished card:
IRL this embossing powder adds a lot to this fun technique. I used a stitched rectangle die to cut out a white frame for my tissue piece. Laid the frame over the tissue piece and used scissors to cut my tissue piece to size. Used red sticky tape to add the frame over the tissue piece. Cut a piece of white craft foam to put the framed piece on. The card stock base is green and scored at the top. Used white/GP for the stamped white card front. "autumn" is a stamp by Hero Arts.
For the two glittered leaves I used a leaf border punch from EK Success and punched out scrap glittered card stock. Used the ATG and put the stamped white piece onto the green card stock base. Used double sided tape and put the framed tissue piece on the stamped card front. Used glue dots to add my two glittered leaves to the lower left corner of the frame.
This is an easy technique and if you plan in advance one of your tissue pieces can give you two pieces for card fronts. The glittered gold embossing powder definitely makes the card front and brings out all the fall colours on the tissue. TFL
Sunday, September 16, 2018
Autumn Pumpkins Card
Fun Stampers Journey has a stamp and die bundle called Martha's Pumpkins and I ordered the set to make cards for Autumn. Here is a photo of the cling stamps:
Cute decorated pumpkins for Autumn, Halloween, etc.. I used the double pumpkins stamp and die for my card:
The card stock base is Stampin Up Pumpkin Pie cut and scored on the side. The dotted print is from Mikes, pumpkin print is from Hobby Lobby, and the white is GP. Cut the dotted print to the size I needed for the card front. Cut the white/GP to the size I wanted for the card front. Set these aside.
For the double pumpkins stamp I used a Stampin Up Pumpkin Pie marker for the pumpkins and also their Always Artichoke marker for the stems/leaves. Once I had the pumpkins coloured I used the 'huff method' and stamped my stamp onto scrap white/GP. Using the matching die I die cut out the pumpkins. I also cut out another pumpkins piece using that die and scrap white/GP to go under my stamped pumpkins piece. I put the two die cut pumpkin pieces together using Stick It sheet. Set them aside.
For the stamped white/GP piece I used a ruler to mark where I wanted the top of the angle pumpkin print to be and how narrow I wanted the bottom edge of that piece to be. Cut the pumpkin print to the size I wanted and put the pumpkin print on the left side of the white/GP card front piece using the ATG. With that in place I put this in the Stamparatus for stamping. The "Autumn Greetings" stamp is from the Sunny Studios stamp set "Autumn Greetings" and I used Stampin Up Pumpkin Pie ink for that.
With the greeting stamped I used the ATG and put this piece onto the dotted piece for the card front and then used the ATG and put them onto the card base. Used pop dots to put the die cut pumpkins piece on the lower front of the card. This photo shows how the pop dots raise up the pumpkins for dimension and it also shows the two layers of the die cut pieces:
Using Autumn coloured sequins I scattered those onto the card front using glue dots:
Easy card to put together and really like the pumpkins stamps/die set from Fun Stampers. Nice detail on their pumpkin stamps.
Spooksville Card
Have followed a demonstrator Deb Valder for sometime. I started following her when she was a demonstrator for Stampin Up and now she is a demonstrator for Fun Stampers Journey. This card is inspired by her video on YouTube:
/www.youtube.com/watch?v=nwlf3p_1e04
I own the Spooksville die set from Fun Stampers Journey so I took my inspiration from her card and used what I have on hand to make my card:
For my card I used black card stock from Paper Trey Ink cut and scored at the top. Orange card stock from the stash was used for the front. The card front piece is white/GP.
Cut the white/GP to the size I would need for the card front. Using an EK Success 2 1/2" circle punch I punched out a large Post It note. I put this circle onto the white/GP piece near the bottom like she has on her card. Using distress inks - Squeezed Lemonade all over the card front with Dried Marigold at the top of the card front and Carved Pumpkin at the top edge of the card front. Using black ink I sponged the edges of this piece. Set it aside to dry.
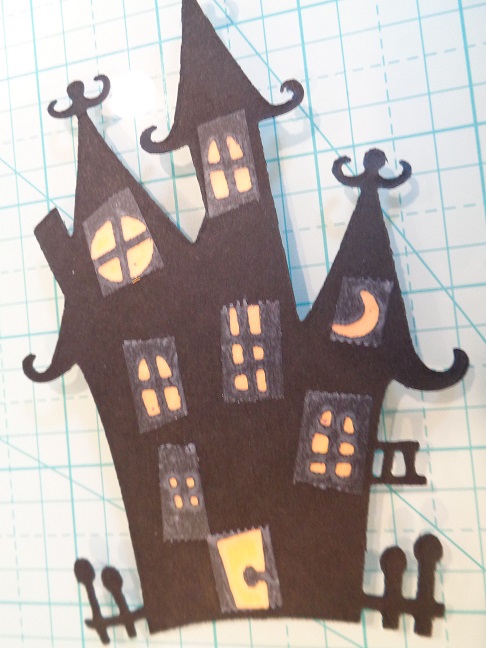
Using the Fun Stampers Journey die set Spooksville I die cut the black house from black #110 weight card stock from Mikes. Also die cut this out of orange card stock to give me the window pieces. Here is the back of the black die cut house piece showing the small pieces of transparent Scotch tape I cut and put behind the windows - then I put the small orange window pieces on the front of the card and the tape holds them in place:
and turned over to show the front of the house die cut piece:
For the tree die cut piece I wanted that to have a little dimension so I die cut the tree twice from the #110 weight black card stock from Mikes. Using Stick It tape I put the tree die cut pieces together. Using an Impression Obsession ghosts die set I cut out the ghosts using white glittered card stock. Used a small circle punch and scrap black card stock and punched out circles to put behind the ghost faces to show their eyes and mouth better. Some circles had to be trimmed since two of the ghosts are so small and I used liquid glue to put the black circles on the back of the die cut ghosts. For the bats I used a multi bat punch from EK Success and punched them out of black glittered card stock.
Used the ATG and put the distress ink card front onto the orange card front piece and then put these onto the black card stock base. Like Deb did on her video I put the house and tree pieces on the edges of the card front. Using scissors I trimmed off the pieces that hung off the sides of the card front. Using a stamp from the Stampin Up stamp set Spooky Fun I stamped the greeting onto scrap white card stock using black ColorBox ink. Die cut that greeting piece using the Stampin Up Bitty Banners die set. Sponged the edges of the greeting piece using black ink. Put double layers of glue dots behind this and put it on the top right corner of the card front.
For the ghosts I also used double layered glue dots to put them on the card front - the double layered glue dots raises the ghosts off the card front but they are not as high as a pop dot would be:
For the bats I pinched their wings upward and used liquid glue to put them on my card front:
Fun die set for Halloween. Thanks to Deb for sharing her card and ideas on her video. Easy card to assemble using die cuts.
Tomb It May Concern... Card
For this card I used Taylored Expressions stamps and a die set -- One stamp set is Tomb Sweet Tomb, die is Tombstone Trio, and their Bare Trees Background stamp was used:
Wanted to keep this card monochromatic so it is on a black card stock base from Paper Trey Ink, cut and scored at the top. Used gray card stock from Stampin Up for the die cut tombstones and the gray piece for the card front. The stamped card front is white/GP.
Using a large Post It note I punched out a 1 3/4" circle punch and put that sticky note onto the white/GP piece which was cut larger than what I needed for the card front. With the sticky note in place I used gray ink to sponge the clouds background onto the white piece. On the lower part of the white card front piece I lightly sponged gray ink over the white so it was not so stark. Once this piece was done I used the Stamparatus and stamped the trees background stamp onto the clouds white piece. ColorBox black ink was used for the trees background stamp.
With this piece sponged and stamped I trimmed it to the size I wanted for my card front. Sponged the edges of this piece using black ink. For the moon I peeled off the sticky note and used a yellow and an orange ink to add ink to that. Once finished I used the ATG and put the stamped card front piece onto the gray card stock piece and then put them onto the black card stock base. Here is a photo of the moon:
Using scrap gray card stock I die cut the tombstones - then used a marker and inked the stamps I wanted to use on the tombstones. With those stamped I used a fine gray marker to add lines to the tombstones so they do not look so plain. I also die cut another set of the tombstones from gray card stock to put behind the stamped ones I had first done. Using Stick It sheet I put the stamped tombstone on the plain tombstones. This second layer makes them more sturdy -- especially the one with the small cross at the top. Used gray ink and sponged the edges of the tombstones to give them an older look. Here is a photo to show the stamping and drawn lines on the tombstones:
For the two tombstones in the front I used pop dots to put them on the card for dimension. The middle tombstone was put onto the card using the ATG. Added black glittered bats to the card that I used an EK Success punch for. Put the bats on the card front using liquid glue. For the ghosts I used glue dots. Wanted to keep those flat on the card front so the tombstones with the pop dots look like they are in the foreground.
Fun stamps and die set from Taylored Expressions.... BOO to You!
Saturday, September 15, 2018
Sparkly Spider Web Card
Used the Spellbinders Spider Web Card Front die for this Halloween card:
Card stock base is black card stock from Paper Trey Ink. Cut and scored the card stock at the top. Set that aside. Cut a piece of water colour card stock from Strathmore at Mikes to the size I would need to fit behind the Spellbinders Spider Web card front die. Using various distress inks I put the ink onto the water colour card stock. When the inks were done I sponged the edges with black ink.
Die cut the web card front die from silver glittered card stock. Cut out a black web card front using black card stock from Mikes. Set these aside. Using Perfect Pearls Shimmer Mist I spritzed my distressed inks piece to add shimmer to that. Set that aside to dry.
For the black glittered spider - I used a spider punch from M Stewart and punched it out of black glittered card stock and also punched him out of silver glittered card stock. Using a tiny circle punch I punched out two green glittered circles for my spider eyes. Since the card stock for the spider is glittered I used a toothpick to add rubber cement to the eye circles to put them on the spider. I also used the rubber cement to put the black spider over the silver spider - off setting it a little. Set this aside to set:
Using Aleene's clear Tacky glue and a fine paint brush I put glue on the back of the black web piece. Put this over the silver web piece - again off setting it a bit. Again used the paint brush and added glue to the back of the silver web piece and put this onto the distressed inks card front piece.
Using an "EEK" die from the stash I cut that out of green glittered card stock - also cut it out of a piece of thin card board from a kleenex box to put behind the green "EEK" word. Used liquid glue to put the words together. The card board behind the word gives it shape and also raises it up on the card front for dimension. Used red sticky tape to put the "EEK" on the card front. Used glue dots to put the sequins (from the dollar store crafts aisle) on the card front:
For the spider -- I used pop dots to put him on the web but I did not want to see the white pop dots from the side of the card so I used a black Sharpie marker to colour the sides of the pop dot black. This way no white is visible under him. (Should probably just buy black pop dots.... haha)
Here is a photo to show the shimmer and shine on the card front that the Shimmer Mist added to the card:
Love this spider web die from Spellbinders because the web is not all even and 'tidy' like most spider web dies are. Fun card to put together -- especially since I was not sure how it would all turn out. TFL
Subscribe to:
Posts (Atom)