Saturday, December 30, 2023

Craft Room Clean Up

Yearly event..... so how to move things along so it is organized chaos?  Seems as I am crafting for Christmas I still have out supplies for BOO Day and Thanksgiving with no time to put things away before Christmas crafting begins.... or continues.... but long ago I figured out a system that works for me when things seem like everything in the craft room is on my work table or counters..... grrrrr

Used index cards from the Dollar Tree and a pack of their black binder clips. Cut the index cards in half and used Sharpie markers to write on the cards words that would help me sort through the mess faster so things could get back to their homes. Once that was done I used my laminating machine and laminated the cards and cut them out using my junk trimmer for plastic sheets and card board pieces. I punched a hole at the top of each card so I can keep these cards on a hook in my craft room. Here is a photo of the cards I had made long ago and use when cleaning/organizing:

The colours of Sharpies do not mean anything -- basically when I made the cards it was while I was organizing and whichever pen I pulled out I used on the cards. Only the holiday cards did I use colours for that holiday that would make sense to me. To start the sorting I grabbed some empty baskets on my shelf and I clipped on one of the cards on each basket and began sorting things I need to put away:

This photo is just a sample of a few of the baskets - these baskets I am using for die sorting on this day. The one on the left is "future projects" which are dies that I bought between Oct and Dec that I want to use soon. The middle basket "new products" are dies that I bought during the Black Friday sales and I plan to use them in future projects but many of them are for Christmas projects for next year. The "Christmas" basket has die sets I used this year - bow dies, box dies, etc.. The "future products" bin I will keep out on the worktable as I am starting my crafting for Valentine's Day and I will be using those products soon and this way I have my items together so I won't forget about something I wanted to make. 

When I do this sorting after the holiday season - Fall, BOO Day, Thanksgiving, and Christmas I sort each type of product - dies first, stamps, then inks, trims, etc..This way I have a basket with each type of product in it and it is easier to put things away -- IE  all inks are kept in one area, I store each holiday dies in that bin for that holiday, etc.. Once I get done sorting and putting things away I remove the binder clips and put the laminated tags away with the rest of them until my next clean up. Baskets are easily stored empty as they stack and go back on the shelf. Before I made my laminated tags each time I did the sorting I would have to stop and label my baskets as to what I was sorting.... this way I have a stack of the laminated labels ready to go each time. 

Christmas Card

Glenda Mollet on YouTube showed the assembly of a Christmas card she made this year with how to tips and tricks so I decided to made one:

She used regular white card stock and not card stock made for water colouring so I used the same. First I blended blue and green ink onto the white card stock. Then I used water and splattered that all over the card stock. I let this dry on it's own without using a heat tool. Once it was dried I splattered it with the Dr. Ph. Martin art ink. Again let it dry overnight. The card stock looked like this after the water and paint splatters were added:

With the card stock all wavy from all the water and inks added I die cut the trees out of this:

When I planned making these splatter sheets I decided to use 3 sheets of card stock for this technique -- from the three sheets I die cut 11 trees using the different tree dies. I knew that when I die cut the trees that the die cutting machine would flatten out the card stock while cutting out each tree die. I used liquid glue and put the three layer tree die pieces together. Added the silver garland to each tree using a die from the die set cut from silver mirrored card stock and used liquid glue to put these pieces on the trees. 

For the card base I used light blue card stock scored at the top and a snowy embossing folder from the stash for the white piece on the card front. I die cut a star for the tree top. Put the embossed white card front onto the card stock base using liquid glue. Put foam tape behind the tree for dimension. Decided I wanted a tree trunk so I cut a piece of scrap brown card stock 1x1 put that at the bottom of the tree using liquid glue. Easy card to assemble and each tree looks different with the water and paint splatters. Thanks to Glenda for sharing what she learned making her splatter sheets for her trees!

Wednesday, December 27, 2023

Mini Post It Note Holders

Had seen the video by Crafting with Paula on YouTube showing how she makes her mini Post It Note holders so I made some to put in my treat bags for Christmas:

No pattern or die needed and they went together quickly. All my mini Post It Note pads have the sticky tops and not on the sides -- Amazon sells both top and side sticky notes. I used double sided card stocks from my stash and I decorated the fronts using decorated corner punches for the front flaps as well as gems from the stash. I even made a couple of holders for the larger Post It Notes I had in my stash:


One score mark is used on these holders and you fold the card stock for the rest of the creases/folds so no odd measuring and scoring for these. They went together very quickly and fun to make. I did not want to make all Christmas holders so I decided to use prints and floral card stocks instead for these. Thanks to Paula for sharing her very easy to follow video and pattern for these cute holders!


PIC'S Gifts

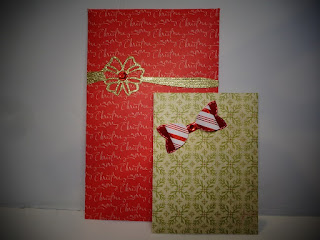
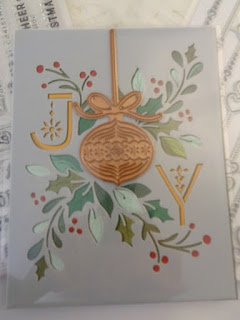
Gifts for my PIC (stamping Partner In Crime) for Christmas this year were various crafting items. I bought her a stencil, dies, stamps, etc. To wrap these items I decided this year I would make a policy envelopes using double sided cards stocks from my stash for each gift and I wanted to use all different bow dies from my stash to decorate the fronts of the policy envelopes. I used a small velcro dot to close each one:


One of the gifts I gave her was the Sunny Studio Sweet Treat Bag die set that makes at least three different bags in the one die set - here is a photo showing my die set and hers with the three bags I made for her as samples:

and inside these bags I gave her foiled holiday greetings I had foiled for her and I die cut a piece of 110# weight white card stock as well as a piece of craft foam for each sentiment for her to use on future projects:


I put the foiled sentiments in the three bags for her since she does not have a hot foiling system and she has so many craft supplies I was not sure what else to give her besides the dies and stencil I gifted her. We are also going to the stamp show in February in Columbia, SC so I gave her a little spending money for that trip or for any other craft supply she has been saving for. Plus all the chocolate treat holders in her treat bag:


Christmas Treat Bags

This year I decided to use the dark green paper gift bags at the Dollar Tree for my Christmas treat bags. I found an ornament printed card stock earlier this year at Hobby Lobby and I used that for my bag fronts:

When I first laid a sheet of the ornament printed card stock on the green bag I felt it was too dark so I went through my printed card stock stash and pulled out the black and white striped card stock and I put that under the ornament print to break up all the dark greens. For the "merry christmas" I used a die set from Waffleflower.com and I cut that out of silver glittered card stock. Since I had 6 treat bags to make I made a template for the "merry christmas". First I laid the die on white card stock and measured where I would want this to be on the bag front. Made a line with a ruler so the greeting would be straight and die cut the die out:

Now I had a template with the die cut out where I would want it on the bag front - from the sides and the bottom of the bag. I used liquid glue and put the ornament printed card stock onto the striped card stock and then used the ATG and put these onto the bag fronts. Set those aside and did all the die cutting for the greeting. Die cut the shadow piece out of vellum and put that behind the white template I made using washi tape. Used liquid glue to put the greeting words into the template onto the vellum for the bag front. Removed the template and my letters were glued onto the vellum. Now I put liquid glue behind the vellum and turned the template over and put the greeting words back into the template - turned this over and placed it onto the bag front and pressed the greeting words with vellum onto the bag fronts. This way the vellum and greeting were on each bag in the same place:

Added different gems from the stash to the bag fronts for some sparkle.  For the top of the bags I used the garland from the Dollar Tree to decorate the bag top. Their garland strand is very thin and sparse so I bought one, folded it in half, twisted it to stay that way and cut it to the size of each bag. Attached it to the bag tops using hot glue:

Inside the bags are candies and little treats. I used a pretzel bag from the candy aisle at the craft store for some treats:

I made Snuggets and other treat holders:

Made square pillow boxes from various card stocks and I used stencils to add colour or a pattern to each box. Used a crimper for a couple of the belly bands around the boxes and decorated the fronts of those. Also used the My-Creative-Time Treat Envelope die for these treat holders:

This is a 2 piece die set and I made all of mine using 6x6 card stock pads. Here is a photo of others I made:

These holders have two pieces - the holder piece and the small piece for the inside top flap:

All the printed card stocks I used for these holders were double sided and some of them I wanted a contrasting top flap liner so I cut those out of other prints. These holders easily can hold a gift card:

The holder on the left has a gift card inside and the holder on the right is holding a Fun Size Hershey chocolate candy bar. I made a holder for a gift to hold cash but altho I liked the candy cane print for the outside of my holder I did not like the back side:

The backside of this print is:

So to cover this up and line the holder with a coordinating print I took the holder die and cut out a printed card stock to be the liner:

Used liquid glue to add the dotted print to the inside of the holder. Once that was in place I folded the holder and used tear and tape to assemble that. Used a holiday sticker from Hobby Lobby from last year:

This is such an easy and quick treat holder/gift card holder/or cash holder to put together and a great use for the 6x6 card stocks. Fun to make all the treat holders for inside the bags to hold holiday chocolates. 


Black Friday Sales

 Here are some of the items I picked up at online Black Friday sales around Thanksgiving.  Many of the online stores did pre-Thanksgiving sales so basically it was a sale week for Thanksgiving:

The above items were from the MayMay sale she had shown on YouTube. I also shopped Sunny Studios:

Also shopped at The Greetery:

Their free gift with the order was a stencil with a matching die:

Divinity Designs had a good sale on their dies:

Their free gift was a die set I had already received from them from an earlier purchase:

Since I already had this set I gave it to my PIC (stamping Partner In Crime) and told her if she had it or did not want it she could pass it onto her mother who also is a stamper. Hands down the best sale for me was at Waffleflower.com:

Their order I saved 40% on:

The other great buy was from Scrapbook.com... They had a few free gifts a shopper could pick from for their order and for my order I picked the free alphabet die set:

I set craft dollars aside for the Black Friday sales each year so I was happy to have such finds.... but then Scrapdiva Designs had her December release on Dec 1st so I bought three die sets from her sale using a 10% off sale code:

Have lots of new items to add to the craft room to use alone or with other products I already own... Happy to find sales, with free items added, for crafting supplies since there are no local stores to shop at anymore and the stamp shows are now far and few between. 

Sunday, November 19, 2023

Turkey Day Bags

 For the front of my treat bags for Thanksgiving I used the new Turkey die from IO Stamps by Anna Wight. IO had a sale and I was happy to be able to pick up this die. Since he has a lot of pieces I assembled him using the assembly line method for all the turkeys. But after I did all the die cutting and sponging of the pieces I decided not to use the dark plaid card stock for the turkey tail and I instead used a glittered print card stock from my stash. This turkey die has a one piece tail unlike other dies that may have layers. When this die set cuts out the tail it is all one piece with stitched lines in two places on this tail:

Here is the assembly line of all the turkey pieces:

As I was sponging the pieces:

Here are a few photos of the bag fronts once they were completed:


The gold rick rack was die cut using a trim die at IO Stamps, again by Anna Wight, and I cut that out of gold poster board from the Dollar Tree. The pumpkins were die cut out of scraps using the Stitched Pumpkins die set from Lawn Fawn. The large tag shape the turkey is on is a die from a multi tags die set from Little B. Burlap flowers were on clearance at HobLob last year. "Let's Get Stuffed" is from a new stamp set at IO Stamps. Used a sign die set to cut that out so the turkey could be holding the sign. The "Give Thanks" is from a kit from Waffle Flower and I used scrap card stocks for that and put clear packing tape over the scrap card stock and then cut out the words - easy way to add shine to the letters. Inside the bags:


"Grateful" and "Thankful" words are from a Frantic Stamper die set and again used Dollar Tree foiled poster board for those. Twine is from the stash.


Hershey nugget candies wrapped with holiday printed card stock and I made the kraft card stock tray to put the nuggets on. Tie bags closed with twine and gold pumpkin is from HobLob from last year. 


Gable box is a die from Fun Stampers Journey. Made the rosettes using printed card stock and hand cute the gold sparkle tulle for the front of the rosette. Here is my circle pattern I lay on top of stacked tulle and cut it out with scissors:


A closer photo of a rosette with two layers of the sparkle tulle:


Used a crate die from Concord & 9th and the Sunflower bag topper from Scrapdiva Design for this treat holder:


Bought one Heath bar and made my own pattern so I could include a Heath bar for everyone's treat bag:


Recent trip to Dollar Tree I picked up the heavy duty adhesive foam mounting tape that is sold in the tools section of the store. I had bought the ones available on the craft aisle but these are supposed to work better so I was happy to find them:


Also I picked up three gold foil poster board sheets and brought them home and cut them apart so I will have this poster board foil sheets for future projects. They used to see foil poster board sheets cut smaller in a variety pack but I have not seen those in a few years. Was happy to find the foiled poster board as well as the other foam mounting tape. Now onto Christmas.......