Sunday, June 27, 2021

Patriotic Ghirardellii Holders and next project - -

Used the Little Treat Holder die set I had bought recently at a used stamper's sale for this Ghirardelli treat holder for the 4th of July:

This holder holds two of the Ghirardelli candy bars. I used various card stocks for the holders and this die set cuts out two holders from one sheet of 8 1/2 x 11 card stock. I used the Sizzix Rosette die set to cut out the rosettes from various patriotic prints I had in the stash. For the scalloped pieces behind the rosettes I used a punch to cut those out. For the flag button on the front of the rosette I had to cut off the pin backing on the button - here is a photo to show the flag button, then with the pin attachment on the button, and then a piece I had used wire cutters on to remove the pin part:

To put the flag button in the center of the rosette I used a small amount of E6000 and hot glue to put a piece of foam tape on the back of the button. Then I did the combination of those two adhesives to put this button in the center of the rosette:

Once the candies were in the holder I used red and white twine to close it. Added clear crystal bling to each corner on the front to add a little sparkle. Easy holders to put together as when the die cuts the shape it also has all the score lines so it is easy to assemble. Here is a photo of the next project:


Sunday, June 20, 2021

More July 4th Treat Holders

 Forgot to post the group photo of the Uncle Sam Treat Boxes I had posted the other day so here that is:


For this next post of treat holders I used the Candy Bar Slider die set from Jaded Blossoms:

This holder holds a regular size Hershey Chocolate Candy Bar and here is a photo of the first two holders I made:

and the other two holders:


Used patriotic card stock from HobLob as well as from the Pebbles American 6x6 paper pad I have in my stash. First I die cut the boxes from red card stock and then white card stock.  Cut out the printed card stocks and put those onto the box fronts using the ATG. With all the fronts on I used a small slit punch for the ribbon on the box front and back pieces:

With the slits punched I used tear and tape and put the boxes together. I wanted to die cut "Happy 4th" from glittered card stocks for the box fronts. Went thru the die stash and found a "happy" in script and a number 4 but do not have an alpha set in script for the "t h" after the 4 .... what to do???  Went back to the die set that the "happy" is from and found "thankful" so I die cut out the "happy", "thankful", and 4 out of glittered red card stock. Once they were all die cut I used scissors and cut apart "thankful" to give me the "th" I needed:

With that done I cut it out of white and silver glittered card stocks so I would have all the colours I wanted to use on the box fronts. Used red and white gingham ribbon from HobLob for the slider to hold the candy bars. Once that was done I used a small star punch and punched out two stars for each box front.  I used liquid glue to put the words and number on the box fronts and glue dots to put the stars on the box fronts:

The candy bar slider die set is very easy to use and saves time from having to measure your candy bar and then having to cut the card stock and score and everything else.This box could easily hold a gift card with the candy bar as well as it is a roomy size box for the candy bar.  Jaded Blossom also sells a smaller candy bar slider die set for the Fun Size Hershey chocolate bars. These went together quickly and they make a sturdy box which will protect the candy bar from breakage. 


Saturday, June 19, 2021

Uncle Sam Treat Box

 Had seen this video on YouTube showing her Uncle Sam Treat Box:

https://www.youtube.com/watch?v=loyGYfgRQks&t=777s

Thanks to StampingwithAmore (Angie) for sharing her idea and pattern. I changed up a few things to be able to use what I have on hand and here is my version of her Uncle Same Treat Box for a treat holder for July 4th:


To begin with I used new card stock I had just gotten on Amazon -- it is #100 weight smooth white card stock and it is a great weight for card bases as well as for boxes:


For my box first I trimmed the white card stock to the 8x8 size needed for the box. Scored this following her score lines at:3 and 5 turning it once and scoring it at 2 and 6.  Following her sample on her video I used the bone folder to crease all the scored lines and trimmed where needed to form the box. She used liquid glue for her box and I always use tear and tape for my boxes so that is what I used. Once the tear and tape was on the box flaps I left the box flat and I put the face on, the striped hat on, and placed the eyes, nose, and mustache pieces on the box front. With the box front/face done I peeled off the strips on the tear and tape and assembled the box.  Here are the dies and punches I used for my Uncle Sam box:

Face (blush) 2 3/4 circle die (one piece)
Eyes (black)  1/4 circle punch (two pieces)
Nose (blush) 1/2 circle punch
Mustache (white) 1 1/2 circle punch (one piece cut in half)

I die cut the blush face circle and used the ATG to put that on the box front. I had a little of the circle at the top of the box piece so I used scissors to trim that even with the box front top. For the striped piece I used card stock from HobLob and cut that 1 1/3 x 4. Cut a thin strip of solid blue card stock and ran that along the bottom edge using thin tear and tape. Used the ATG and put this striped piece at the top of the box front over the face piece.  Using the 1/4 circle punch I punched out two black circles for the eyes and I used glue dots to put the eyes on the face. 

Using blush ink I used a dauber for his cheeks. Punched out the white circle for his mustache and cut that in half and put that on the face using glue dots. Used the 1/2 circle punch and punched out a blush piece for the nose and sponged the edges of that using blush ink. Put that over the mustache. For the handles I wanted to use the blue card stock I had on hand so I used two circle dies from the same die set and used washi tape to keep those together. I cut out four blue circles for the handles - I glued two of the handle pieces together to make the handles more sturdy. Using a pencil I marked the center of these circle handles and put tear and tape pieces at the bottom of the circles to be attached to the inside of the box. The pencil line will be even with the box top edge so the handles will be even on the front and back pieces. Here is a photo of the dies and handle pieces before I put them in the box:


Peeled off the tape strips and put the handles onto the completed box - here is a photo to show these handles in the box:


Using various dies and punches I put together the layered stars piece. Added a clear crystal to the center of that to add sparkle to that piece. I had used this circle handle idea on another treat box I had made for Christmas and these handles are very sturdy. This is an easy treat holder to put together for July 4th and the 8x8 box makes a good size box. Thanks to StampingwithAmore for sharing her idea for this cute holder! 


Thursday, June 17, 2021

Patriotic Nuggets

Made some wrapped Hershey Nuggets for July 4th using all items from the stash. For the printed card stocks I wrapped the candies in I used this paper pad from Pebbles that I picked up long ago from AC Moore:

Here is a photo of some of the nugget treat holders I made:

I pulled out a pattern I had used for BOO Day nuggets. This pattern is for the "tray" in the treat bag that the nuggets sit on:


For my nugget holder for a July 4th treat holder I bought a bag of the Hershey Milk Chocolate candies and this bag holds approx 28 wrapped candies:


I wanted my treat holder to hold 5 candies rather than the 4 my BOO Day holder held so I added one inch to the length of the tray pattern piece and cut my white #110 card stock at: 5" x 2 3/8". With the short side at the top of the scoreboard I scored the long side at 1/2".  Turned this piece and scored the other long side also at 1/2". This tray piece keeps the nuggets neat in the plastic treat bag and it keeps the candies stacked so they will not fall all over on the inside of the bag. Here is a photo of one of these treat holders showing the side of the tray piece inside the bag:


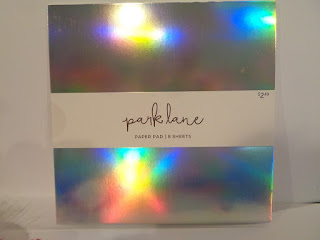
To start I cut and scored the white tray for the nuggets. Using various card stocks from the patriotic paper pad I cut wrappers for the nugget candies 1" x 3 1/8". I used glue dots wrap the card stock strips on the nugget candies. Using a small star punch from my stash I punched out silver glittered card stock and red glittered card stock stars. I also used this 6x6 holographic card stock from ParkLane from Joann's for my center nugget piece:


Hard to photograph since it is so reflective. For each nugget tray I put a white star wrapped nugget, then a red striped wrapped nugget, then a printed blue wrapped nugget, then the star and the striped pieces again. To put the little stars on the candies I used mini glue dots. 

For the clear bags for the treat holders I used these bags from ClearBags.com:


These bags have an adhesive strip at the top of the bag to close them but I wanted to use twine to tie my bags closed so I used scissors and cut the adhesive strip off:


For the "Happy 4th" heart stamp I used an old wood mounted stamp from Darcie and stamped it onto scrap white card stock using dark blue ink. Punched that out using a circle punch. Used scrap red card stock and punched out a scalloped circle and put the stamped circle on that using TomBow glue. Used a small hole punch and punched a hole at the top of the circle for the twine and tied this onto the treat bag when I tied the twine on it to close it. Easy treat holder to put together and tray piece keeps this holder neat and tidy inside. TFL


July 4th and a sale - -

 Couple of weeks ago my PIC (stamping Partner In Crime) rode together to a stamper's used stamping sale. This is the first time in over a year that we have been able to do anything together so it was a fun afternoon. Here are the items I picked up at this sale:


The Snowglobe Scene die from Elizabeth Craft which will get some use for holiday cards - I think I paid $6 for that die set and this die set was $3 --

No packaging with this die set as it is a combination of two die sets she sold together. The distressing and cutting tools set by SU was $2.00:

Usually at a stamp sale I take a piece of scrap card stock with me for any punches I find but for this sale I had forgotten my scrap piece. This way I can try out the punch at the sale before I buy it to be sure it works and cuts well.... But I wanted this EK Success Tulip Border punch so I picked it up anyways and brought it home -- very happy to say it cuts beautifully:

That was $6 or $8 and happy to have it. My last big purchase of 25 cents was an orange marker:


Usually at these sales I do not buy markers or opened stamp ink pads as you never know if they are all dried out or anything but this marker has lots of colour to it and it will come in handy for my holiday Snuggets, BOO Day projects, as well as Easter....

The sale before this one was at Daphne's store in Matthews and had picked up a Walmart bag full of unused SU wood blocks for stamps. The seller said she did not use the wood blocks and she just saved them and put them in a bag thinking she would eventually use them for something crafty but she never did - so happy me I picked up these unused blocks for $1 for the bag. I knew I would use them for decorating for July 4th:


and


I used craft acrylic paint from HobLob to paint the blocks red, white, and blue. Once dried I added scraps of printed card stocks to the fronts of the blocks using ModPodge. Added glittered stars I punched out and I used Beacon 3 in 1 glue to put those on the fronts of the blocks. For the "USA" I used large letter dies and cut them out of red glittered card stock. This is the second time I used these blocks to decorate with - the first set is from BOO Day:


I also wanted to make a holiday wreath so this year I made a Deco Mesh Yardstick Wreath for the door:


I painted one side of the yardstick that was the front and I added the pipe cleaners to put the mesh on the yardstick. Lots of videos on YouTube for this yardstick wreath and it is very easy to put together. Once the mesh was attached I put a dab of hot glue on the back of it to keep the pipe cleaners in place. To fill the front of this I used red, white, and blue stars from HobLob that I hot glued onto the mesh. Also cut apart red, white, and blue flowers from the Dollar Tree to fill in the front:


Also at the top are two star sprays also from HobLob:


Also made a flag block using the SU wooden blocks:


Easy stripes to make using washi tape for my rows. Added one star to the flag and I may distress the edges of it now that it is dried.  Lots of July 4th projects in the works in the craft room -- now finishing up the rest of the treat holders I am making and will post those once they are complete. TFL  ** Here is a new photo of the flag block once I sanded the edges and sponged a light brown ink to the edges to give it more of a distressed look:


It now has a softer look and not so many straight lines and edges. It looks good with the other blocks I had decorated as well. 


Saturday, June 5, 2021

Sympathy Card

 Was able to pick up the Sizzix/Tim Holtz 3-D Impresslits floral frame embossing/die on sale at Hobby Lobby. I had seen a video using this frame by Vicki Papaioannou on YouTube for embossing using waxes. I had never used waxes before so I thought I would try this out - I ordered some waxes from SImonSays and some other colours from Amazon for my card.

Used #110 weight card stock from Mikes and cut out some frames:


The darker your card stock is the better the waxes will look - plus you do not need any expensive tools to apply the wax as your finger tip with do if you do not want to use a small paint brush. First I applied purple wax to the frame:


Since this is a light application it does not take long to dry. Once it dried I used a silver wax over that leaving some spots that would show the purple wax:


With the frame finished I die cut the flowers using textured card stock. The floral die set has colours on the back of all the die pieces so as you are cutting the layered pieces you know which pieces will go together. 


Used the #110 weight black card stock for the card base. The two prints for this card are from the stash. Stamped the greeting on white card stock scraps and die cut that piece out. Put foam tape behind the greeting and the frame piece. 

Here is a photo to show other frames I did in different colour waxes:


The frame embossing/die has so much detail that the wax works well on it. Thanks to Vicki P. for sharing her ideas and tips and tricks for using the Prima wax on a pretty project. Hoping Sizzix/TH will come out with more of the 3D Impresslits as well. But for now lots of projects ahead using the new embossing/die frame as well as working with Prima waxes.