Thursday, March 24, 2022

Bunny Bow Embellishments

 Had seen these embellishments on a few YouTube videos so I went to Etsy.com and was able to find this die set there. Happy me it took about 2 weeks to get this die set into the craft room. Here is a photo of the die set:

This die set has three different bunny ear dies as well as the die set for the bow so it is economical as far as having options to use it. Here is one of the embellishments I made:

For all the embellishments I used the #110 weight white card stock from Mikes so that they are sturdy and the dies cut the card stock nicely on one pass through the die cutting machine.  For the pinks for the ears and feet, as well as the prints for the bows, I used scrap card stocks. Here is a photo of more of the Bunny Bow Embellishments:

To show how to assemble these embellishments I die cut the bunny head/ears piece from purple card stock and the feet are the Mikes white card stock and pink scraps:

The curve on the feet piece fits over the curve on the bunny head/ears piece and lines up for placement:

Once these are adhered together you place your bow over the white part above the feet and you have your completed embellishment:

Very easy embellishment to put together and another good use of scraps.... This die is available in both small and large and I bought the large set and from the bottom of the bunny toes to the top of the ears it measures 3 1/2" high by 2 3/4" wide approx.  Another cute bunny project for upcoming Easter treat holders and projects.

Sunday, March 20, 2022

ScrapDiva Dies

 Erica, at Scrapdivadesigns.com has a channel on YouTube - Scrapdiva29. I have seen some of her videos here and there and she now has an online store for dies. Her recent Easter release was too cute not to shop.... so I bought her Easter Bunny Bag Topper die set:

This die set has a larger bag topper die set and a smaller bag topper die set:

Very economical for a shopper to have both the larger and smaller die set in the same set and not having to buy two die sets for the different sizes. Here are the Bunny Bag Toppers I made for this Easter:


And:

I used the smaller die set and die cut the topper piece out of solid white card stock and then die cut out the printed card stocks. I also used an eyelet doily die set from my stash and die cut a doily and cut that in half for my bag topper. Used hot glue for the pom pom tail and the feet were assembled and attached using liquid glue. Easy project to put together and too cute not to make for Easter. For my solid base I cut a piece of solid card stock larger than the bunny die piece and then used a scalloped edge die for the bottom edges on the solid piece and put the bunny bag topper pieces onto that. 

Erica has lots of really cute dies in her store and they are affordable dies and they die cut well - my bunny bag toppers are all cut out of #110 weight white card stocks and the dies cut beautifully the first pass through the die cutting machine. Also easy to assemble this set as well.  Fun holiday bag topper for Easter treats!

What is inside PIC's bag?

 Made an Easter gift bag for my PIC (Stamping Partner In Crime) - here is a photo of the bag:

Which I gave to her early as she will see everything on my blog anyways . . .  So what is inside this Easter treat bag? I always make treat holders for chocolates... but after they are gone you have now empty treat holders..... last year I made my PIC a decorated pokey tool:

Her craft room is decorated with her favorite colour purple so the purple pokey tool in the photo was for her. This year I wanted to give her a few things for her craft room but also for the holiday... but how to package them??? Decided to try making a Pocket Flip Book for her and here is that:

The Pocket Flip Book is mainly three envelopes I made using the envelope punch board and I also added two flat pockets inside for extra goodies for her. The attached photos are things I gave her in her flip book but I took photos of mine that are already out of the packaging for the most part. 

In the first envelope of the flip book is a set of the sticker gems from the Dollar Tree I picked up for both her and myself:

In one of the flat pockets is a new release die from IOStamps (Impression Obsession) and it is a sewing machine die. (I do not have a photo of that as I only bought the one for her). In the center envelope I have this bunny die set from AliExpress:


Due to the smaller dies in this set I did not cut apart the die pieces so I would not lose any of them. Since the dies from AliExpress do not have photo packaging I die cut the die when I get it from scrap card stocks and put a put-together die piece in with the die set so at a glance I will know what this die set makes. Here is a finished product using this die set on one of the Easter treat holders I made her:

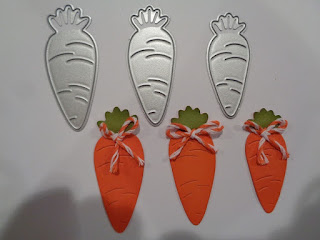
In the other flat pocket I die cut the bunny again so she could keep a sample with her die set if she wants when she stores her die set. The last pocket has a set of three chunky carrot dies and that is from Oriental Trading:


Their packaging also does not have a photo so I die cut her the three carrots using my die set and put it with hers so she would have the die cuts to store with the die set. Besides the pocket book I gave her twine from Hobby Lobby and also a mini scraper I had picked up for us at the Dollar Tree:


And lastly --- I had seen the video on glues by "Scrapbooking with ME Crafts" on Youtube. She talks about all the different glues available, what they work well on, how they work, etc.. She talked about the thicker glues -- Fabric-Tac, Fabric Fix, and other Beacon glues. I like the 3 in 1 glue by Beacon and I buy mine at Hobby Lobby but with it being a thicker glue the cap the bottle has is a bigger tip. When you use this glue in their bottle it can "glerk" out and I find I have to use a toothpick to get the finer line of glue I want to use on a project.  She spoke about using icing bottles to use with these thicker glues and so I bought a set of them with the silicone caps for my PIC and myself:

These plastic bottles are easier to squeeze than the Beacon bottles and the tips are fine so you get a smaller line of glue using them - I bought our sets off Amazon and here is part of the packaging:

The bottles with tips and the silicone caps are by Sugarbelle and the silicone caps fit easily over the silver tips for an air tight seal so your glue will not dry out. Happy to have seen her video on all the glues with all the tips and products she shared for them. Hoping my PIC is able to use some of the non chocolate Easter treats in her bag long after Easter is over. . .

Thank You Card

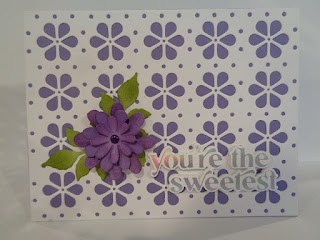
 Made a thank you card for my PIC - Stamping Partner In Crime - for all the items she gifted me for my birthday - will post those photos later. I used the Eyelet cover die from Pink & Main and then used the Glimmer Hot Foil machine for the greeting on the front which is from PinkFresh:

Card stock base is purple cut and scored at the top. Then used a lighter purple card stock for the card front. Die cut the Eyelet cover plate from white card stock. Used liquid glue to put that on the lighter purple card front. Set that aside. Using a flower die set from Elizabeth Craft I used scrap card stocks and cut out the flowers and the leaf pieces. Sponged the edges of all of those with matching inks and put the flowers together using a purple brad. 

Used the ATG and put the card front pieces onto the card stock base. Using glue dots and liquid glue I put the flowers and leaves onto the card front. Using holographic silver foil from Spellbinders I hot foiled the greeting "you're the sweetest" onto white Hammermill card stock. Using the matching die I cut out the greeting with the Big Shot. Also die cut this greeting out of regular white craft foam. Used liquid glue I put the foiled greeting onto the white die cut greeting piece. The craft foam gives the greeting dimension on the card front.  Once that was done I used liquid glue to put the greeting on the card front. The holographic foil does not show well in the photo but it is very shiny IRL. The eyelet card front die cuts the card stock easily and it is a pretty design for a card front. 

Easter Treat Holders

 This post shows some of the treat holders I am making for Easter -- first is the MamaElephant Favor Bag die with a bunny on the front:

Used different solid card stocks for the bag pieces and then used my 6x6 card stock pads for the prints behind the bunnies. Used a grass die from the stash for the strip of grass the bunny sits on. Here is a photo of one of the finished treat bags:

For the gingham print on the front of this treat bag I die cut the rectangle die out on a diagonal. I used a carrot die from Impression Obsession (IOStamps) from scrap card stocks. The bunny die comes with the flower and leaf die pieces and I cut those all out of scrap card stocks. Inside the treat bag is a clear bag with a few chocolate treats inside. The green and white twine is from the Dollar Tree. The gold bulldog clip is from my stash. Bunny is die cut out of #110 weight white card stock and I sponged gray ink on the edges of that. (Bunny die is AliExpress).

Easter Gift Bag


Working on the gift bags for Easter and here are photos of that progress. I started with a white gift bag from Hobby Lobby and using the Basket Weave stencil and a snow stencil from MFTStamps I stenciled a light pink ink onto the bag fronts:

I slipped a piece of cardboard into the bag and then stenciled the bag front using light pink ink. When I use stencils I keep my ink pad on a piece of foam drawer liner so the ink pad will not be moving all over the table. First I stenciled part of the Basket Weave on the bag front and then I stenciled the snowflake design to fill in on the bag front:

I used a large caps alphabet die set from the stash and using #110 weight white card stock I die cut the word "Easter". Then I die cut it out of different glittered card stocks from the stash. I used a lower case alphabet die set from the stash and die cut the word "wishes" using the #100 weight white card stock. Then also die cut this out of the different glittered card stock. Using liquid glue I put the glittered letters onto the white card stock letters to make the letters more sturdy. 

Drew out the bunny ear pieces onto scraps and then traced these onto the the #110 weight white card stock and cut them out using scissors.  Made a smaller ear pattern for the pink part of the ears and I cut out those pieces using light pink glittered card stock. Used liquid glue to put the ear pieces together. Here is the front of the gift bag I made for my PIC (stamping Partner In Crime):

For the pink tulle at the top of the bag I used tulle from the Dollar Tree as well as gem strips also from the Dollar Tree. Used a small bow die from Fun Stampers Journey for the small pink bow in the center of the tulle trim piece. I put the letters on the bag front using tear and tape. The photo does not really capture the stenciled background on the bag front but IRL you can easily see it. Used pink tissue from the Dollar Tree for the inside of the bag and in there are some of the treat holders I made for Easter. Since I put bunny ears on the front of the bag on the back I hot glued a big white pom pom for the bunny tail. Fun bag to put together..... 

Trip to Ikea

 The nearest IKEA to me is a three hour trip to Charlotte and I usually make that trip a few times a year. The last time I was there was late last summer when I shopped a closing sale of a favorite paper crafting store. With that store now closed the only reason to make the trip would be Ikea so I made a list of the items and item numbers I was looking for so I would be sure to remember everything I wanted to look at or buy...

Mikes has a craft cart they sell and their cart has a wooden piece that you can set on top of the cart. When that first came out I had already bought a few of the Raskog carts for my craft room so I checked the Ikea website to see if they also offered a wooden piece for their carts. I saw they have a cutting board that would fit the Raskog carts but this cutting board was not available in the US stores... until.... with me making my list for this trip I also looked on their website for this "Hogsma" cutting board for the Raskog carts. Happy me that I saw that the Charlotte store now carries this cutting board so that item moved to the top of the shopping list.... 

First stop at Ikea was the kitchen section where they have all their cutting boards -- NO Hogsma cutting boards to be found -- grrrrr... the website had said they had 128 of them in stock but none to be found... so my DSD was shopping with me and she asked an associate she saw and they told her those cutting boards were upstairs in the kitchen accessory department. She went upstairs and found them for me -- here is a photo of the packaging:


And the numbers on the back of it:


Here is a photo of the the cutting board on my Raskog cart in the craft room:


This fits the cart nicely and it is a good weight so not flimsy. The Raskog carts are also well made and they hold a lot of items in my craft room. The board can easily be lifted off so get to the things I store on the top of the cart. I am happy Ikea now sells these cutting boards that fit the carts -- but it would make sense if they sold these cutting boards with all the other types of cutting boards they offer in the same department - some of them with the cutting boards and maybe some with the kitchen accessory department....

Also bought some more of their storage bins that I store my metal dies in so this was a good trip to Ikea.... In the plaza next to Ikea is a Hobby Lobby and we shopped there as well and then had a late lunch and headed home... Another fun day trip with a great find for the craft room!

Sunday, March 13, 2022

5 Pocket Flip Book

 Had seen the video for Pocket Flip Books by Lyric Lover Crafts (Amber) on YouTube for her Pocket Flip Books she makes using an envelope punch board and three envelopes she made. Her video is very easy to follow and here is a photo of the 5 pocket flip book I made:


Following her instructions I used the envelope punch board and made three envelopes. I followed her assembly directions and my flip book came together quickly and easily. Once I had my flip book put together I used a light gray ink and sponged the edges of the front and back to give it a shabby look. For my flip book I added two more pockets inside my flip book for extra items - here are photos showing the pockets in my flip book - I used scrap yellow card stock to put in the pockets to show my pockets:


As she does in her video I reused the envelope flaps I cut off some of my envelopes on the front of the flip book to decorate it. For the circle in the center I used a circle die from the stash and cut out the floral piece from the card stock I used for my flip book from Authentique. (I used this double sided card stock because it has a good weight to it and I did not want the flip book to be flimsy). I used a doily die from my stash for the cream doily behind the floral circle. To add sparkle to the flowers in the circle I used a clear Wink of Stella pen. I put the circle on the front of the flip book using foam tape. Tied my book closed using crinkled seam binding tied in a bow. 

The solid pocket in the center of my book is a piece of card stock from my stash that matched the colours on the Authentique floral card stock. I used a tab punch to add a tab to that pocket. This was a simple project and thanks to Amber for sharing her project and for her instructional video! This is a good project to use for a swap or for little things you are collecting or saving. Nice and flat project that can be mailed also.