Sunday, February 26, 2023

Dollar Tree Bunnies

Recently shopped a Dollar Tree store I never shopped at before and they had these wooden bunny deco pieces in their Easter section. There were two of these but one was missing a large piece of wood on the side of it so I picked up just one of these wooden pieces. Brought it home and decorated it:

I left the wooden bunny as it was and just decorated the ears and added a bow and a face and heart nose to the bunny face. I wanted to find more of these bunnies but I checked the two Dollar Tree stores I usually shop at and they did not have any of these bunnies in stock.. My DSD sent me a text the other day saying she was stopping at her Dollar Tree and was there anything I was looking for? I told her about this bunny and sent her a photo of the back of the bunny with the stock number on it:


Happy me that she called and she was able to pick up more of these bunnies for me. Here is what they look like when you buy them:


For this new batch of bunnies I used acrylic paints I had in my stash - white and a gray. I added water to the paint and mixed that in and then painted the wooden bunnies. The gray was much darker than I wanted so for the two gray bunnies after the gray paint dried I went over it with the foam brush I had used for the white bunnies just to add a little white to the gray. Here is a photo of all the bunnies that are painted, decorated, and finished:

For all bunnies I used an oval punch for the ear pieces -- that oval is 1 3/4 x 7/8. I used printed card stocks from the stash for the ears. Since the printed card stocks are thinner paper I punched out the printed ear pieces and punched out scrap white card stock pieces and glued them together to make the ear pieces more sturdy. Once those were dry I put them on the painted bunnies using liquid glue. For the bows I used my Easter 6x6 paper pads and the medium bow die set from Pink & Main for the bows. All the flowers are from the stash. With all the bows die cut I formed the bows and I used hot glue to put the bow at the base of the left ear. I added the flowers to the center of the bows using the hot glue as well. 

For the black eyes I used black crystals from the stash and put those on the face using liquid glue. The heart nose was punched out using a multi heart punch from EK Success from light pink glittered card stock and used glue to put that on the bunny face. I used a small dauber for the inked circle cheeks on the face using pink inks. East project to put together. These little bunnies would look good on a rag Easter wreath or a table decoration, etc.. Happy DSD was able to find more of these bunnies for me and am sure I will be able to use these for decorating for Easter!

Sunday, February 19, 2023

Another project finished - - -

 Decided to keep all my holiday dies separate from my other dies. I have a set of baskets for my Christmas dies and also the BOO Day (Halloween) dies and so I decided to sort out the Easter dies since I am now working on Easter projects. I am using a white basket I had bought at HobbyLobby before and I emptied that out and now am using it to hold the Easter dies I have. 

Gathered up all the Easter dies and sorted them into groups. Using #110 weight coloured cardstocks from Mikes I used the We R Memory Keepers Tab Punch Board and I made tab dividers. I used my label maker to label all the tabs and I put everything together in the basket:

I had already sorted and made dividers for the Christmas and BOO Day dies so happy the Easter dies are also sorted and labeled. It is so easy to just take the one basket to the worktable for die cutting than to have to go through all the other dies looking for Easter dies to use. I keep the dies on magnet sheets and those are in a clear job ticket pockets from C-Line. Glad to have this finished so now I can get back to crafting again! 

Built to specs . . .

When does it stop??? Seems like organizing, sorting, moving items around in craft room never ends.... I decided I wanted to centralize many of the stamping tools I use all the time so I decided what I wanted and how I wanted it to work so took my plan and went out to the garage to ask DH to build this for me...

I moved my lower drawer Alex unit next to my work table and I wanted to keep my trimmer and other stamping items on top of that so I would need a shelf unit built - but I wanted it to also have a shelf. Here is a photo of the new shelf DH built for my craft room:

I will be on vacation the last week of March so my plan is to paint this white to match the Alex unit it is on top of. I put everything on it that I wanted it for and it is all loaded up and ready for future projects:

On the top is my Genesis Trimmer which was a gift years ago. Then the shelf has my two MISTIs and my scoreboards - I have two Martha Stewart scoreboards because I used to take Stampin Up stamp classes but no one offers those anymore. When I took classes I had a bag packed with all my most used supplies in it for classes so I could just grab the bag and head to classes.. but once the classes stopped I unpacked the bag and no longer needed that packed up for anything. 

On the bottom are two trimmers - the black one I use for clear packaging, card board, and anything else I would not want to use the Genesis for. I also have a the small Ranger trimmer as well as my old Carl paper trimmer. Under the black trimmer is my WeRMemory Keepers glass mat. 

Happy to have all these items next to me on top of the Alex unit. I reorganized the drawers in the Alex unit to hold my most needed items for my projects:

Between Christmas and Valentine's Day I used lots of tear and tape and glues so happy I have been able to replenish those for Easter projects ahead. The second drawer has pop dots and the sheets they are kept on. I keep the sheets and use scissors to cut apart the smaller pieces for projects I need a small pop dot piece for:

I also put all my Velcro strips and dots in a clear box with lid to keep those together:

Happy to get this area organized and in place for future projects. It will certainly be helpful to have so many of the most used items right next to me and off the top of the work table when I am crafting. Thanks to DH for making my shelf for me and happy it turned out better than I thought it would!!


Bunnies Up Buttercup~

This post has a couple of Bunny die sets I recently bought. First one I picked up from FranticStamper.com:

The die set is by Marianne Designs and I think he is so cute. I die cut him out:

Cute but think I can do better so I added pink ear pieces, eyes, and a pink heart for the nose:

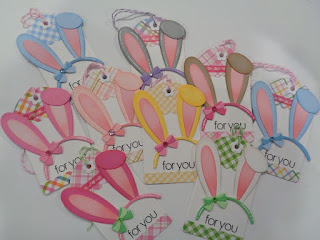
Easy bunny to put together and am sure this die set will get lots of use for the upcoming holiday..... Then WaffleFlower.com put out their February release and I placed an order the day they made this release.... Online there were lots of projects featuring their new release products. I had seen the Bunny Tags made by Angelica C. on her blog:  myloveforpaper.com and they were so cute. She had used the tag die set from SunnyStudios and happy me that I also owned that so I made up tags as well:

For my tags the tag base is #110 weight white card stock and I used various plaid card stocks from my stash for the decorated pieces on the tags. I also added washi tape on a few of the tags to dress them up. The "for you" is a stamp from my stash and I stamped that using black ink. For all bunny die cut pieces I used scraps. Also for the bows scrap card stocks were used. Added crystals from the stash to the bows. Here are photos of some of the Bunny Tags alone:


Thanks to Angelica for her inspiring projects featuring the WafflerFlower Bunny Ears Die set. I have a few other projects I plan to use this die set on so hoping to be able to work on those this week ahead....

Road Trip... First in 3 years . . .

Up early yesterday for our drive to South Carolina for the SSAT stamp show in Columbia... Happy to get to go to a stamp show as we have not been to one in 3 years so my PIC (stamping Partner In Crime) and I were ready and waiting for February 18th for this show!!

Not many vendors but we did not come home empty handed..... From The Ton booth I bought the Pansies Background stencil and matching die set. I also picked up a pack of mini ink pads:

Shopped at the Northwoods Rubber Stamp booth and found these:


Stopped at Paper Sweeties booth and bought one stamp set and got the matching die set for free. This is a Gnome set:

We have known the owner Debbie M. for a few years and we always shop her booth. She said she is going to be selling Paper Sweeties and getting ready to retire so sadly one more stamping vendor to eventually be gone. Happy we were able to see her at the show tho!

Stopped at A Muse Studio and I picked up a die set of stitched egg ovals:

No photos but did pick up a dotted stencil and also happy to see at the InkyAntics booth that they were selling Simon Hurley products so I picked up two colours of his Lunar Paste that I have wanted to try out for some time now....  Had a nice lunch and still got back to NC before dark:

Fun day for us for sure.... DH was our driver so an easy ride for us stampers.... We have two more events we will be going to this year and certainly are looking forward to them! Nice to shop for crafting items in person rather than just online.....


Saturday, February 4, 2023

Heart Ornaments for Valentine's Day

Had made the painted/decorated light bulb ornaments for Christmas this past season:


So decided to make heart shaped ornaments for Valentine's Day. Ordered the clear plastic heart ornaments from Amazon and painted them:


Once paints were dried I decorated them. Beads, chains, jump rings, and ribbons are from the stash. 


All Tucked In - Add On's - Valentine Treat Holder

Years ago I bought the All Tucked In die set for a box from Taylored Expressions. They came out with an add on for that die set and I used that for Christmas treat holders:


They came out with another Add On die set for this box and here is a photo of the All Tucked In box die set and the Valentine's add on die set:

I used two of the Valentine word dies for my treat holders - the All Tucked In box holds three of the Ghirardelli candy bars. (For my photo I put a piece of scrap white card stock in front of the candies in the box so you can easily see the hearts/word this die set cuts out):

This photo shows the front of the box and the back of the box to show how this box is held closed:


Easy box to die cut and assemble and happy Taylored Expressions made another Add On die set for their original All Tucked In box die set so I get more use from that!


I


Library Card Treat Holder

Bought the Ellen Hutson Library Card bundle on sale and although I have plans to use this as a pocket I decided to make a treat holder for Valentine's Day using this bundle set:

Die cut the Library Card die out of red card stock. Also die cut the printed card stock for the back using this die. Used tear n tape to assemble the pocket. Using a die from IOStamps by Anna Wight I cut a piece of white card stock for the rick rack piece at the top of the pocket. Used two washi tapes from the stash for the pocket front - a small washi print for the rick rack piece and a larger washi tape print for the front bottom of the pocket. The covered paperclip I used scrap red foil card stock and cut that with a banner die. Cut out red foil hearts using a heart border die piece from Trinity Stamps for the red heart at the top of the paperclip. Easy holder to assemble and for my treat I used a fun size bag of M&Ms:


Glue Stoppers

Decided I would make myself and my PIC (stamping Partner In Crime) our own glue stoppers that can be found all over YouTube. Here is a photo of the two stoppers I made:

I bought my stainless steel pins for my stoppers from Amazon - they have a clear crystal at the top of them. (You need to use stainless steel pins so they will not rust in your glue bottle and turn your glue brown from the rust). Here is a photo of the first one I made and it is for me:

The top of the pin is a clear crystal and using E6000 adhesive I put a white seed bead, then a red bead, and a second white seed bead. Below that I used an earring back and that gave me two loops to hang my dangles on. I used various beads from the stash and the two red flower pieces are from HobbyLobby. The chains, beads, and jump rings are from my stash. I put a earring stopper at the base of the glue stopper for now and when I put it on my glue container that can be removed. 

My pic is a purple person and I will say you are hard pressed to find a lot of purple crafting items in this craft room but I went through all the beads and was able to come up with some options for her glue stopper:

I made her stopper for Valentine's Day and to package this I used the mini Match Box die set from Hero Arts that I recently used for a Valentine treat box:

I put my glue stopper in one of these match boxes to see if it would fit:

Since it fit I made a purple box for my pic for her stopper:

Hoping she likes her glue stopper.... In her bag I decorated - similar to this one:


I bought her a set of the Heart Bag Topper dies from Scrapdivadesigns.com. Here is the die set of three bag toppers - small, medium, and large:

and the larger die is on the back:

Here is a photo of some of the bag toppers I made for Valentine's Day and I used the largest die for my bag toppers:

and a closer photo of one of the rosettes I had made to put on the bag toppers:

The glue stoppers are easy to assemble and having the earring back at the base of the beads gives you two loops for your dangles to hang from.