Showing posts with label St Patty's Day. Show all posts

Tuesday, March 5, 2024

Waffle Flower Shamrock Release


I recently bought the Shamrock release from Waffleflower.com for upcoming St. Patrick's Day cards. In the past I have bought a die set for a Leprechaun from another manufacturer and that was not an easy die set to assemble... the Waffleflower Leprechaun die set is so easy to assemble - here are the pieces cut for this die:

I used all scrap card stocks to assemble the Leprechaun. My base piece is the brown and this base piece will be the colour of his eyes and mouth if you want it to be. Once the base piece was cut I used a pale pink card stock scrap for the face die piece - I kept the little mouth piece this die cut out as later I would use this piece for his mouth. Then I cut out the hair/beard die using a rust coloured card stock scrap. For the hat I used green card stocks and I sponged the edges of the hat using a darker green. I cut out the hat band/buckle using a brushed gold foil card stock. With the hat cut out and edges sponged, I used liquid glue to put the hat band/buckle on the hat. Glued the hat to the brown base piece. Then I glued the hair/beard piece to the face and then glued this piece onto the brown base. With that done, this is when I glued the small mouth piece to the face on the base. My Leprechaun was complete. Set him aside to dry. Here is a close up photo of the Leprechaun:

Once he was on the card front I used a white gel pen and added the white dots to his eyes. Very easy Leprechaun to assemble and he helped to use more of the card scraps up so this was a good project to make.

This next photo shows the card I made using the Leprechaun and other items from this release:

I used the shamrock stencil in this release to add the shamrocks to the white card front using green ink and blender brushes. I wanted to add more design to the card front so I used a small circle stencil from my stash and stenciled the circles onto the card front pieces. The card base is green and cut and scored at the top. Cut a black card stock for the frame for the card front. Used liquid glue to put the stenciled shamrock card front on the black card stock. Then put these pieces onto the green card stock base. 

For the "lucky" die I cut that out of the gold foil poster board sold at the Dollar Tree. The shadow piece to this die I cut out of vellum from the stash. Used liquid glue to put the "lucky" word onto the vellum shadow piece. Also used liquid glue to put this word set onto the card front.

For the Leprechaun for some of the cards I cut out a piece of white craft foam to put him on to give him some dimension on the card fronts. The other cards I just used tear and tape and put him on the card fronts. Once the card fronts were all done I decided I wanted to add green glittered card stock shamrocks. I went through my stash and used the small shamrock die from the Karen Burniston die set for Happy St. Patrick's Day  that I had bought last year. Used liquid glue to add those to the card fronts and they help to add some sparkle to the cards.

Card on the left has the craft foam base die cut piece behind the Leprechaun and the card on the right has the Leprechaun on the card front using tear and tape and he is flat on the card front. Another fun release from Waffle Flower just in time for St. Patrick's Day cards!


Sunday, February 20, 2022

St Pat's Cards

 Not a huge fan of St. Patrick's Day -- I do make cards but I do not make treat holders and such. Earlier this year I had ordered the Gnome die set from Jaded Blossoms. For Valentine's Day they sold a die set for the original Gnome die set - Valentine Gnome Add On I believe it was called. I did not order that add on set but.... 

When I saw the St. Patrick's Day Gnome Add On die set I placed my order. Here is a photo of that set:


A recent stop at Hobby Lobby and I picked up a new St. Patrick's Day card stock print for my cards for this year:


The shamrock print was more of an emerald green and I knew I had solid emerald green card stock for my card stock bases in the stash so I was happy to find this print. Using my scraps I decided to cut out the gnome for St. Pat's. With this die set having so many tiny die pieces I decided not to cut the die pieces apart but to keep it as a one piece die set:

Die cut the gnome base, hat, nose, shoes, and beard from the original die set for the gnome. From the St. Pat's set I die cut the hat, pot of gold, hands, and shamrock using scraps. Assembled the gnomes and here he is:

I have the Diagonal Stripes hot foil plate in my stash from Spellbinders and I wanted to use that for background for the gnome. To start with I cut the emerald green card stock for the card base with it scored at the top. Used a piece of white card stock for the card front and trimmed the shamrock printed card stock for the card front. Put the card pieces together using the ATG. With all my gnomes die cut and assembled I decided to foil a background frame piece. 

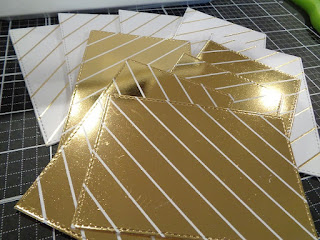
Using the Hammermill card stock I used the Glimmer hot foil machine and Spellbinders diagonal stripes hot foil plate and their gold foil for my background piece. Once the white card stock was foiled I set that aside. Using the PinkFresh solid hot foil plate I used the same piece of foil I had just used on the white card stock background and foiled that onto a new piece of white card stock - once that was done I peeled off the wasted foil piece and this was all that was left of the wasted foil:


Here are two cards I made using the same piece of gold hot foil:

The card on the left was the first piece that was foiled and the card on the right uses the wasted piece of the gold foil left from the first card. For the foil panels once I did all the foiling and then used the solid plates for the wasted foil pieces I used the Stitched Stax Rectangle die set from MFTStamps to die cut the foil panels behind the gnomes:

The one thing about the solid hot foil plate is because it is solid it not only holds the heat longer but it is also a heavier hot foil plate. My magnetic pick up tool from Spellbinders can not lift and hold the solid hot foil plate off the machine over to the rubber cooling mat that comes with the machine. So off to the kitchen I went and now when I lift the solid hot foil plate off the machine I use a spatula to lift it up and over to the cooling mat:

Definitely an improvement using the Hammermill card stocks for hot foiling. Also I use the "hinge" method to keep my hot foil plates straight and where I need them to be on my card stock. Will say PinkFresh has many really nice hot foil plates but I had a hard time trying to buy their Perfect Sentiments - Holiday hot foil plate with matching die set..... Everyone had it sold out or on a back order. I wanted to buy both the hot foil plate and dies together but finally gave up on locating any sets anywhere..... decided I would try to buy the die set from one place and hot foil plate from another.... 

Was able to buy the die set from a seller on Etsy and then bought the hot foil plate from EllenHutson.com during one of her 20% off sales. That will probably be my next hot foil project so I will have lots of holiday greetings ready for cards and treat holders for Christmas. Very happy I was finally able to buy these two products for holiday hot foiling..... 


Also my PIC (stamping Partner In Crime) had gifted me the foil trimmer from Spellbinders and that is what I trim my foil pieces with and it cuts down on static and keeps the foil flat when trimming it to the size you need:

Also -- this a size comparison photo of the Jaded Blossoms Gnome I used on my St. Patrick's Day cards and the Gnome from SimonSaysStamps release awhile back:


Happy the St. Patrick's Gnome arrived this week and has already been put to use in the craft room. DH wanted to stop at Harbor Freight this week so I picked up a couple of plastic bins for organizing smaller items in the craft room:

I like the smaller boxes inside also snap closed so it will keep smaller beads or bling together in an organized space.... never know what I can find at Harbor Freight for the craft room..... Off to clean up and start on Easter projects this week - will post those once I get them done.... 

Tuesday, March 4, 2014

Irish Blessing Card


Card is on a green card stock base. Cut a piece of darker green card stock for the card front. For the embossed white background piece I used the St. Pat's Background embossing folder from Darice. The shamrock card stock is from Recollections at Mikes. Typed up the Irish Blessing on the computer and printed it out on white/GP.

To make this card I cut and scored a piece of green card stock for the card base. Then cut the darker green for the card front. Used the St. Pat's Background embossing folder from Darice to emboss the white card stock and as usual when I use an embossing folder I emboss two pieces of card stock at the same time. This makes a softer embossed impression and it prevents the card stock from tearing/ripping on the embossed areas. Once that was embossed I put the folder and the extra embossed piece back in the file drawer for later use.

Cut a piece of the shamrock printed card stock 2" wide and put that across the upper part of my white embossed piece. Trimmed the white embossed piece to the size I needed and used the ATG to put this onto the darker green card stock. Then put these onto the card base front.

Printed out the Irish Blessing on the computer onto white/GP card stock. Cut this to the size I wanted. For the three shamrocks next to the Blessing I used a stamp from Delafield Stamp Company and green ink. Once that was done I cut a piece of green card stock to go behind the Blessing piece. Used a small circle punch for the small green circles in the corners and put those on using a glue pen. For the button I dug out a button from the button jar and ran jute/twine through that leaving the 'tails' in the back of the button. Trimmed those to the size I wanted and put the button on using a large glue dot. Put the Blessing piece on the card front using pop dots for dimension.

Here is a closer photo of the embossed white piece:


TFL and YOLO