Monday, November 26, 2018

Another 30 . . .


Last year a gal at work asked me to make 30 holiday tags for her Christmas gifts for her family. Here is a photo of some of those:


Once again she asked me this year for another 30 tags and here are photos of the tags I just made:


Best way to make multiple tags is to die cut all the tag shapes out in various colours and sizes and prints so as you are working along all your bases are ready to go. Was happy to use so many of my dies/stamps/washi tapes/trims for these tags. First I thought it would be hard to come up with 30 different tags -- especially since I did not duplicate any from last year -- but I had made a few extra before I realized I had finished the 30 I needed! Fun to make a project that goes together quickly....

Sunday, November 18, 2018

Thanksgivng Treat Bags, Tootsie Pop Holders, and Turkey Toes . . .


Just finished putting together the last of the Thanksgiving Treat Bags. Here is a photo to show the kraft gift bags from Hobby Lobby that I decorated for Thanksgiving that I have shown in other posts:


Here is a better photo of each one:


For the bag fronts I used printed card stocks from the stash and kraft card stock from Mikes. The dotted strip across the bags is from Hobby Lobby - it is in a package of the strips used to make paper garlands with. I cut these pieces to the size I wanted for the bag fronts. For the watering can I used the T Holtz Sizzix Watering Can die and various craft paints over dryer vent tape for the finish on those. The clear plastic pumpkin in the lower right corner is also from Hobby Lobby. Added sequins to the bag front from the stash. Added die cut leaves and such to the front of the bags using glue dots.

Inside these treat bags are a few treat holders I made:


LOVE these pumpkin treat holders - I used the Fun Stampers Journey* stamp set Martha's Pumpkins with matching die set. Stamped with VersaMark ink and used white embossing powder by Recollections at Mikes. Cut out the box/insert piece and then die cut three of the plain pumpkins for the backs of the treat holder. Here is a photo to show the pieces before assembly:


I assembled the box/insert and put the pumpkin front and the pumpkin back on the box/insert piece:


and a photo of the plain back:


For the front of the holders I used a green marker on the stem piece of the pumpkin and I tied a small bow for each holder and put those on the fronts using hot glue:


Inside this holder is 4 Hershey Nugget candies -- three are standing up and there is one on top of those and they do not fall out. This next holder is for a Tootsie Pop:


I had stopped in at Big Lots and found a bag of the Tootsie Pops that had chocolate outside the inner chocolate so a win-win for a chocolate lover! I found this Pumpkin Lollipop Holder Die at My Creative Time:
https://shop.my-creative-time.com/Pumpkin-Lollipop-Holder-Die-MCT-D202.htm

Cute die and it can easily hold a larger lollipop than the Tootsie Pops. It is free standing and the die cuts beautifully - for my lollipop holders I used both double and single sided card stocks. Used the stem and leaf die from the die set and cut out a stem and leaves from scrap card stocks. Used various twines to tie the holders closed. "Happy Thanksgiving" is a stamp from Stampin Up Teeny Tiny Wishes. I wanted to make a Tootsie Pop holder but did not want the "same old, same old" holder... Was happy I found this cute die set.

For this next bag of treats I used the Brachs autumn candies:


Harvest Corn.... (that IS a vegetable, isn't it?? ;0) haha)  I had some clear treat bags in my stash (from the candy aisle at the craft store) and my bags each hold 16 pieces of candy. Typed up a label on the printer and printed that on white card stock. Used a small turkey stamp from DeNami Designs and here is a photo of the Turkey Toes treat bags:


I used the more of the strips from Hobby Lobby to put behind my trimmed Turkey Toes label and put these at the top of the treat bags. Another photo of the Harvest Treat Holders I showed in an earlier post for these treat bags:


In the bags I put a small amount of the brown kraft shred from the dollar store and then put in the treat holders. Scattered small pieces of candy in the bag around the holders and topped the bags off with more of the paper shred. Tucked in leaf picks I bought at Hobby Lobby. With Thanksgiving now finished it is onto Christmas -- cards, projects, treat holders, tags, yada yada ..... But first I HAVE to locate the top of my work table!! haha    ;0)   * Fun Stampers Journey stamps/dies/products can now be bought on the Spellbinders website so you no longer need a "demonstrator" or "coach" to buy from. Their stamps stamp beautifully and of course Spellbinders make their dies so those are also nice. Here is the website for Spellbinders:

https://www.spellbinderspaperarts.com/login.php

Also -- here are photos of more of the Thanksgiving cards I sent out:


For the above cards I used an old stamp set For All Things from Stampin Up for the card front. The "Grateful" is a stamp that reads "Grateful for You" but I just inked up the "Grateful" part of the stamped and stamped it onto scrap white card stock. The printed leaves card stock is from Hobby Lobby. Used square and scalloped square dies for the stamped greenery piece. Added sequins to the card front from my stash.

And more of the acorn cards I made using the Spellbinders October 2018 Small Die of the Month I belong to:


Glad to have everything done.... but now to begin again -- first everything has to be put away tho.... but what it is.....

Sunday, November 4, 2018

Thanksgiving Cards


This post shows the three Thanksgiving cards I have made so far for this year using the Spellbinders Small Die of the Month for October. Here is a photo of what those dies look like:


Spellbinders has a small die of the month club and a large die of the month club and not sure if I would like a monthly club I signed up for the small die of the month club to start. This is my second monthly die set and so far?? Loving it.... Like that it is a die set as I will be able to use them over and over again unlike the Paper Pumpkin from Stampin Up where you can get punch out shapes or bags or whatever they include in their kits. Plus this small die of the month club is only $12.50 per month and that is affordable to me!!  We pay more than that for most of the die sets at the stores.

My first card I used the wishbone die from this set:


The card stock base is a kraft card stock and the autumn stripe card stock is from the stash. The cream card stock used for the wishbone was a piece of scrap card stock. Cut the cream card stock larger than the die piece and put Stick It Sheet on the back of the cream card stock. Cut out the die and set that piece aside. Wanted to have the wishbone have dimension so using the top tab to a kleenex box I die cut the wishbone from that. Put the cream die cut piece on the kleenex die cut piece and that gives this die cut piece some shape and dimension -- here is a photo to show how I do this using a word die:


Cut and scored the kraft card stock base with the scored line on the side of the card. Using card stock from Close To My Heart (Saddle) I cut a piece of that to fit behind the striped piece. Put them together using the ATG.   Put this on the card stock front using the ATG.  Added the wishbone using small glue dots and tied a twine bow for the top of the wishbone. Using glue dots I put three brown sequins on the card front.  Tore off a small piece of washi tape from my stash and put this on the lower right corner of the card:


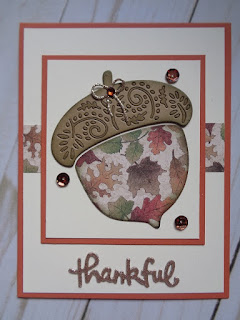
The next two cards I used the acorn dies in this die set. The first card is more rustic looking:


The acorn dies in this set has the decorated acorn top, the acorn shaped bottom, as well as another die that you can use to cut out "hello fall" on the acorn body.

I wanted my acorn top to have some dimension and colour so first I cut the top out of a darker brown. With this die cut I left the cut card stock in the die and cut up small pieces of Scotch tape to put on the back of the die cut piece - the tape keeps all the small die cut pieces in the acorn top piece so I would not loose pieces when I took it out of the die. Then I cut out another top piece using a lighter brown card stock that was backed with Stick It Sheet. With that die cut I put it over the taped darker die cut piece. Here is a photo to show the back of a die cut acorn top piece with the Scotch tape all over the back:


With the Scotch tape all over the back of this piece I can easily remove this piece from the die and keep all the tiny pieces in tack. With the dark and light acorn top pieces put together I set them aside. Cut a piece of the leaf printed card stock larger than the acorn bottom die. This printed card stock is thinner paper so I used the ATG and put the leaf print onto a scrap piece of kraft card stock to make it stiffer. Die cut the acorn bottom out and sponged the edges with brown ink.

Cut and scored a piece of rust card stock for the card base with the scored line on the side of the card. Cut two pieces of cream card stock - one for the card base and one for the piece I was putting the acorn on. Then I cut a piece of the rust card stock for the card front to fit behind the smaller cream piece. Put the smaller pieces together using the ATG. Using the ATG I put the acorn top and bottom die cut pieces onto the smaller cream piece for the card front. Set this aside.

Using a small piece of the leaf print I cut a piece to fit across the cream card stock front. Put the strip on the cream piece using the ATG and then put this onto the card stock base. Used double stacked large glue dots behind the acorn piece and put that on the card base front. For the "thankful" I die cut that out of glittered card stock backed with Stick It Sheet and the kleenex box top. Put those two words together and used TomBow glue to put this on the card front. Used small glue dots and added sequins to the acorn piece. Used a tiny bow die and cut out a bow using the glittered card stock and added a brown crystal to that. Put this onto the acorn top using a micro mini glue dot.

Used the same layout for this card with a foiled print:


For this card I used a printed card stock from a pad of holiday printed card stock on sale at Mikes:


Used a multi purpose print for the bottom of the acorn:


Used the foil printed square in the upper left corner of this page and backed this with a piece of solid card stock that matches the card stock base to give this print more shape. Die cut the acorn bottom out. Set it aside. Used the same solid colour as the card stock base and die cut the acorn top out. Left it in the die and covered the back of this piece using the Scotch tape pieces. Removed it from the die and then die cut gold foil card stock backed with the Stick It Sheet for the acorn top. Put the gold over the rust piece for the acorn top:


Cut and scored a piece of rust card stock with the fold on the side. Cut a piece of cream card stock for the card base front. Using scraps I cut a strip to put across the card front. Put this onto the card stock base using the ATG. . Cut a piece of rust and cream card stocks for the rectangle for the acorn piece. Put those together using the ATG.  Used the ATG and put the acorn pieces onto the cream rectangle and put this onto the card stock base using doubled up large glue dots. Used a small bow die and cut out a rust bow and put that at the top of the acorn and added a gold bead from the stash to the center of that. Put it on the acorn top piece using micro mini glue dots.

For the "thankful" again I used the gold foil card stock backed with a card board die cut piece. Used TomBow glue to add this to the card front:


Nice dies from Spellbinders and they easily cut through the card board pull tab on the kleenex box. Did not have to use shims in the die cutting machine or anything - the dies cut with one pass in the machine. Easy cards to put together and another fun die set of the month!


Saturday, November 3, 2018

Heigh-ho . . . I. O.


Heigh-ho . . .    I. O.  . . .    It's off to shop we go . . .

My PIC (stamping Partner In Crime) and I shop various stamp/scrapbook shows throughout the year and we always shop the booth of IOstamps -- AKA Impression Obsession. We like their dies and stamps and at these stamp shows they offer show specials so shopping their booth is always a must . .
On their website, IOstamps.com, they have their shows and events listed for the year ahead so we can plan our road trips in advance. . .

Earlier this year I saw on their "Event" page that they were having their yearly Warehouse Sale. I did not know they had this yearly sale but knew it would be a sale I would want to attend - right away I emailed my PIC and told her about this sale and we made our plans to attend it. It is a two day sale and we decided we would go on the first day which was Friday.  We both took a vacation day from work and I asked DH (who I now call the "Cuber Driver" since he is the 'uber' driver for us two crafters) and he said he would take us. . .  Plans in place and we were ready to go . . . we both started saving our monies to set aside for this sale ... As the sale date got closer all was well until...

Hurricane Florence arrived --- who invited her???? So with bad weather in the area IO canceled their September warehouse sale and rescheduled it for November 2nd and 3rd.  My PIC and I changed our vacation days and we were all set . . .   She and I had tried to find detailed information about this sale on the web so we would know what to expect but all we could find were postings by people that said they would be attending.  So before the sale my PIC called IO and asked some questions so we had an idea what to expect at this sale. We were not sure of the set up or if the sale included all past product only or over runs or what?

My PIC had told her mother, another card maker who lives a few hours away from us, about this sale and she said they would meet us at the warehouse for the sale. Plans in place we were set for our road trip. Left the house very early yesterday morning, picking up my PIC on our way, and we headed out for our day long adventure. . .

The IO warehouse is in Oilville, Virginia and that is about a 25 mile ride outside of Richmond. With their sale starting at 9AM I knew we would probably get caught in the rush hour traffic in Richmond so I allowed for extra travel time for the trip.  DH always says he does not understand if we are doing a road trip why I have a set departure schedule in place ? ?   I told him with this being a warehouse sale and a set starting time that we wanted to be at the warehouse early so we could get in line. . . Happily the traffic in Richmond moves right along so we did not have any delays. . .

We pulled up to the warehouse parking lot ---


Happy we made the trip and we had about an hour to wait until the sale to start -- only one other vehicle was there -- my PIC's parents! Here was the parking lot -


So of course my DH turns to me -- not a soul in sight in the parking lot or by the front doors -- and says "You had better hurry" -- hahaha... NOT -- ;0(     So my PIC, her Mom, and I were the first to arrive for this sale and in line. Her Mom had said they drove there the day before and stayed at a hotel for the night. She said they had driven to IO the day before the sale to see where it was and the gals at IO took her on a tour of the sale space so she would know how things would be set up - she could not shop but at least one of us knew how things would run. She told us all the dies would be in numerical order, not by theme or holiday, so it was helpful we each had made our shopping lists using their product numbers. They set up this 'store' in their warehouse for this one time yearly sale.  Here is a photo through the front doors that I took while we were waiting for them to open:


While we waited for them to open we saw them hanging all the signs for the sale -- all clear stamp sets $5.00 each, all dies - older, current, and new releases 50% off, etc.. More and more shoppers arrived and we enjoyed meeting two nurses that are also paper crafters behind us in line. We had a fun conversation waiting for 9AM to arrive. Fun ladies and a fun time in line for sure.... The parking lot filled up and the line extended . . .  Doors opened a little early and we were happy to shop - all the ladies were so nice -- no shoving or pushing or anything -- they would hand you dies or products if you asked, etc. A nice bunch of gals for sure....

First I shopped the dies on three walls of this 'store' then I shopped the loose cling rubber stamps in boxes on table tops. They also had tables with boxes and boxes of clear stamp sets as well as a table with boxes and boxes of unmounted stamps. Around the corner to a back room where they had shelves of ink pads and matching re-inkers, spinning racks of cling stamps, a table of kits, and a shelf unit that had unmounted background stamps - these stamps could have a small flaw on them or they may not be 1st quality and each were $5.00.  Once you picked out the background stamps you wanted you gave them to an employee and they mounted them for free for you -- here are my two background stamps I picked up:


I also picked up one ink pad and re-inker on sale for Christmas holiday projects - their Cherry ink:


A photo of loose cling stamps I picked up for 50 cents each or a $1.00 each - they are so cheap since they do not have packaging:


I also bought three of their clear stamp sets at $5.00 each:


Two of the stamp sets have sayings from the Wizard of Oz movie which is a favorite of mine and my PIC found those for me --- but the main reason I shopped this sale was for the dies:

 and more:


and more:


and to show new releases were also included in their warehouse sale:


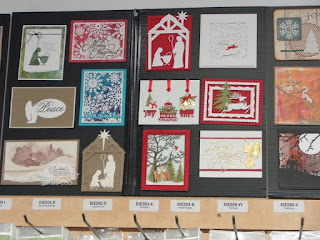
Not only did I save on the dies being 50% off but did not have to pay shipping from a website.  My PIC bought lots of stamp sets and dies as did her mother. Three happy stampers for sure. The good thing about this sale is IO had hung up their sample boards on all the walls with dies for card inspiration and project ideas. We were allowed to take photos of the sample boards and so I did:


Here is a peek into a back room they have - They were offering a free Make N Take but we did not stay for that:


Two employees ran the registers so it did not take long to check out and you could take a bag full of past IO catalogs. I like looking at those for inspiration ideas or cards that they use a few different dies on to make a background or a 'scene' on your card front. Happy to get those catalogs free for sure!

We shopped for about an hour and a half or so and I was happy I found all the dies on my list except for one die that is a new release and it was sold out but they will be getting more in stock so I will order it from their online store. Both my PIC and I spent less than we expected so we had monies left for lunch at a restaurant that did not have a drive-thru window - haha.  We said our good byes to her parents in the parking lot and they headed out.

DH was waiting patiently for us and was happy to drive us wherever we wanted - we stopped at Tuesday Morning and checked that out... followed that with a run to Bed Bath and Beyond for one of the double Inter Design fridge bins my PIC wanted but we found out that she will have to order that online.... Then off to lunch -- went to Long Horn and had a nice lunch. Across the street from there is a Hobby Lobby. My PIC and I stopped in there and she was able to buy quite a few of the Disney character dies from the Clearance Section for her scrapbook for her grand daughters. I picked up a die set from Spellbinders on sale:


We also stopped at Harbor Freight as my PIC had coupons so she and I could get a Pittsburgh Magnetic Parts Holder dish free - we are going to use them for holding die pieces on our craft tables while we are making our cards. Thanks to my PIC for sharing her coupons!  After errands were run we ended our shopping trip with a stop at a nearby favorite:


Then we headed home and we were home earlier than most of our day trips so this worked for us. A fun road trip for us stampers and happy to have been able to shop the IO Warehouse sale... We both said we will go again next year as well... Will be spending today putting the dies in their bins and getting things put away in the craft room....   Certainly a road trip to "die" for -- haha!!! Thanks to DH for being our "Cuber driver" one more time..... ;0)