Tuesday, August 14, 2018

PTI Christmas Projects


***  This card was chosen as a Favorites of the Week on Splitcoast Stampers. Thanks to Bonnie for selling me this PTI stamp and die set from her stash!   Thanks to Shirl for adding it to her Favorites of the Week list! ***

Recently bought a new-to-me stamp set from Paper Trey Ink - Polka Dot Parade #9. I bought the stamp set and the matching die. Here is the Christmas card I made using these new-to-me products:


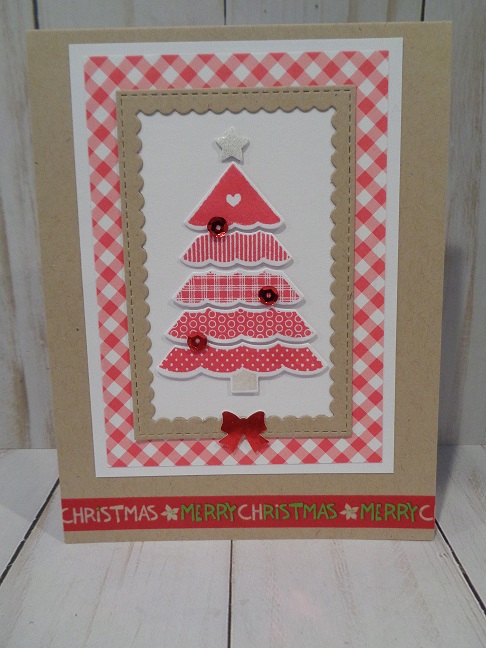
Card stock base is kraft cut and scored a the top. Used white/GP for the card front and gingham card stock from Hobby Lobby that I cut on the diagonal for my card front. Used a scalloped rectangle frame from the stash and cut out a frame from kraft card stock. Put the frame over a piece of white/GP cut to the size I needed to fit behind the frame.

Using the Polka Dot Parade stamps I stamped all the tree layer stamps using red ink onto white/GP card stock which I had die cut using the matching tree die.  Put these onto the kraft card stock frame piece using double layered glue dots:


Used the ATG and put the framed piece onto the card front. Added three red sequins to the tree and used a bow punch for the red foil bow. Put the bow on the frame piece using a glue dot:


The above photo also shows the holiday washi tape I put across the bottom of the card front to complete the card. Fun stamp and die set and happy to be able to buy it!!

PTI -- PaperTreyInk.com  -- had seen this video on YouTube by Jill Norwood showing the tags she made using the PTI Enclosed: Bell die set:

https://www.youtube.com/watch?v=a18PWWLQVNM&t=582s

Loved her bell tags and I ordered a Bell die set for myself. That arrived yesterday and here are the bell tags I just made:


Easy bell tags to put together - first I decided what printed card stocks I would use for the front of the tag. With that decided I then decided what solid card stock to use on the back of the bell tags. With card stocks decided I cut out the solid back pieces. Stamped "to" and "from" on those with inks to match the tags. Die cut the front printed bell pieces. (I backed those with Stick It Sheet for adhesive). Set the solid bell backs and printed bell fronts aside.

Using the foil poster sheets from Hobby Lobby she suggests I cut out the "Joy" bell die piece as well as the bell clapper piece from the foil sheets I was using for my bells.  I also backed those with the Stick It Sheets since liquid glue could make a mess on the foil die cut pieces. With everything stamped and die cut I began assembly.

First I put all the bell clappers on the printed bell front pieces. Turned that over and put the stamped bell back pieces onto those. With the front and back pieces together I turned it back over and put the foil "Joy" die cut pieces on the printed bell fronts - using the Stick It Sheets for adhesive made this job quick and easy. With all "Joy" pieces in place now I could add ribbons and anything else I wanted to add to the bells. The black print bell has a holly die cut piece on that, the blue has a small snowflake that was punched out of the foil sheet, the green bell I used a bow die for the bow at the top of the bell. Added a crystal from my stash to each clapper to give it some sparkle and shine. Closer to the holiday I will add more jingle bells and holiday icons tied to the ribbons at the tops of the bells. Here is a photo to show the back of the tags:


This is a nice die set and the bells are a nice size for holiday tags. Thanks to Jill for sharing her holiday bell tags and video!


Autumn Harvest Card


Saw and ordered the Sunny Studios Happy Harvest stamp and die set and have not had any time to do much of anything with it other than taking it out of the packaging....  Finally was able to make this card using a technique I have wanted to try like forever..... Was able to use one the stamps from the Happy Harvest stamp sets:


This card was very easy to make and IRL is very dimensional. First the card stock base is kraft card stock with Pumpkin Pie for the card front. The white piece on the card front covered in leaves is a piece of white/GP.

To begin I cut and scored the kraft card stock base with the fold at the side.  Cut the Pumpkin Pie piece to the size I needed. Cut the white/GP piece to the exact size I wanted for the card front. Using a leaves stencil from my stash I laid the stencil over the card front white/GP piece on my craft mat. I used Texture Paste from Ranger to cover the leaves stencil. (Not Embossing Paste).. With the stencil covered I gently lifted the stencil off the card stock and put the stencil into plastic container with warm water - this keeps the paste moist so it is easy to get it off the stencil when I wiped the stencil clean. I let the stenciled leaves white/GP dry naturally.

Once the stenciled piece was totally dry I laid my cleaned and dried stencil over the stenciled piece lining the stencil over the stenciled leaves. With that in place I used washi tape to hold that in place. Using various distressed inks I added ink to my leaves using a sponge applicator for each colour:


For the greeting I cut a piece of white/GP to the size I wanted and stamped the greeting stamp using brown ink. Added a piece of green checked washi tape to the left side of that piece. Using the same distress inks I used on the stenciled leaves I covered a scrap piece of white/GP with inks. Used a leaf die and cut out a leaf.  Used clear Wink of Stella and covered the leaf so it would add some shimmer and shine to the banner piece:


Used the ATG and put the card layers together and then put them onto the kraft card stock base. Added various sequins to the card front for some sparkle. Here is a photo to show the leaves on the card front and the dimension the texture paste gives them:


Fun technique and love how easy it was to use on the stencil for the card front. TFL

Halloween Tree Card


Love the Halloween stamps from  www.sosuzystamps.com and I recently bought the Halloween Tree stamp from them. Here is my card using that stamp:


Black card stock base is #110 weight from Mikes. Purple is from stash. Front distressed piece is white/GP with distressed inks over that. Sponged edges with black ink. Wanted the center of the tree to stand out to show the details of the stamp so used a scrap piece of white/GP and stamped the image onto that using Memento black ink. Then also stamped this stamp onto the distressed card front.

Used a circle die and cut out the white/GP circle. Used the ATG and put all the card layers together. Used foam tape behind the white circle for dimension. Added black sequins to the card front:


Easy card to put together and LOVE the sosuzystamps!  Great images that give you great stamping possibilities!  BOO!

Sunday, August 5, 2018

Morning Glory Cards


While searching for cards with card fronts with a floral background I came across this video on YouTube by Justine H.:

https://www.youtube.com/watch?v=nMLK4iptoPU&t=430s

I have only one floral background stamp from Rubber Cottage and it is very small daisy flowers. I liked the Morning Glory Garden background stamp used in the video so I ordered one from  www.thetonstamps.com .  Here is a photo of this background stamp underneath a background stamp I have from Impression Obsession to show this stamp is larger:


In the video she made 5 cards using this background stamp in different ways. I like the stamp because the flowers are large and some of the flowers on the stamp have solid images. There also is not a directional pattern so you can use any part of the stamp to ink your card stock. Here are the two cards I made using this background stamp:


Both cards are on a #110 weight white card stock from Mikes. To make the cards I cut and scored the white card stock bases at the top and set aside. Cut white/GP card stock to the size I needed for my card fronts.

Ran the anti static bag over the card front piece.  Used VersaMark ink and inked the floral background stamp and laid the white/GP card stock on that. Put a piece of copy paper over that and rubbed the card stock front into the ink on the background stamp. Used Stampendous white embossing powder and embossed the card front. Let that cool and covered it with three blue distress inks:


Using the MFT Label Maker stamp set I stamped "Just A Hello" onto white/GP card stock using ColorBox black ink using the MISTI.  Using scissors I cut these pieces out. Used the ATG and put the distressed card front onto the white card stock base. Used tear and tape and put the three word pieces onto the card front. Using two M Stewart butterfly punches I punched out a white and a turquoise butterfly. Put them together using TomBow glue. Added three clear crystals to the center of the butterfly. Put this on the card front using glue dots. Added clear sequins to the card front using micro mini glue dots. Here is a photo to show the solid embossed part of the card front:


For the red card I did all the above steps but used three red distressed inks for the card front. Used the ATG and put this onto the white card stock base. Stamped the "birthday" for the card front. Cut that out with scissors and put it on the card front using tear and tape.

For the "happy" I cut that out of red foil card stock backed with Stick It Sheet.  Cut that die out of a kleenex box lid and put the foil "happy" onto the card board "happy"  for dimension. Used the clear TomBow glue to add the "happy" above the 'birthday' on the card front. Here is a photo to show the dimension the card board behind the word "happy" gives it:


Used diamond Stickles and added three drops to the card front. Here is a better photo of the front of the card:


This next photo shows the dark red ink I added to the center of one of the flowers to give it depth:


This is a nice floral design for a background and the distressed inks helps it to look different on each card made. Easy cards to put together. Thanks to Justine H. for sharing her ideas on her video. TFL

Saturday, August 4, 2018

BOO Bags


Made two treat bags for BOO Day that will be filled with candy treats for the holiday. Here is a photo of the two treat bags:


To start - each bag was made using the Sizzix Sweet Treat Bag die. First here is the black bag:


I cut out two bag pieces from 65# weight black card stock from Mikes. Used tear and tape and put the bag front and back pieces together but kept the bag flat. For the embossed spider web panel for the bag front I cut a piece of the black card stock to fit into the spider web embossing folder from Taylored Expressions. Once it was embossed I cut it to the size I needed for the bag front. Using the Platinum Nuvo mousse I lightly covered all the spider webs with colour. Since the embossing folder is the standard size my embossed piece is too short to cover the bag front.  I will be putting paper shred in the bag with a cellophane bag of candy treats so I will not be closing the top of the bag so the front piece needed to cover the whole bag front panel. To fill in the space from the top of the embossed piece to the scallops on the bag top I added trim from the dollar store. The purple crystals on this trim add sparkle to the bag front.

Put the embossed panel on the bag front using the ATG with the beaded trim while the bag was flat. Set this aside. For the many bugs I used a bug punch from the dollar bin at Mikes -- when things were a dollar..... I used various glittered card stocks for all the bugs and the big bug is black glittered card stock and that was punched out using a M Stewart punch.

Greeting -- wanted something more than just "Happy Halloween" and sitting on my work table is my new order of stamps from   www.sosuzystamps.com  (LOVE them!) with Halloween stamps/greetings. This is one of  my favorite stamps in that order:


Had used that on this card:


Like the saying, like the font, and everything about this stamp but... for my treat bag I wanted to have a small greeting tag on the bag front so I used only part of that stamp for the greeting tag:


Using painters tape I taped off the part of the saying I did not want on my tag and I used black ColorBox ink and inked the part of the stamp I wanted to use - before stamping it onto scrap white/GP I removed the painters tape from the rest of the stamp and then stamped it. Used a wobble stitched tag die set to cut this tag out. Sponged black ink on the edges of this. Trimmed off more of the purple crystal trim and put a piece of this on each upper corner of my tag. Set this aside.

With the bag assembled and with front panel on, and still flat, I used glue dots and added various colours of glittered bugs to the bag and tag. Added the big bug using double layered glue dots to give him some dimension as he travels across his web.... With my greeting tag at an angle I did not want you to see the white tag showing from the back of the bag so I cut a piece of scrap black card stock the size of the tag and put that behind the tag using the ATG.  Used double layered tear and tape on the back of the greeting tag and put that across the front of the bag. Here is a photo to show some of the shine this bag front has with the Nuvo mousse on the webs and the glittered bugs and purple crystal trim:


With all the bugs and tag on the bag front I used tear and tape and closed the bottom of the bag which gave it the bag shape. Using the mousse over the webs really gives this bag front depth. The bag front is very shiny and sparkly IRL.

For the kraft bag and ghost:


Used 65# weight kraft card stock from Mikes. Cut out two bag pieces - front and back. Used tear and tape and put the front and back pieces together and kept this bag flat so I could finish it.  For the embossed piece on the bag front I cut a piece of kraft card stock to fit into the Spooky Bold embossing folder from Fun Stampers Journey:


Once embossed I cut that to the size I needed for the treat bag front. Lightly sponged brown ink over the raised embossing and also the four edges of this piece. Used Halloween printed card stock from the stash and cut two pieces of that -- a small piece for the top of the embossed bag front piece and also a larger piece to put across the bag front. Sponged the edges of both of these pieces using rust inks. Taped the small print to the top of the embossed piece using tape on the back of it. .

For the "Happy Halloween" on the banner piece that is washi tape from the stash. Put that on the banner and used the ATG to put this across the lower part of the embossed piece. Wanted to add a ghost so I used an old Sizzix ghost die (die is yellow and it cuts out a large and a small ghost) and cut my ghost out of glittered white card stock. Used a small oval punch and punched out a black oval to put behind the ghost face so his mouth and eyes are black. This is the back of the die cut ghost with the black oval glued on the face:


Knew I was going to have the ghost hang off the bag front so I wanted the ghost to have a finished look. Used scrap white/GP card stock and cut out another ghost - used TomBow glue and put this white ghost on the back of the glittered ghost to cover the black oval:


Used the ATG and put the embossed piece on the treat bag front. Added small orange crystals from the stash to the embossed piece. Used double layered large glue dots to add the ghost to the right edge of the banner piece. Once again I will put paper shred in the bag and a cellophane bag of candies for the holiday. Closed this bag using the tear and tape and that gives it the bag shape.

Two easy treat holders for BOO Day with two different looks. TFL

Thursday, August 2, 2018

BOO to you when one makes two!


Wanted to make BOO Day cards with new stamps that came in the mail yesterday from

www.sosuzystamps.com

so I began making one card and ended up with two.... Here are the cards I made:


All I knew I wanted to do on the card was have a distressed ink background.. Trimmed a piece of white/GP card stock 4 1/4" by 5 1/2". Used various distress inks and covered the whole white/GP piece:


With that covered with ink I decided to cut this in half so I now had two pieces that were 2 3/4" by 5 1/2":


By cutting this into two pieces I could make two cards using this one distressed background piece. Picked out two of my new stamps and stamped each background piece using the MISTI and black ink from Memento. With the Halloween greeting stamps stamped I added bats and a witch to one card front and for the other card front I die cut some white glitter ghosts.

With these distressed card fronts being smaller than the front of a card I decided to use white/GP for both of my card fronts. The white card stock acts as a frame for the distressed pieces. For the ghost card I used a card stock base of turquoise cut and scored at the top:


With the turquoise card base cut and scored I put the white/GP card front on that using the ATG. With my greeting stamped onto the distressed piece I decided to use regular black ink and sponge that on the edges. Added two small pieces of holiday washi tape to the upper and lower corner of this piece. Used  multi ghost dies from my stash and cut those out of white glitter card stock. Used a small circle punch and punched out three black circles to put behind the ghost eyes and mouth to show them off. I used TomBow glue to put the black circles behind the ghosts. Set those aside.

Cut a piece of black card stock a bit larger than the distressed piece and put that behind the distressed piece using the ATG. I did not want to use pop dots for the ghosts but I wanted them to be a little raised on the distressed piece so I doubled up on the glue dots -- put one glue dot on and then put another one over that so the ghosts are a little raised and put them onto the the distressed piece:


Cut a piece of white craft foam to fit behind the distressed piece using double sided tape and put this in the center of the white card front. The craft foam gives it dimension and lifts it off the card front. Added three coloured sequins to this card front.

For the second card I only did stamping - the greeting, the witch, and the multi bat stamp. This card is on a purple card stock base:


Once this card was stamped, sponged and on the white card front I added clear sequins using micro mini glue dots to the stamped piece:


Using the white card front not only frames the stamped distress piece but it really makes all the distressed ink colours stand out. Also they give these cards a different card front look. My new stamps from   sosuzystamps  are great and stamp beautifully!! Love the font on these stamps and that gives the BOO cards a spooky look.  TFL


Wednesday, August 1, 2018

Shimmering Dream Card


One more card using my two new favorite additions to the craft room -- the Fun Stampers Journey Rose Garden die set and the NUVO Mousse in Power Blue -- here is the card:


This card is sooooo easy to make!  To begin with I used a piece of white/GP card stock cut larger than the die set. Using the Rose Garden die set I cut this out. Using the NUVO Mousse in Powder Blue I covered the die cut piece with the mousse. This goes on smoothly and covers well. Set this aside.

Cut and scored a piece of white #110 weight card stock from Mikes for the card stock base with the scored line at the top. Wanted to use a die cut for the word "dream" so I cut that out of scrap white/GP card stock. Also cut that word out of a card board tab top to a kleenex box. I used TomBow glue to put the card board "dream" under the white/GP card stock word "dream".  By gluing these together it will give the word dimension on the banner. With those glued together I covered that word also using the Powder Blue mousse. Set this aside.

Measured and cut a banner large enough for the word die cut piece for the card front. Dug out a white flower from the flower jar stash in the craft room. Used a M Stewart sprig punch for the sprigs I used under the flower. Using Pearls Shimmer Mist I spritzed the sprig pieces, the flower, and the word "dream" to add a little of sparkle to them. Set those aside to dry before I put them all together.

Measured and cut a piece of white/GP card stock to fit behind my die cut card front. Put them together using TomBow glue. Used the ATG and put theses onto the white card stock base. Using a large glue dot I put the sprigs behind the flower and then added the banner piece that was cut using the Stampin Up Banner punch. Put the "dream" die cut word onto the banner piece using TomBow glue. Put this onto the card front using large glue dots. Here is a photo to show the shimmer and shine the mousse adds to this die cut card front piece:


LOVE the NUVO mousse -- goes on smoothly and really adds a lot to a card front. Also am loving the Fun Stampers Journey Rose Garden die set. Here are items I have already used it for:

A gift bag front (over clear sheet):


My two cards using the Over and Under with distressed inks:


And now this card covered with the mousse:


I apply the mousse using the distress ink sponges and handle and this is how I store all the mousse and applicators:


Two new fun additions to the craft room that I am enjoying getting to use. TFL

Over and Under Cards


Here are two cards I made using the Fun Stampers Journey Rose Garden die set:


For both cards I started with a sheet of 8 1/2" x 11" white/GP card stock and covered that with distress inks and also Stampin Up Only Orange ink:


Wanted more spots of colour on this than the colours spread out so some colours were added in small areas and others in larger areas. Half of the sheet I left with a more pastel look and the other half had the darker shades. With this sheet covered I took it to the trimmer and cut it in half width ways so I had two pieces. For the more pastel piece I die cut the Fun Stampers Journey Rose Garden die set. With that die cut I cut and scored a yellow card stock base with scored at the top. Cut a piece of white/GP card stock to fit behind the rose die cut piece. Used a glue pen and put the die cut rose piece onto the white/GP piece. Set this aside. Here is a photo to show the pastel colours on the die cut piece:


For the vellum banner across this card front I used the MFT All Occasion Sentiments stamp set and purple ink and stamped this using the MISTI. Used the heat tool to set the ink. Put the vellum strip over the die cut card front and attached it to the back of this using double sided tape. Using the ATG I put this onto the yellow card stock base. Added sequins using micro mini glue dots. Here is that card:


Using white/GP card stock I cut out the Rose Garden die set. I trimmed the other piece of distress inked card stock to the fit behind this rose die cut piece. Used a glue pen to put the white/GP rose die cut piece onto the the inked card front. Set this aside. Cut and scored a card stock base of orange card stock with the scored line at the top. Set that aside.

For the banner piece on this card I used scrap white/GP card stock and stamped a stamp from the same MFT stamp set using Stampin Up Only Orange ink. Used the ATG and put this banner piece across the card front and trimmed the edges to be the same size as the card front. Used the ATG and put this onto the orange card stock base. Here is a photo of the card front and a photo of the banner piece:


Used clear crystals from the stash to add some sparkle to the banner piece of this card. Both cards show off the Rose Garden die but using the distress inked pieces gives each card a different look. TFL