Monday, March 3, 2014
Easter Bunnies Card
To begin with the background on the front of this card is the Acrylic Distressed Technique that I saw on frenchiestamps.com. Here is the first card I had made using this background technique:
For the technique you cut your card stock for your card base and score that. Then you cut your piece that you will be using for your background a bit bigger than what you will need for your card front. For my Easter Bunnies card I used white/GP card stock. Using a foam paint brush I brushed on pink acrylic paint from the craft store to cover the front of my white/GP piece. Set this aside to dry. While that was drying I used StazOn black ink and stamped the bunnies stamp from Whipper Snapper onto white/GP. Set that aside. Decided to use a coral card stock for my card base and that is from Close To My Heart. Cut and scored that. Once that was done I set it aside.
Using coloured pencils I coloured in the bunnies image. Used the Spellbinders rectangle dies to cut that out. Cut a piece of coral card stock to go behind the bunnies piece. Put that on the bunnies piece using the ATG. For the greeting "Easter Greetings" I used a stamp from Hero Arts. Stamped that onto scrap white/GP card stock using coral ink. Cut that out using the Spellbinders Tags, Double Ended die set in the Cuttlebug. Set it aside.
The painted card stock was now dry so I put it in the Darice Easter Eggs Background embossing folder and ran it through the Cuttlebug --- whenever I emboss card stock I always use two sheets of card stock in the folder. For the extra embossed piece I just used white/GP and put it under the painted piece. I put that plain white/GP embossed piece back in the file drawer with the folder for later use on another project. By embossing two sheets of card stock at the same time you get a softer embossed image and you will not get any rips or tears to your design on your card stock.
Once this painted piece was embossed I used a sanding block and sanded the front of the painted embossed sheet. This will show your design off as well as accent it with the white/GP card stock showing through the embossed design. Once it was sanded I cut it to the size I would want for the card front. Here is a closer photo of the sanded design:
Using orange/white twine from M Stewart I tied the greeting tag onto the embossed piece. First I put pop dots behind the greeting tag to raise it up and keep it in place. Then used the ATG to put the painted embossed piece with the greeting tag on it on the card stock base front. Put the bunnies image also on pop dots and put that on the card front. Here is a closer photo of the stamped image:
I have searched for an embossing folder with Easter Eggs on it for sometime and finally found this folder by Darice @ AC Moore. Two problems with it --- wished the eggs were smaller on the embossing folder and also this folder is directional --- the eggs do not go in every direction so you have to pay attention when you are putting this embossed design on your card front. Here is a photo of the empty folder for you to see this better:
When doing this Acrylic Distressed technique be sure to do the painting first and allow time to dry. Also when you are sanding it can be messy so put down scrap copy papers on your work table to keep your mess to a minimum. I have learned to use a makeup brush to go over the sanded surface to pick up the paint/sanded paper residue -- do NOT blow onto your sanded project piece as the sanded residue will go all over the place. TFL and YOLO and again here is the card:
Saturday, March 1, 2014
Ghirardelli Easter Treat Holders
Recent trip to the Big W I found the new Easter Ghirardelli candies. They come in a bag of two pieces and there are different designs in the white chocolate -- a bunny, a chick in an egg, the basket and eggs, etc. Each package has two different designs. Over the years I have made different holders for Ghirardelli candies:
and so it goes. . . . but I just bought the SU Scalloped Tag Topper Punch and I wanted to use that for these new style Easter Ghirardelli candies. Here is what I made:
These candies are pre-wrapped in different colour wrappers so I matched my card stocks to the wrappers. For the turquoise wrapper I used SU card stock and a floral ribbon to close my holder. Since I used the floral ribbon I used a floral embossing folder from Cuttlebug --- Caramelo is the title --- to emboss the tag/holder. For the plum wrapper on the right I used card stock from Close To My Heart and I used a checked ribbon for that. I embossed the plum holder using the Swiss Dots embossing folder. For both of the greeting tags I cut them out using the Spellbinders "Charmed I'm Sure" tag die set. Then sponged the edges of the greeting tags to match the holders. This is how I made these holders:
Cut the card stock 2" x 5 /12". Score at 1 1/4", 1 1/2", 3 3/8", and 3 5/8. Put this piece into the tag topper punch with the end that has the 1 1/4" and 1 1/2" scored lines on it -- this will be the top of the holder. Punch the tag topper and then use a bone folder to make your scored lines sharp. Now emboss these in the Cuttlebug. Once they are embossed re-crease your scored lines. Put the Ghirardelli candy in the holder using a large glue dot on the back of the candy wrapper and put this in your holder. Wrap the holder around the candy and tie a ribbon around it and tie this in the hole at the tag top, as seen in the photo:
Stamp your greeting onto scrap white card stock and cut that out in the Cuttlebug using the tag dies. Sponge the edges of the greeting tags to match your holder colours. Tie the tags onto the ribbons using twine. Clip ends of the twine off when you are done tying them.
This is an easy holder to make and another version of a treat holder for the Ghirardelli candies. These would be cute treat holders to hand out at the office or to tuck into an Easter basket. TFL and YOLO.
Friday, February 28, 2014
Easter Tag Treat Holders
This treat holder was made using the new SU Scalloped Tag Topper Punch. This holder is one piece and there are two pieces that make the sides to the holder. Inside this holder are 4 Hershey nugget candies and I covered them using the plaid card stock that I used for the bottom front of the holder.
This is how I made this holder:
Cut a piece of pink card stock 2" x 9". Score this with the longer side at the top of the score board and score it at: 1 1/8", 2 1/2", 3 3/4", 5 1/4", 6 1/2" and again at 7 7/8". Once all your scored lines are made then put one end into the Scalloped Tag Topper Punch and punch that end. Then put the other end in the punch and again punch that end. Using the bone folder sharpen all your scored lines.
For the side pieces cut two pieces of pink card stock 1 3/4" x 2 1/2". Score these pieces at 1/2" on the two short sides and one long side. Once scored clip the corner pieces off and add red sticky tape. They should look like this:
Now a photo of the scored tag and the side pieces with the red sticky tape:
Fold the tag holder on the scored lines. Remove the red sticky tape from the side pieces and put them onto the tag holder. Now your holder is made. Used plaid card stock for the lower part of the front of the holder.
To decorate the front of the pink holder I used a Sizzix die that I just picked up at Joann's on sale for 60% off:
Cut this out of scrap green card stock using the Cuttlebug. Since this die is so detailed to cut it out easily I used wax paper. First put the die, cut side up, on the Cuttlebug plate then cover that with a piece of wax paper, then the green card stock. Put the top plate on this and ran it through the machine. Before taking it out of the machine I ran it through the machine again backwards to be sure it was all cut. Once that was done I took the top plate off and turned the die over and the extra green card stock came off. Using the awl I just poked that in a couple of spots of the die from the back and the cut design piece fell out. Peeled off the wax paper and the cut design was ready for use.
This die cut piece is too large for my holder so I had to cut away some of the design to fit on the front of my holder. Decided to use a glue pen to put this on the holder rather than using the Xyron as some of the die cut piece was going to hang off the front of the holder:
Added two flowers from the flower jar and put those together using a brad. Put the flowers on the holder using a glue pen. Added pink crystals from the stash. To close the holder I tied two ribbons at the top.
For "Happy Easter" I used a stamp from the SU Teen Tiny Wishes stamp sets and dark pink ink and stamped that onto scrap white card stock. Used the SU Bitty Banner die set to cut that out. Put that banner on the front using a glue dot. Here is a view of the chocolate nuggets in the holder and you could always added Easter grass to fit around the nuggets:
Here is another holder I made, with a bunny on the front, and this holder has a piece of chocolate by Ferrero Rocher and white paper shred from the dollar store:
For the front of this holder I used plaid card stock from Hobby Lobby. The bunny was made using these punches:
Bunny feet is the butterfly punch cut in half, the body and head are the 3/4" circle punch, the tail is the small flower punch, and the ears are the smallest piece from the Blossom Builder punch and I trimmed them at one end using scissors. All pieces were sponged after punching them out using brown ink. Put the bunny together using small glue dots and put it on the front of the holder using a large glue dot.
The "Happy Easter" is a stamp from Taylored Expression Mini Messages stamp set and I stamped that onto scrap white card stock using turquoise ink. Punched that out using a tag punch from M Stewart. Added a crystal from the stash and put that tag on the holder front using a small glue dot.
Here are both holders again:
The best thing about the Scalloped Tag Topper Punch is you can made your tag piece as long or as short as you like --- but the width can only be up to 2" wide as that is the width of the 'channel' on the punch that you put the card stock in. Lots of projects ahead with this punch . . . TFL and YOLO
Saturday, January 25, 2014
The girls and I . . .
Am heading out today to go over to a gal's house from my stamp club and I will be showing a couple of them how to make the cards I learned at the class I took from Daphne at Betty's in Greensboro. Am packing up my supplies and decided I would take the 'girls' along with me. . . This year I am trying to make things I have wanted to make forever but never did -- either due to time or fuzzy directions. Since I am big on how-to's for projects I was so happy to find these 'girls' and clear directions by Miss Kimm at: http://kimmlandmesser.blogspot.com/ She not only explains things clearly but she has photos of each step and this all helps the 'girls' go together quickly. Here are the two I made last night in about a 1/2 hour from a package of 6 pairs of tube socks from the Dollar General:
Tube socks, rice, and ankle socks make up these cuties and buttons and flowers from the stash jars. What hat is complete without accessories?
I used Aleene's glue for the eyes and the buttons. The flowers are on the hats with a brad and the white pom poms are on the hats using glue.
Who would have guessed that with rubber bands and rice you get something cute? A BIG thanks to Miss Kimm for making these and sharing them and a bigger thank you for posting a very detailed tutorial on the how-to's of it all. (She used fuzzy anklet socks for her hats and scarves but with the cold weather I could only find regular anklets --- but I do prefer the fuzzy hats and scarves). Also with the package of tube socks there are 6 pairs in there so you could make 12 of the Snowgirls up from one pack. I bought the big bag of rice from the big W store and that was cheaper than the known brand names rice. TFL and YOLO
Wednesday, October 2, 2013
WHEN did this happen ? ? ?
Luke has been home for two days yet it seems like forever... do we own him or does he own us? He is lying by Dad's chair, guarding:
He already came across a full grown German Shepard that was willing to show off his dental work for little Luke to see . . . Luke ran into Dad's arms -- I am sure just to protect Dad --- haha. Thought I would share a photo since have gotten lots of well wishes for Luke. TFL and YOLO
Monday, September 30, 2013
Guess Who's Coming to Dinner ? ? ?
It is always hard to say goodbye to our pets -- and this one esp since it was hubby's dog/best bud/shadow for 15 years. . . This is Norman --- or Normie as I called him -- and he passed away in January 2012.
This was puppy (Normie) lying in my garden on my Pachysandra next to the bird bath that he was under the impression was a tall water bowl for him . . . DH did not take his loss well but that was to be expected. He had talked about getting another dog but never did anything about it . . . until today --- he said he was ready for a new dog and today was the day he wanted to begin his search . . . well that did not take long -- out of 6 puppies this little guy was chosen as he took right to DH and vice versa.
So Guess Who's Coming to Dinner ? ? ? This little guy is Luke --
He seems to be pretty smart -- his first leash and already he has tried to chew that but I will say where there is a will there is a way --- I gave him Puppy Chow in a Cool Whip bowl as I have not washed his new bowls yet but as you can guess the Cool Whip bowl started to move so what else would you do as a dinner guest but put your foot in it to hold it still??? Silly puppy --- but it worked:
We stopped at the Vet's on the way home and he will be seen on Friday so that will be good. DH is over the moon and happy and that is always a good thing. He named the new puppy Luke and I am happy about that as he suggested Muncie --- like the motor parts --- so Luke it is. A new addition to our family . . . . but certainly no replacement for Normie. TFL and YOLO
Monday, September 16, 2013
Scrow Pops
Had seen the Scarecrow Cards made and here is a photo of some of the ones I had made using the SU Top Note die. Then I saw these little guys made using the SU Curly Label punch:
Too cute and would be great on tags and such --- here is a photo to show the difference in sizes of these guys:
So decided to use the little guys for a tag and two Tootsie Pop holders. Here is the tag first and I used the SU Two Tags die to cut out the green tag from SU card stock. The scarecrows for these little guys were made using Kraft card stock from Mikes and I used the SU Square Lattice embossing folder to emboss them. Sponged the edges and put them together. For the tag I tied on a ribbon and then a piece of hairy yarn around that:
These tags would be good for a candy bag or such. This smaller scarecrow is a good size for smaller items than a card. Here are my two "Scrow Pops" as I call them:
Will start with the holder on the left -- Used white speckled card stock and cut the piece 2 1/4" wide by 8" long. Scored this at 3 1/2" and 4 1/2". Before folding and creasing the score lines I put this piece in the TH embossing folder Textured Leaves. I only put the holder front into the folder and embossed it. The bottom and back of the holder are not embossed. Once embossed I used a corner rounder punch and rounded the top corners of the holder. Using SU Sahara Sand ink I sponged over the leaves and then the sides of the embossed piece. Using the bone folder I creased my scored lines and folded my holder into shape. Using a pencil I made two marks near the top of the holder and then used a small circle punch for the two holes. Put the Tootsie Pop in the holder using a glue dot to hold it in place. Used a small stamp for "Give Thanks" and stamped that onto scrap speckled white card stock. Cut that oval tag out using the Spellbinders Back to Basics Tag set--sponged the edges and then used SU twine and tied the holder shut. Put a clear glue dot behind the oval greeting to keep it in place.
For the small scarecrows -- using the Curly Label punch I punched out a piece from kraft card stock. Then punched out a second label from printed double sided card stock. Drew the mouth on the kraft piece with a black marker and then embossed this in the SU Square Lattice embossing folder. Sponged the edges of this piece. Added wiggle eyes and made a triangle nose. Sponged the edges of the hat and used the SU Trio Flower punch for the flower for the hat and added a crystal. Hair is brown paper shred from the dollar store. Put the scarecrow onto the holder using pop dots. Here is a closer photo of the embossed/sponged holder front:
Now to the second holder:
This holder is made using cream speckled card stock from SU. Made the holder as the other using a piece 2 1/4" x 8". I used the same embossing folder as the other holder but for this holder I used that embossing folder as the background image. I inked the raised side of the embossing folder using brown ink and put the front of my holder only into the inked folder. Closed the folder and ran over it with a brayer. This transfers the inked design onto my piece. Once that was done I rinsed off the embossing folder with water and set it aside to dry. I sponged the edges of the inked front of my holder using the brown ink and then used the bone folder to crease my scored lines. Put the Tootsie Pop in the holder with a glue dot and again made small holes to close the holder with twine. The twine for this holder is the $1.00 twine from AC Moore. Here is a closer photo of the inked background on the holder front:
Used brown ink to stamp the "Thanksgiving Blessings" stamp and used a die from the Sizzix Banners #2 die and stamp set. Put the banner/greeting piece on the holder using a glue dot. Put the scarecrow on the holder using pop dots. Did not round the corners at the top of this holder. But clearly you get two different looks from the same embossing folder:
Tootsie Pop holders are free standing and cute table markers or favors. Easy to do and the smaller scarecrow is a perfect size for the holder fronts. TFL and YOLO
Tuesday, May 7, 2013
Hissy Fit and the Landlord . . .
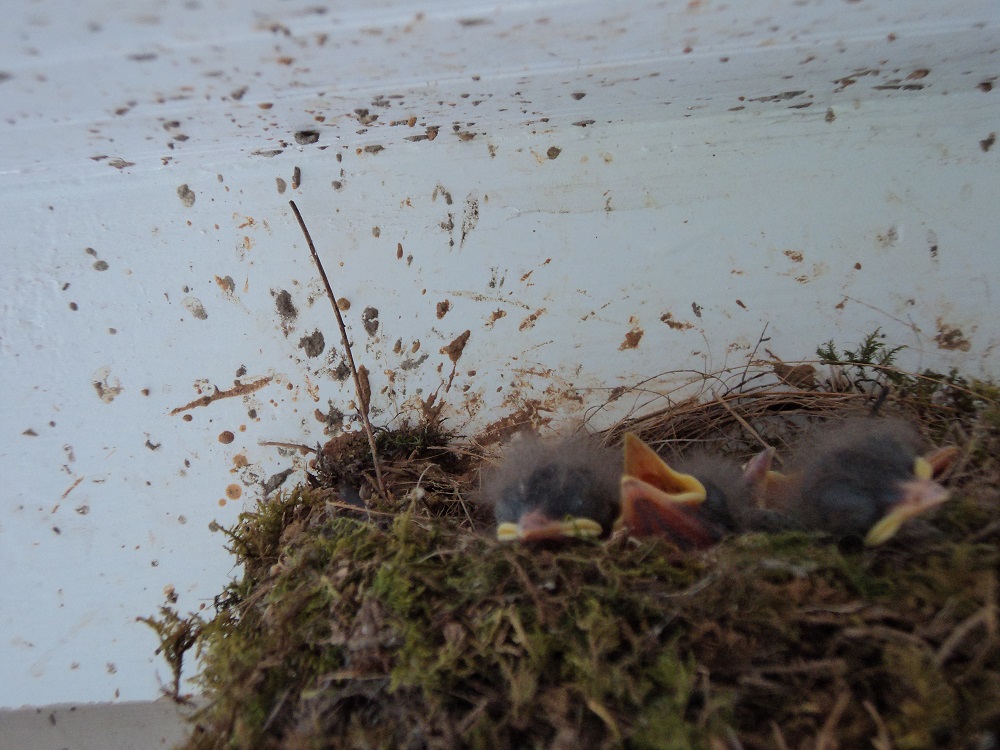
Well, well, well . . . just when you think you have seen everything and that you know some one . . . . I guess you never know... WHAT is that on the bird nest on the front porch? ? ?
It seems that since our tenant had 5 babies she has outgrown her little nest pretty quick. Now the kiddies --
see photo --- are getting bigger and flapping the wings and such.. Here they were on April 29th:
As with any babies once you start feeding them the growing begins. . . These little babies are not anymore little babies and with five of them this spacious nest is not so much. . . DH was concerned that they are getting too big for the nest and with them moving around . . . . plus we noticed at night Mom is having a hard time being able to get into the nest so DH decided something has to be done ---
This is what I came home to today:
It is a platform DH built and screwed into the wall behind the nest and it is smooth on the top for the babies and Mom --- he was afraid they would fall out of the nest since they are getting feathers and moving around so much --- he watched and waited after he put the platform up and Mom has come and gone with the delish fav lunch of bugs and worms (ick) and here is a photo of her standing on the platform feeding the kiddies:
So hoping she is over the Hissy Fit she was having as he was putting up her new porch -- he was very careful not to touch anything or bump the nest but Mom guarded him through the new porch project . . .
I am hoping this will help Mom tonight when she is guarding the kiddies until morning. . . What a landlord DH is --- now if I could get a new porch put up for me that fast --- hahaha.... TFL and YOLO
Subscribe to:
Posts (Atom)