
Thursday, July 18, 2019

Autumn Treat Bag

Here is a photo of the treat bag I made for Autumn - it can also be changed out to be used for Thanksgiving as well:


Recent trip to the Dollar Tree brought home kraft gift bags and fall flowers. Decided I would make an Autumn Treat Bag using these items. Here are the flower bundles I picked up:


Although I like the colours of the flowers they sit too high for my bag front. I used wire cutters and snipped just below the flowers to remove the wired stems. With this done I put the flowers onto the cookie rack I have in the craft room that I had picked up at the thrift store:


With the flowers on the rack I then spritzed them with the Pearls Shimmer Mist to give them a little sparkle. Set these aside to dry.  Once dried I pulled out the stem/flower center pieces they came with and I used a small brad to hold the three layers of the flowers together. I did not want to keep them as high as they were made for my bag fronts. Easy thing to do and I think the brad gives them a much softer look.


For the print on the bag front I used old card stock from the stash and die cut the panel out using the Cheery Lynn die set I had bought from a used stamping sale for $5 earlier this year. I used the largest die in that set. I cut out one of the panel pieces using the printed card stock and then die cut 2 pieces of cream #110 weight card stock from Mikes. Stacked these three layers together using the ATG.

For the foil leaves/sprig pieces by the flowers I used the foiled poster board I recently picked up from the Dollar Tree:


The packs have a variety of sheets in them so you have a lot of choices to work with. I like this because it is like a brushed mirrored card stock and it is a little heavier than the mirrored card stock. I used a leaf punch from EK Success for the leaf pieces and the small sprigs were punched out using a punch from M Stewart.

Used cream card stock from the stash and cut out a large doily using the large doily die from Cheery Lynn. Used a circle punch and punched out a printed card stock circle to put in the center of the doily. Used the ATG for that. With the panel piece done I used a sponge and sponged the edges of the panel piece with matching ink. For the orange/gold ribbon I used tear and tape to put those two pieces across the panel piece. Trimmed the ends off equal to the sides of the panel. I have one ribbon piece at the top of the panel and one at the bottom of it.

For the pumpkin -- I used scrap card stocks and die cut the pumpkin pieces and layered them two or three times for dimension. Used a printed card stock for the pumpkin center piece:


Sponged the edges of the pumpkin pieces and layered them together using the ATG.  Used a die from the stash for "autumn"  and cut that out using the Dollar Tree gold poster board. Put that across the pumpkin front using Glossy Accents. With all the pieces for the bag now done and cut out I assembled it all.

Put the doily/circle piece on the panel front over the ribbon pieces using the ATG. Put the pumpkin on the bottom of the doily piece over the ribbon using pop dots and tear and tape.  For the flowers I needed something to mount them on as I did not want to just glue them to the panel. I used a circle punch to punch out a circle - used hot glue to put the flowers on that. Added the leaf/sprig pieces under the flowers. Punched out a second circle to cover all this under the flowers:


Put the second circle on the flowers circle to give it a cleaner look and I used tear and tape to put the fine gold thread under the flower piece. Put this onto the doily on the panel piece. Wanted to add some more gold to the bag so I used a doily border die from Close To My Heart and die cut the border out of the same gold poster board from the Dollar Tree:


The die cut the gold board on the first pass through the machine. I used scissors and cut the border length in half and put this at the top and the bottom of the panel using red sticky tape:


Using Glossy Accents I added random fall coloured sequins to the doily piece on the panel. This panel was easy to put together once I had done all the flowers and they were dry. Each panel will look different depending on what fall printed card stock I use from the stash. The "autumn" die can also be changed to using "Blessings" or "Thankful" if you wanted to make treat bags for Thanksgiving.


Easy bag to decorate and I like that all of them will look different depending on what card stocks I can dig out of the stash!!  TFL


Tuesday, July 16, 2019

Pieced Halloween Tag


Had seen a few videos by Ginny at Polly's Paper Studio and she has lots of tips and tricks and easy videos to follow.  Wanted to try her Vintage Crepe Fringe Tutorial directions for my tag and here is a link to her video:

https://www.youtube.com/watch?v=cUBFFxlQv7A&t=31s

Here is my Halloween tag:


The back and front pieces of her tag are all scraps from other projects she has made so it was fun trying to layer my scraps together as well as trims to help add layers to the tag.

To begin with I die cut a tag using the #110 black card stock from Mikes for the tag base. Using that same die I die cut a piece of scrap card stock and put that on the back of the tag using the ATG:


As she had suggested in her video I die cut three pieces of scrap card stocks for the front of the tag. These scraps were too small to make a full tag but you need the die cut pieces to fit on your tag base so that is why she suggests using the die to cut your pieces out. Using the ATG I put these scrap die cut pieces onto the tag front.

I wanted to add some washi tape to the front of the tag so I cut a piece of gold spider printed washi tape a bit bigger than the tag. I put a wide piece of tear and tape across the tag front and then put the washi tape over the tear and tape. Trimmed off the ends of the washi tape on both edges of the tag piece. Using tear and tape again I put a piece of black netted trim at an angle across the center of the tag which is under the doily piece. Here is a photo to show these layers:


Used a doily die and scrap cream card stock and die cut a cream doily for the tag front. For my Halloween image on the tag I used a sheet of 6x6 card stock from Authentique from my stash. The page has a variety of images and I used scissors to cut the image out. Used the ATG and put this image piece onto a scrap piece of #110 weight cream card stock. Used scissors and trimmed around the image piece. I did not want the cream card stock to be a mat/frame for the image but to just make the image piece more sturdy.

With the image piece trimmed to size I used another tip from Ginny -- I took a black Sharpie marker and ran it across the edges of the image piece so when you look at the tag from the side you do not see cream card stock or white cores from the prints where I had to trim them. Here is a photo of one side of the tag to show the edges are black on the image piece - I also did this to the tag piece so all edges are black:


Such a simple tip that adds so much to a project....  I used an old mini bat punch from EK Success to punch out the small bats for the tag - I use glittered black card stock for those to add some sparkle to the tag front.  I added black crystal bling from the stash to the image piece. I used tear and tape and put the image piece over the doily. Used Scotch foam tape to put the doily piece onto the tag front.

For my fringed crepe piece I used the hot glue like Ginny had done in her video. I also do not have silver pipe cleaners (chenille stems) so I used black since that was in the supply box for Halloween. For the bow I used a ribbon from the stash and the Mini Bowdabra and made the bow. Added a matte black crystal (from Eyelet Outlet) to the center of the bow. The tie for the tag is Halloween bakers twine. Thanks to Ginny for sharing her idea using the crepe paper for more than a rosette! Fun tag to make and always happy to use the scraps. . . .

Another fun project -- had seen a few videos from Tmika - AKA  Scrapdaworld. In a few of her videos she featured vinyl bows she had made and so I thought I would give it a try. Here is the link to her video:

https://www.youtube.com/watch?v=eGz4ne50bJI

She decorated the center of her bow with some gems/bling but for my bows I used a holographic crystal from the Dollar Tree:


A recent trip to Hobby Lobby I picked up two different thicknesses of their clear vinyl.  This is sold in the fabric department with the home decor fabrics.  Like Tmika I used the A6000 glue to close the bow loops and put it on the bow back pieces. I used my medium bow die from Pink & Main for my bow. Both thicknesses of the vinyl I used worked well for my bows and happy to find out the dies cut easily through the vinyl. Thanks to Tmika for sharing her bows and her how-to's video on those.

Friday, July 12, 2019

Pocket Watch Bears in Blue


My PIC (stamping Partner In Crime) had gifted me a pack of the Neenah Astrobrights card stock in blue and I thought with the shimmer of the card stock it would make a nice Pocket Watch Bear tag for the holidays.  Here is the tag:


For the pocket watch I used the Sizzix/Tim Holtz die. Used Spellbinders circle die to cut out the center of the watch die cut pieces. Also used a Spellbinders scalloped circle die for the white scalloped circle behind the watch. Cut out a circle from a snowflake printed card stock from the stash.

The bear is the Peeking Santa Bear die, the boughs is the Vintage Bells die both from Cottage Cutz. Bows were made from punches from my stash. Used the Aileene's Turbo glue to put the watch layers together. The "noel" is from a Tim Holtz holiday phrases die set and I used Holographic mirrored card stock from AC Moore for that. Poinsettia is a die from the stash. Ribbon and crystals are from the stash.

Here is a photo to show the shimmer of this Neenah card stock:


Also a photo to show the colours on "noel":


For the poinsettia and the bough and holly pieces I die cut those from scrap white/GP card stock and spritzed them with Pearls Shimmer Mist. Added a blue crystal to the center of the poinsettia:


On the back of the watch I die cut a piece of the Neenah card stock to give this a finished look:


The camera does not capture the sparkle and shine of this shimmer card stock but IRL it is very pretty. Happy me my PIC gifted me this pack!!  TFL

Thursday, July 11, 2019

Scripts and Scraps Fall Treat Bag


Working on various holiday projects and am in the middle of treat bags for BOO Day (Halloween).  I am trying to use up scraps and bits and pieces of things for these smaller projects so while I was pulling out printed card stock scraps I came across what is left of a full sheet of printed card stock in my Halloween bin:


This parcel piece of scrap paper turned into treat holders for Fall using the Paper Bag die from Jaded Blossom:


This paper bag die was already out on the craft table so I decided I would use it for Fall treats as well. Here is a photo of the two Fall treat bags I have made so far:


I am trying to use pieces of ribbon and crystal bling that I have in the stash in the craft room but for my Fall projects I also wanted to use burlap for added texture to the projects. Problem with burlap is it is hard to get it to adhere to anything, it is thick and bumpy, and sheds.... Recent trip to a Hobby Lobby I found a spool of thinner burlap (sold where they sell their rolls of tulle by the sewing dept).

To make these treat bags first I used scissors and cut out two of the framed prints on the card stock. Used the ATG and put them onto cream card stock to frame them. Trimmed around the edges of those using scissors. Set those aside. Decided to make the bags using Kraft card stock so they would be good and sturdy but add to the Fall colours I would be using.

Die cut the Kraft paper bags.  Before I assembled those I decided I wanted to put a printed card stock inside the treat bag as a liner. I had enough of the pumpkin print for the bag back pieces. To cut these I measured the curved side of the die itself and then cut the pumpkin print a bit bigger than that. I die cut the print on the curved side of the die and I used the ATG to put it on the Kraft paper bag die cut piece that was still flat and unassembled. At the scalloped top I used a glue stick to get adhesive on that and I put the print on the die cut bag piece. With that in place I used tear and tape to close the bags. With this die you can close it two ways -- with the bottom flap showing on the back and also with the bottom and side flaps folded in. I closed these bags each way to show this:


With the bags made I used more pieces of scrap dotted card stock (long ago from Mikes) to put across the front of the bags. Just trimmed those to the size I wanted them to be. I used the ATG and put these on the bags. For the burlap I cut a small piece to fit on the bag front. Adhesive can show through the burlap so I was careful in how I put the adhesive on. On the scarecrow bag I used the Fabric Tac glue in the center of the burlap to put it on the bag. The scarecrow and greeting banner cover that. For the watering can bag I used tear and tape along the center of the burlap and that works just as well as the liquid glue.

When I had decided to make these treat bags for Fall I looked through the stash and found a small Happy Fall stamp in a stamp set from Divinity Design (ODBD).  Using autumn coloured inks I stamped this onto scrap white card stock and then cut them out into banner pieces for the projects. This way I have greetings in the different colours so all the treat bags will not be the same.

For the bag front I put the dotted piece across the bag front. Trimmed a burlap piece to size. I frayed the edges a little for texture. With the burlap on the bag I cut a small piece of ribbon and put that over the burlap using tear and tape. Used tear and tape behind my greeting banner piece. For the image I had cut off the printed card stock I used pop dots behind them to give the bag front some dimension.  Put them on the bags at an angle.  Added four mini crystals from the stash to the bag fronts.

Here is a photo of each bag:


These photos show the details on the front of the bags closer:


This Paper Bag die cut through the Kraft card stock easily on one pass through the Big Shot. Very easy treat bag to assemble.  Glad I came across the scrap card stock in the Halloween bin that I turned into Fall treat bags.... At least I have more use from the Halloween printed card stock. TFL


Wednesday, July 10, 2019

If the shoe fits . . .


Love the Halloween dies released last fall from LDRS Creative. The first two cards I made using some of these die sets are from the Wicked Boot card die set. This is what the die set packaging and dies look like:


Here are the cards I made:


The card on the left I used all the die pieces in the set for the card:


The card stock base is black SU card stock and the prints are from my stash. For the spider webs and the bats I used mirrored card stock. The greeting "BOO" is a stamp from Jaded Blossom "Halloween Treats 2" and I used lavender ink for that. Added purple crystals from the stash for the greeting piece. The black bow with pearl is from the Clearance aisle at Walmart.


This second card I used all the die pieces but I did not add the bats to the card front. Instead I used an older bug punch from the LONG ago dollar bin at Mikes and I punched out the bugs from black glittered card stock and put them on the card front using glue dots. I also used a small star punch and punched out stars from purple glittered card stock and put those on the card front randomly to add some sparkle and shine to the card front. I turned the decorated tab on the shoe sideways and trimmed some of it off and put the bow on that part of the shoe.

These cards are also free standing:


Fun cards to die cut and decorate. Am sure they will bring smiles on BOO Day for the receivers! Since both card bases are the black card stock I will use the layering piece of this die set to cut out a piece of white card stock for the inside of the card to stamp and write on. Very easy cards to put together since all the pieces needed are in the die set.  TFL

Tuesday, July 9, 2019

Scrap Exchange


Another trip to the Scrap Exchange and lots of goodies to be found . . .   Yesterday DH and I stopped at the Scrap Exchange to see what we could find . . .  Usually when I shop there I do not go on a Monday since they are very busy on the weekends with lots of shoppers but with this weekend being the 4th of July I figured most people would have headed to the beach or the mountains or other family places....

I wanted to go early in the day so we could be home in the afternoon so I could finish more projects I have been working on the craft room.... not expecting to find anything . . .  and then....

My first stop is always the crafts area and lots to be found for me -


Stampin Up Graveyard Gate stamp set - never used/mounted:


$5.00 for that stamp set and the snowflake embossing folder from QuicKutz was 50 cents. . . Happy with that until I pulled down a bin that was over my head on a rack and there I found:


This is the original Bowdabra with wand and I picked that up for $2.00.  I had recently bought the Bowdabra Mini for BOO Day embellishments I have been working on:


So now that I have the larger Bowdabra I can make bows for wreaths and decorations and such so I was happy to find that..... Then over to the bin full of paper punches where I found all these EK Success border punches:


You never know when you buy a used punch if it will punch out the imagine well or not. Since I did not bring a piece of card stock with me I had to wait until I got home to see if they punched well or not and yes they did:


Was happy they all punched the designs well on the first try.... Never forgetting my PIC (stamping Partner In Crime) I stopped at the case that had the Cricut programs and I found one she did not already have and it was $5.00:


I had asked the cashier to open the box so I could be sure the program/keypad/and booklet were all inside and they were.... My PIC seems happy she has another program for her massive Cricut stash and that it was only $5.00!! So two happy stampers yesterday from the Scrap Exchange.  Always nice to find surprises when we go there and you just never know what you will find!  TFL
Pocket Watch Bears


Had seen this project by Carol Hurlock:

http://chocolatecraftsandbearsohmy.blogspot.com/2013/09/cottagecutz-pocket-watch-beary.html

She has lots of projects on her blog but also many videos on YouTube.  She has an envious amount of dies in her stash and what she does with her dies is inspiring. I especially like how she uses a die for more than what the packaging shows.

I made two of the Pocket Watch Bears and they can be used as an ornament, a 3-D tag, or to hang on the handle of a gift bag. First is a photo of the dies I used for my bear project:


Here are the bear projects:


For the pocket watch base I cut it out of white #110 card stock from Mikes. Using a printed card stock from Hobby Lobby I cut out a circle of that using a Spellbinders circle die. I used the ATG to put the printed circle onto the white pocket watch die cut piece. Then I cut out 4 more of the white pocket watch die cut pieces for the layers. I used the same Spellbinders circle die to cut out the centers of the 4 extra white die cut pieces.  Using Turbo glue from Aleene's I glued the 4 cut out circles onto the solid white pocket watch die cut piece with the circle print on it stacking them so they are on top of each other. Set this aside to dry.  Here is what they looked like when I set them aside to dry:


On the back of both of my pocket watch pieces I used matching card stocks for the front of my watches and I left these die cut pieces solid:


I did not put the solid pieces on the back of my watch die cuts right away. The pocket watch on the left I decided to add a scalloped circle die cut piece so while that stacked watch piece was drying I die cut a scalloped circle and then used the ATG to put the stacked pocket watch piece onto the scalloped circle. I used the Turbo glue to put the solid pocket watch die cut pieces onto the backs of the layered pocket watches. (Carol had used a snowflake wreath around her pocket watch but I do not have a die like that so I used the scalloped circle die instead on one of the watch pieces and I left the second one plain).

Using the bear die from Cottage Cutz I cut two of those out and assembled the bears. I used a black thin Sharpie for the bear eyes and once dried I added a dot to the eyes using a white gel pen. I do not have the two bow dies she used so I die cut out the two bows and then used a smaller bow die for the printed bows on my pocket watches. Added a red crystal from the stash to the center of the bows.  For the poinsettias I die cut those from solid card stock. Used green card stock for the bough pieces as well as the mini holly vines. With the flowers and greenery cut out I laid them out and spritzed them with Pearls Shimmer Mist to give them a little sparkle/shine:


Once those were dried I trimmed the greenery pieces and put them together using Glossy Accents and set them aside to dry. For the "joy" on one of the watch pieces I die cut that out of gold foil card stock (AKA mirror card stock). I used the white #110 weight card stock and cut it out again and put these two pieces together using Stick It Sheet to give the word some dimension:


The heavier white card stock helps these thinner letters to keep their shape on the project.  I added a gold crystal from the stash to the poinsettias.

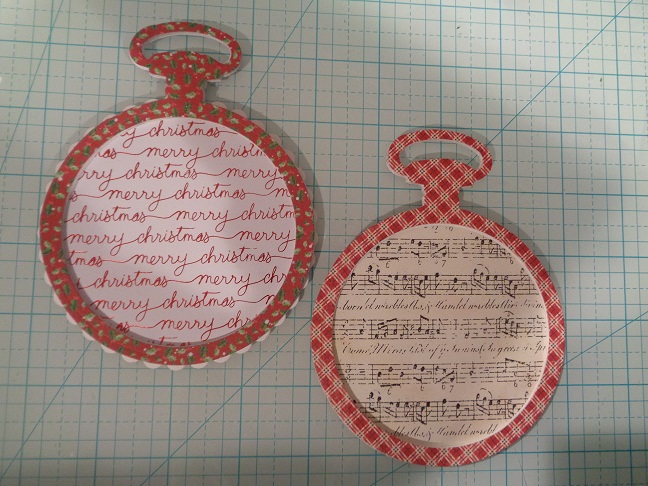
Here is a photo to show the Merry Christmas card stock I picked up at Hobby Lobby this week:


In the photo you can see the words have a foil finish which gives this piece some shine. For the other piece I used the music printed card stock from Hobby Lobby for the background:


Here is a photo to show the "fur" on the bear's hat is from white glittered card stock:


With all my pieces cut, put together and dried I decorated my watch pieces.  First I put pop dots behind the bear and put him at the bottom of the watch. Then put my poinsettia pieces with greenery on the stacked frame piece and then added the double bow pieces.  Using holiday ribbon I tied a piece at the top of the watch.

Here are more photos:


A big thanks to Carol for sharing her cute Pocket Watch Bears and for all the inspiration on her blog and YouTube videos!!  TFL

Wednesday, July 3, 2019

July 4th Cards


Here is a photo of the cards I sent out for the 4th of July:


This card is on a base of navy card stock cut and scored at the top. Used a piece of white/GP for the card front that I embossed using a stars embossing folder. Used the ATG to put the embossed piece on the card front.

For the flag I used an All Night Media striped stamp and stamped that onto white/GP card stock cut larger than the stamp. I used red ink for that. Using a ruler I drew a light pencil line around the stamped striped piece about an eighth of an inch and trimmed the card stock to the size I needed. I measured that and cut a piece of navy card stock a bit bigger to put the striped piece on. Used the ATG to put them together.   Using a square punch I punched out a navy card stock square and put this onto the striped piece using the ATG. Used a Marvy star punch for the white star and put the star onto the navy square using a large glue dot.

I used pop dots and put the flag piece onto the embossed card front. With that done I decided to use clear Wink of Stella over the white star. Some cards have a sparkly star and some of the stars I just left white. This photo shows the Wink of Stella over the star:


Since it is DH's birthday tomorrow I am posting my July 4th card today. If you should be celebrating tomorrow enjoy and be safe!  Happy 4th!!

Put the blame where it needs to be . . .


Put the blame where it needs to be. . . .   and so I shall.... My PIC (stamping Partner In Crime) is the one that started this so I guess I need to put the blame on her.... ;0) 

I had never heard about the craze of using make up brushes for inks/stencils/and such for paper crafting... But happy to say my PIC did and she gifted me a couple of the make up brushes awhile back when she first heard about them.... Videos were all over YouTube using these miracle brushes for inks/stencils and such and now more and more online companies are offering the brushes or their version of the make up brushes -- with stands you can buy to store them in -- for an additional fee . . . . 

I had seen a video by the Frugal Crafter, Lindsay W, on Youtube and she was showing items from a recent stamp show she had attended. She went over the make up brushes and below her video was a link to a set of these brushes on Amazon -- for $14.98 and they are made by the same company that is a big seller of these brushes. . .  More than one online store sells their version of these brushes for $50 and another $17 for their stand to hold them....

Cute but not going to work for me -- both cost and space wise I do not have room on my work table for any other stand/holder etc.... Once I had seen Lindsay on her video off to Amazon I went and I ordered two sets of the brushes -- one for me and one for my PIC.  I also ordered us the egg shape cleaner for these brushes and that was $3.98 for a set of two. Now we both own the ten piece brush set and the two silicone cleaners... We are good to go....

But storing them -- I want my brushes near by and I want them standing up to help the bristles. What worked in the past.... has worked again.... here is a photo of one of the Raskog carts I have by my work table:


This is the top compartment of the IKEA  Raskog cart and the clear divider is also from IKEA. This divider holds my ATG, Post It notes, adhesive, markers, my teflon bone folder and wallpaper seam roller, and then the make up brushes. In the section in front of the makeup brushes are the two silicone cleaners I bought for them. Here is a better photo of the brushes:


This is a can from stewed tomatoes that I washed and when dried I covered it with dotted gift wrap I have on hand. (My can opener takes the lid off with no sharp edges on the cans). These cans are a perfect size for what I use them for in the Raskog cart and they keep the brushes upright and do not damage the bristles. Easy enough to wash out and put the gift wrap on the can to dress it up. Price is great so money I saved on a spinning brush rack can be used for more crafting items!!! ;0)  haha

A BIG THANKS to my PIC for telling me about these great brushes!!!