Wednesday, August 19, 2020

First one thing and then another . . .


HAPPY ME that in today's mail was my newest tool purchase -- the Stacker by the Scor-Pal company. This new tool is sold out at a lot of online stores but I was able to find mine from Rubber Stamp Tapestry - www.pegstamps.com. This product was released earlier this summer and when I found it for sale I was happy that there were two of them left in stock so I ordered one for me!  Here it is:


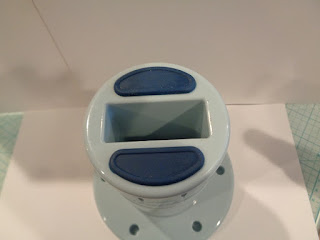
The Stacker is a great addition to my craft room and I know it will get quite the work out by me. The Stacker is assembled so it is already put together for use when it arrives. To save on shipping charges this holder arrives empty and it is suggested that you fill the canister with rice, sand, dried beans, or small pebbles for weight so when you are using it it will stay in place. Here is a photo of the top of the Stacker:


You peel off the two blue oval pieces and fill the canister with whatever you want to use for weight. I filled mine with uncooked rice. Once the two sides are filled you put the two blue oval pieces back on the Stacker and it will be all set. The center of this canister has a rectangle space which is for tools, pencils/pen, bone folder, awl or whatever you want to store with your tear and tape for use. 

Here is a photo of the front of the Stacker right out of the box:


I put three of my favorite sizes of Scor-tape and other tear and tapes on my Stacker for later use:


As you can see as you are using your roll of tape you can stick the end of it to the side of the Stacker for easy use for your projects. This Stacker has rubber feet on the bottom of it so it will not be moving all over the work room table while you are working. Here is a photo to show I have my Scotch adhesive resistant scissors in the canister for use with my tear and tape:


I will probably put one of my extra bone folders and an awl in there for use with the tear and tape. This canister can hold any tape rolls that have a 3" core which is tear and tape and also some of the Scotch foam tapes with the larger core. 

I  had read reviews about this new product before I bought mine and I am happy I ordered it on the weekend and it arrived today.  The only thing the box says is to not use liquid to fill it for weight but to use something like sand, rice, dried beans, or small pebbles. This holder is the perfect size for the craft room work table as it does not take up a lot of space. Plus with your tape rolls fitting over the center canister you will not be misplacing your tape under everything on your table while you are working on projects. 

Another good product from the Scor-Pal people and I am happy I was able to buy one for my craft room.  First the Scor-Pal scoreboard, then the smaller version the Scor-Buddy, then their Scor-Tapes, and now the Stacker.  With the holiday projects I am working on my tear and tape will get lots of use and now I can easily store the tapes and also find the tapes on the work table while working !  ;0) Another great product from the Scor-Pal people!

Tuesday, August 18, 2020

Witch way to use it?


Bought the Witch die from Impression Obsession:


Cute witch but to me I thought it would make a cute scarecrow so that is what I made:


Easy die to put together and whether it is a witch or a scarecrow it is a perfect size for embellishments or on a card front. . . The die has many details like the lines on the hat and the detail of the hair. Plus the buckle piece on the hat slides over the strip of card stock across the front of the hat. For the scarecrow I sponged the edges of all the scrap pieces I used to give him some dimension.

Laundry room DIY


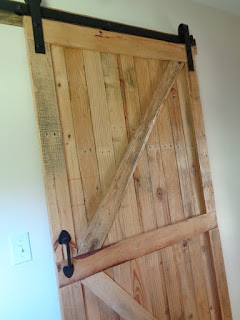
Finally the laundry room is finished and I thought I would quickly post a photo of what we have been working on.... told DH I would buy everything but it had to be on the cheap..... First I wanted a door for the laundry room since it was just a doorway into it.  DH picked up two free pallets and made a door that slides open:


Then I wanted open shelves above the washer for storing the liquid detergent and such:


I had seen other people keep their liquid detergent in a sun tea jar so it is easy to dispense as well as much better looking than a plastic jug of detergent.....  The "Wash/Dry/Fold" sign was on sale at Hobby Lobby. The small plants on the bottom shelf are from Ikea and everything else was from a thrift store or a garage sale that I already had on hand. The shelves are cheap pine that DH picked up at Lowes when he picked up all the hardware for the shelves.  Happy this project is finished and it is certainly nicer to do laundry in a finished room!  TFL

Sunday, August 16, 2020

Treat Bag Fall Topper


Had seen a video by "PaintsandGlitter" featuring her fall embellishments on YouTube and that prompted my latest project. I had a few of the die sets she used but not the Marianne Designs Raccoon die set. I was able to find a new die set of this on Etsy and it arrived this week:


For my fall embellishments I decided I would use them for a treat bag topper for Thanksgiving. Here is a photo of some of my bag toppers flat:


and the bag toppers standing up:


For my bag toppers I used #110 weight kraft card stock from Mikes. I die cut out all the toppers I would need before I began the raccoon pieces. Here is a photo of that die:


I used all scraps to die cut the raccoons and I put them all together using liquid glue. Set those aside to dry. I used the Rosette die from Sizzix for my rosettes and I used various fall printed card stocks from the stash for those. Some of my papers are lighter weight than others so for each of my rosettes I used a 2 1/2" circle punch and punched out solid circles for the rosette base to give them some weight. .

For the "autumn" banner I used the Brenda Walton die from Sizzix and I die cut out a solid card stock banner and then a white or cream banner to put the "autumn" die cut on - again used liquid glue for that. For the "autumn" words I used various glittered card stocks from the stash. Here is a photo of the die set I used for the banner:


For the "autumn" word I used a Karen Burniston die set from my stash:


I used hot glue to put the rosette on the solid circle base. I used either gold or sliver metallic thread for each rosette and added that with the hot glue in the center. Put the raccoon over the thread in the center of the rosette and then added the word banner to each one. Here is a closer photo of some of the bag toppers to show the raccoons as well as the metallic thread on the rosette:


For the flower on her head I used a small flower punch and scrap card stocks. Added gems from the stash to each one. This raccoon rosette fits perfectly on the bag topper for the treat bags. Happy I saw her video and thanks to Raquel for sharing her embellishments for inspiration. The raccoon is super cute and am sure I will be using the die again for other projects. . . 


Sunday, August 2, 2020

BOO Blocks and Bits


Supposed to be cleaning up the craft room from working on all the BOO Day (Halloween) projects I have been working on . . . .   While putting things away I came across a basket of unused wooden blocks from Stampin Up that I had not mounted my stamps on.  Long ago had seen many crafters use their unwanted wooden blocks for holiday decor projects and of course this turned into a "some day" project on my list. . .  until now.  Here is a photo of my BOO Blocks I made using my unused wood blocks:


With all the projects I had worked on for Halloween I had a bunch of die cuts and punched pieces in a bag waiting to be used. I took the bag to the craft table and pulled out items I wanted to use on my blocks. To start the project I die cut out all the glittered letters. I put each glittered letter on top of two regular card stock letters that I glued together to give my glittered letters dimension on the blocks. With the letters done I pulled out blocks that the letters would fit on. I measured each block and cut out scraps of printed card for each block - here is a photo to show my original die cut letters and the prints:


I painted all my blocks using acrylic paints I had in the stash - I used five colours and I used the black paint twice for the letter blocks. I also pulled out smaller blocks to put my jack o lantern pumpkins on and I painted those blocks as well. I set these all aside to dry. With the blocks drying I went back to the card stock prints I had trimmed for each block. I had sponged the edges of these prints after I cut them out but I decided to use the distressing tool on the edges to give them a rougher look.

I laid out the prints on the work table and decided what bits and pieces I would use from the scraps bag for the blocks - this is when I had to decide if I would use a "theme" for decorating all the blocks or if I would just decorate all the blocks separately and then put them together. Looking at all the scraps I had in the bag I decided to just do each block as it's own and then put them all together as they were. Once I had started to decorate my blocks I made the decision having all the glittered letters being black would not work so for two blocks I die cut new letters using glittered orange card stock and one letter from the glittered silver card stock. I die cut those and put the layers of the letters together and set them aside to dry.

I put the printed card stocks onto the wooden blocks using matte finish Mod Podge. For three of the blocks I added a small piece of washi tape and I also used the Mod Podge over the washi tapes:


As for the little blocks with the jack o lantern pumpkins they are not attached to the larger blocks so you could put them on top of the letter blocks or between the blocks:


I used crystals from the stash and added them to the blocks for some sparkle and shine. The mini ghosts on some of the blocks are from a single die from Impression Obsession. I did use a star punch to punch out glittered stars from scrap card stock to add to the blocks. Also I wanted a small pumpkin for the "O" and the "Y" block so I used a small oval punch for those. Punched out three ovals and sponged the edges and put them together and added a stem. This smaller pumpkin fit perfectly on the letters on the blocks.

Easy project to put together for BOO Day. Nice using things I already had on hand and did not need to go to a craft store and buy. Glad to put to use the new wooden blocks from the basket as well as card stock printed scraps and the left over pieces from Halloween projects.