
This is a photo of the gift bag I made for my PIC and I will show what I put inside for her Christmas gifts...

I used the front of a greeting card from the Dollar Tree for the front of the bag with striped card stock from HobbyLobby. Made the silver poinsettias using IOStamps dies. Snowflakes are very dies from the stash. Made the red satin bows using the Bow It All. "Merry Christmas" is a die from the stash and I used red mirrored card stock for that. Here are photos of some of the treat holders I had made for inside the gift bags:


I have shopped enough of the stamp shows with my PIC (stamping Partner In Crime) and taken enough card making classes with her to know what she may like.... many stamp shows we get back in the truck for our trip home only to share what we ended up buying at the stamp shows and more times than not we have the same items be it stamps or dies or card stocks or bling.... We have not been able to shop the stamp shows last year due to cancellations and we have not been able to get together for shopping or classes or anything.... but I knew when I saw things I wanted to buy for me that it would be safe to order one for her. Since I could not be with her when she opened my Christmas presents I decided to make her samples of her gifts using the items I had also ordered for myself. My samples were made using scrap white card stocks and inks that were on the craft work table at the time. Here are photos of the stamps I bought for us both:

This is a Christmas background stamp from Taylored Expressions. This next photo is the ShipLap background stamp from IOStamps - Impression Obsession:


This next photo is of a stencil from Taylored Expressions -- Folksy Firs:

and my new favorite snowflake stencil is the Nordic Snowflakes from Taylored Epressions:

I also gave her a holiday stamp set:

This die set from MFTStamps:

I had bought it for the traditional colours:

but after it arrived I saw on YouTube a crafter used blender brushes for the colours behind the letters:

To wear on her jacket or ugly Christmas sweater I made her a pin:

For the pin I used things from the stash - chains, charms, and beads. On the right side is a snowman with a mittens charm and at the bottom is a snowflake charm. On the right side is a bells charm, an angel, and a heart at the bottom.
For BOO Day my PIC had made this Ferrero Rocher holder for me:

She gave me the info where she had seen this idea and I tracked it back to the originator and I made a HO HO HO Ferrero Rocher box for her - this is what the first one I made looked like:

Here is a photo of the box I had made for her:
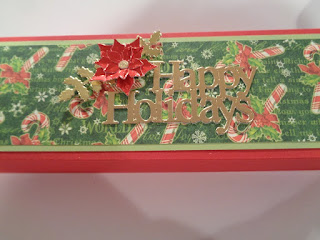

I used red mirrored card stock and for the center I used gold glittered card stock:
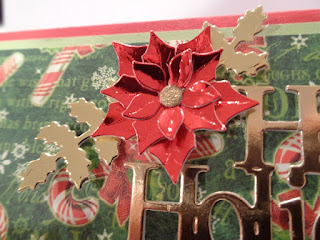
The solid circle piece for the center of the flower fills it in nicely and the glittered card stock gives it some sparkle against the red mirrored card stock. Fun flower to put together and just the right size for this box top project.
While packing up holiday products I came across a new die I had ordered Black Friday week. It has clear packaging and no photo with it so before I put it away I made a sample die cut of the die:
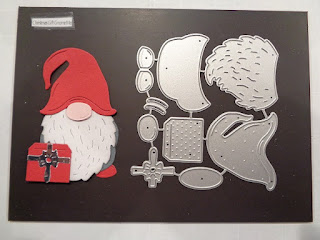

This way next year I have a sample of what this die set is, what it looks like, and the size it makes. The red present in front of him die cuts separately so he can be used without that piece. Happy to finally see the top of the craft workroom table again... but probably that won't be for long.... haha
No comments:
Post a Comment