Friday, September 14, 2018

Gift Wrap Treat Bag


Saw this Christmas gift wrap at Hobby Lobby on sale and I picked it up:


I used a Sizzix treat bag die and cut out my bags:


Really like the red and green together with the gold stripes -- here are two of the bags put together just waiting to be filled near holiday time and decorated:


Once they are filled I will fold over the top of them to close them and probably use decorated larger clips to keep them closed.  TFL

Snow Kissed Halloween Treat Holders


Had seen the video on YouTube by "shoeprincess1" where she made these treat holders:

https://www.youtube.com/watch?v=yyhVzG9q-2Y&t=314s

These treat holders hold three of the Ghirardelli candies and who would have guessed they are made using the stamp and die set Snow Kissed from Heartfelt Creations?


This photo shows two of the holders I made:


Used Halloween prints from the stash for my holders. The holder on the left I used black craft foam and die cut that out. Used glittered card stock for the purple "scream" and a die for that. Ghost is a Sizzix die. The "31" is glittered card stock from the stash:


The orange holder on the right I used a spider web die and cut that out of foil card stock. Used a spider button and cut the back off of that. Put him onto the web using rubber cement. Used clear Wink of Stella to go over his eyes to add sparkle:


Next two:


Used witch shoe stickers for the front of the holder on the left. The shoe stickers are puffed so they add dimension to the front:


The holder on the right I used flocked black card stock and punched out the black cat:


This is the last holder I made:


A Sizzix die was used for the ghost out of white glittered card stock. Here is a photo to show the backs of these holders -- they all have different card stocks on them:


Easy video to follow and thanks to Shoeprincess for sharing it!  TFL

Fall Pumpkin Card


Card stock base is Stampin Up Mustard, kraft is Mikes, card front is Very Vanilla. Plaid print is from Authentique. My PIC (stamping Partner In Crime), had given me some rolled corrugated card board she had picked up on clearance at Mikes so I used that for my "FALL" letters.

Used the alphabet dies from Stampin Up for the "FALL" and I was concerned when I die cut my letters that the die cutting machine would flatten the corrugated card board but happily it did not totally squish them:


Cut and scored the card stock base. Cut the kraft card stock to the size I needed for the card front. Cut the Very Vanilla a bit smaller and cut a piece of the printed card stock into a triangle. Put all the card stock layers together using the ATG and set the card aside.

For the letters I cut out matching letters from Mike's kraft card stock and put the corrugated letters onto the kraft letters using the ATG. This makes the letters stronger and gives the corrugated letters "backing". Sponged the edges of each letter using brown ink. To position the letters onto the card front and to be sure they were even and straight I used the We R Memory Keepers "Thickers" that I picked up at Hobby Lobby on clearance for $2.49. I used the straight template for my letters:


I put the letters onto the template for a photo but I used the ATG and put adhesive on the backside of the letters and laid them just on the edge of the template and put them onto the card front being careful to press the adhesive onto the card front but not to smash the corrugated cardboard.

With the letters on the card front I used a small oval Marvy punch and punched out three ovals from Pumpkin Pie card stock. Sponged the edges of those and put them together using mini glue dots. Used a small leaf punch from Mikes dollar bin (when their dollar items were a dollar) and I punched out a leaf. Put that on the pumpkin top using a micro mini glue dot. Cut a green stem for the pumpkin. Put the pumpkin on top of the "L" in fall using a mini glue dot. Easy card to put together and really like the texture the corrugated paper gives the letters and card front. TFL


Wreath Builder for Fall


Using the Stampin Up Stamparatus, with the Stamp N Storage magnet pad, I used the Wreath Builder for Autumn stamp set by Gina K Designs and I made a wreath card for fall:


Here is the Stamparatus** with the magnet pad and a photo of the stamp set:


Gina K sells the templates for both a 3 3/4" and a 4" wreath:


The templates are plastic sheets so when I first opened my template package I used a black Sharpie marker and wrote the size on each template so in the future I can see which template is which in the storage envelope I have them in.  For my wreath I used the Gina K ink cubes for my inks. Here is a photo showing the first stamping for my wreath:


There are many videos on YouTube showing how to use her wreath template and it is an easy wreath to put together and it keeps it's shape and is either a circle or as on my card an oval. Once my wreath was all stamped I used a dotted background stamp and stamped that on my stamped piece to fill in the black spaces around the stamped wreath image.

I used clear coloured gems from my stash for my card front. The card stock base is Stampin Up Crumb Cake, Really Rust card stock used for the front. Stamping was done on white/GP.

** In the photo showing my Stamparatus you can see an empty Stampin Up stamp storage case. When I use the Stamparatus I put the empty stamp case next to the Stamparatus. When I open the door to the Stamparatus to ink my stamps I lay it on top of the stamp case so the door is level when I am tapping the ink pad onto the stamp. This way the door can not snap off or get broken. The stamp case also helps that I do not have to use one hand to hold the door while I am inking the stamp.

Sunday, September 2, 2018

Treat Bags are done --


Had a time where I did not want to really work on anything in particular until I stopped at the Dollar Tree. Picked up some spider web tulle - black gift bags - gemstone spider rings. Decided these would make up the Halloween treat bags I would make for this year. Just finished the five bags I need and here is a photo of those and then photos of products I used:


To start with the Dollar Tree sells these smaller black gift bags for 3 for $1.00. The tulle and rings are also $1.00 per package. Also their "diamond wrap trim" is used at the bottom of a couple of the bags. The glittered purple tulle and the plain orange tulle is also from their store:


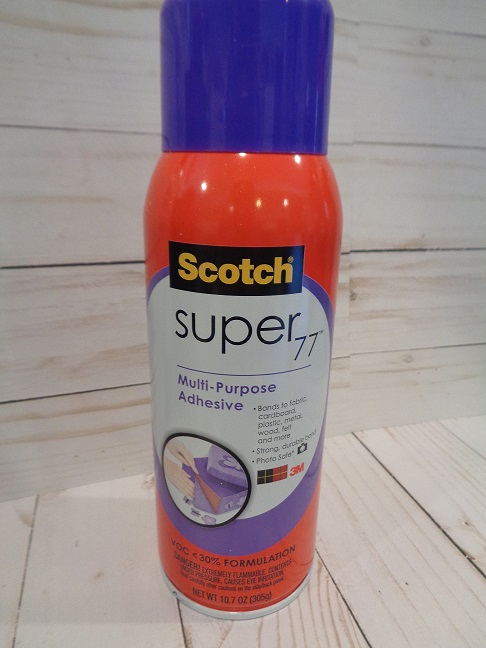
Decided I would use scissors and cut around the spider webs leaving them on one piece of tulle which makes them easier to handle. Used a button shank removal tool and took the ring part off the gemstone spider rings so they would lay flat. I added the flat gemstone spiders to the bag front using hot glue.  I picked up the silver spider web tulle, the gold one, and also an orange one for my gift bags fronts. With my bags flat I cut my web pieces out being sure they did not hang over the edge of the bag front. Using Scotch 77 adhesive spray (got it at Mikes with a 50% coupon) I sprayed the back of my web piece and put it on the bag front. I did this outside as is advised on the back of the spray can. I sprayed all the web pieces and put them on the bags while the bags were flat. Here is a photo of the adhesive spray:


With the web pieces on the bags I then made the ribbon Loopy Pompoms for each bag - I had seen the video by Jeanine J showing how to make these:

https://www.youtube.com/watch?v=7X7W0V82udw&t=9s

Thanks to her for sharing this idea! I made five of the ribbon pompoms using ribbons from my stash. I sprayed them all with hairspray to make them stiff and to hold their shapes. While those were set aside to dry I added sequins and glittered bugs I punched out of glittered card stock to my bag front. Did not know what adhesive would work on the web pieces for the bug and sequins so I used rubber cement with a small paint brush to add that to the back of the sequins and the bugs. Put these all over the web pieces. (The orange, purple, and black sequins are from a package from the kid's craft section at the Dollar Tree. The gold and silver sequins are from my stash).

Used various Halloween dies and cut out glittered and foiled card stocks. Also cut out the same words from the card board from a kleenex box and put the glittered and foiled words onto the card board words using TomBow glue. The card board gives the words shape and also makes them higher than the bugs and sequins so this gives the bag fronts some dimension. Here is a photo of each bag, then the bag front, then the ribbon pompom for each:


Bag #2:


Bag #3:


Bag #4:


Bag #5:


IRL the web pieces on the bag front are very shiny and sparkly. The sequins also add some sparkle and shine. LOVE the ribbon pompoms and her video is very easy to follow and these are very easy to make. Key to them is to use gross grain ribbon as that ribbon is sturdier than the printed satin ribbons and it holds the loop shapes well. What a fun way to add ribbons to the gift bags but not in a bow form.

Am now working on the tags for these bags but am glad they are all finished and will be ready for the Halloween holiday. Will work on my tags and then the treat holders for the chocolates inside that I will add the week of Halloween. *** Tags are below:

For the tags for these bags I wanted something small but also sparkly -- used a small Happy Halloween die from my stash and I cut that out of black glittered card stock. I used all scrap coloured card stocks for behind the die cut piece as well as the scalloped circle behind that:


This black glittered card stock is very sparkly and I bought that at Hobby Lobby. Here are photos of the bags with the greeting tags:


For now I just laid the greeting tag on each bag and I will attach them once I fill the bag with holiday treat holders. Not sure if I will tie the tag on the bag handle or put it someplace on the bag front. Each of the bag fronts are different from the size web piece I cut or the sequin placement, etc.. Will have to see what works with each bag once they are ready for the BOO Day festivities the week of Halloween. Glad they are all done and finished.... now onto other projects.... ;0)

Tuesday, August 14, 2018

PTI Christmas Projects


***  This card was chosen as a Favorites of the Week on Splitcoast Stampers. Thanks to Bonnie for selling me this PTI stamp and die set from her stash!   Thanks to Shirl for adding it to her Favorites of the Week list! ***

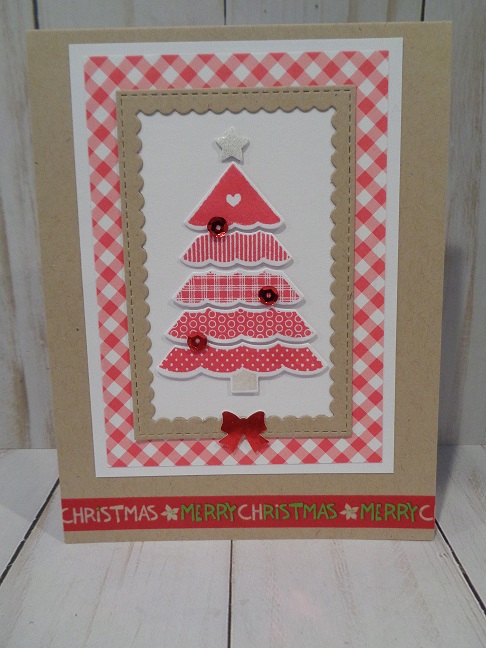
Recently bought a new-to-me stamp set from Paper Trey Ink - Polka Dot Parade #9. I bought the stamp set and the matching die. Here is the Christmas card I made using these new-to-me products:


Card stock base is kraft cut and scored a the top. Used white/GP for the card front and gingham card stock from Hobby Lobby that I cut on the diagonal for my card front. Used a scalloped rectangle frame from the stash and cut out a frame from kraft card stock. Put the frame over a piece of white/GP cut to the size I needed to fit behind the frame.

Using the Polka Dot Parade stamps I stamped all the tree layer stamps using red ink onto white/GP card stock which I had die cut using the matching tree die.  Put these onto the kraft card stock frame piece using double layered glue dots:


Used the ATG and put the framed piece onto the card front. Added three red sequins to the tree and used a bow punch for the red foil bow. Put the bow on the frame piece using a glue dot:


The above photo also shows the holiday washi tape I put across the bottom of the card front to complete the card. Fun stamp and die set and happy to be able to buy it!!

PTI -- PaperTreyInk.com  -- had seen this video on YouTube by Jill Norwood showing the tags she made using the PTI Enclosed: Bell die set:

https://www.youtube.com/watch?v=a18PWWLQVNM&t=582s

Loved her bell tags and I ordered a Bell die set for myself. That arrived yesterday and here are the bell tags I just made:


Easy bell tags to put together - first I decided what printed card stocks I would use for the front of the tag. With that decided I then decided what solid card stock to use on the back of the bell tags. With card stocks decided I cut out the solid back pieces. Stamped "to" and "from" on those with inks to match the tags. Die cut the front printed bell pieces. (I backed those with Stick It Sheet for adhesive). Set the solid bell backs and printed bell fronts aside.

Using the foil poster sheets from Hobby Lobby she suggests I cut out the "Joy" bell die piece as well as the bell clapper piece from the foil sheets I was using for my bells.  I also backed those with the Stick It Sheets since liquid glue could make a mess on the foil die cut pieces. With everything stamped and die cut I began assembly.

First I put all the bell clappers on the printed bell front pieces. Turned that over and put the stamped bell back pieces onto those. With the front and back pieces together I turned it back over and put the foil "Joy" die cut pieces on the printed bell fronts - using the Stick It Sheets for adhesive made this job quick and easy. With all "Joy" pieces in place now I could add ribbons and anything else I wanted to add to the bells. The black print bell has a holly die cut piece on that, the blue has a small snowflake that was punched out of the foil sheet, the green bell I used a bow die for the bow at the top of the bell. Added a crystal from my stash to each clapper to give it some sparkle and shine. Closer to the holiday I will add more jingle bells and holiday icons tied to the ribbons at the tops of the bells. Here is a photo to show the back of the tags:


This is a nice die set and the bells are a nice size for holiday tags. Thanks to Jill for sharing her holiday bell tags and video!


Autumn Harvest Card


Saw and ordered the Sunny Studios Happy Harvest stamp and die set and have not had any time to do much of anything with it other than taking it out of the packaging....  Finally was able to make this card using a technique I have wanted to try like forever..... Was able to use one the stamps from the Happy Harvest stamp sets:


This card was very easy to make and IRL is very dimensional. First the card stock base is kraft card stock with Pumpkin Pie for the card front. The white piece on the card front covered in leaves is a piece of white/GP.

To begin I cut and scored the kraft card stock base with the fold at the side.  Cut the Pumpkin Pie piece to the size I needed. Cut the white/GP piece to the exact size I wanted for the card front. Using a leaves stencil from my stash I laid the stencil over the card front white/GP piece on my craft mat. I used Texture Paste from Ranger to cover the leaves stencil. (Not Embossing Paste).. With the stencil covered I gently lifted the stencil off the card stock and put the stencil into plastic container with warm water - this keeps the paste moist so it is easy to get it off the stencil when I wiped the stencil clean. I let the stenciled leaves white/GP dry naturally.

Once the stenciled piece was totally dry I laid my cleaned and dried stencil over the stenciled piece lining the stencil over the stenciled leaves. With that in place I used washi tape to hold that in place. Using various distressed inks I added ink to my leaves using a sponge applicator for each colour:


For the greeting I cut a piece of white/GP to the size I wanted and stamped the greeting stamp using brown ink. Added a piece of green checked washi tape to the left side of that piece. Using the same distress inks I used on the stenciled leaves I covered a scrap piece of white/GP with inks. Used a leaf die and cut out a leaf.  Used clear Wink of Stella and covered the leaf so it would add some shimmer and shine to the banner piece:


Used the ATG and put the card layers together and then put them onto the kraft card stock base. Added various sequins to the card front for some sparkle. Here is a photo to show the leaves on the card front and the dimension the texture paste gives them:


Fun technique and love how easy it was to use on the stencil for the card front. TFL

Halloween Tree Card


Love the Halloween stamps from  www.sosuzystamps.com and I recently bought the Halloween Tree stamp from them. Here is my card using that stamp:


Black card stock base is #110 weight from Mikes. Purple is from stash. Front distressed piece is white/GP with distressed inks over that. Sponged edges with black ink. Wanted the center of the tree to stand out to show the details of the stamp so used a scrap piece of white/GP and stamped the image onto that using Memento black ink. Then also stamped this stamp onto the distressed card front.

Used a circle die and cut out the white/GP circle. Used the ATG and put all the card layers together. Used foam tape behind the white circle for dimension. Added black sequins to the card front:


Easy card to put together and LOVE the sosuzystamps!  Great images that give you great stamping possibilities!  BOO!