Sunday, February 16, 2025

Stamp Show Columbia, SC

Well.... yesterday was the Stamp Scrap Art Tour (SSAT) stamp show in Columbia, SC.  My PIC (stamping partner in crime) and I have gone to this stamp show for a few years now and it is always in February and it would be the first show of the year we would attend.... so thinking after yesterday it may well be the last time we go to the show in Columbia.... 

As usual DH is our Cuber Driver - "Crafting Uber Driver" for us and he drops us off at the show and then he will go to a flea market or swap meet in the area while we are at the show. Before we attend the show we always check to see what vendors will be there and then plan our shopping..... this year there were maybe 6 vendors after you take out the local Stampin Up booth and the local Close To My Heart booth selling off the rest of their stock since CTMH has closed.... but we still wanted to go to the show so plans were in place. 

Since DH was driving us he wanted to take his truck as usual so the night before I put things in the truck for the trip - my tote bag for shopping, my printed out list of things I was looking for as well as my print out of ink colours I had just bought. So the next morning I loaded up the cooler with our drinks, water, snacks, and ice for our trip and headed out to the truck in the rain with that only to find the truck was leaning to the right in the front - it was dark out so I got out my phone and turned on the flash light..... right away I knew why the truck was leaning..... flat front tire but luckily only the bottom was flat.... haha

DH was not laughing when I told him so I suggested we take the car instead so everything had to be transferred to the car for the trip. I did not want to try to deal with the flat since it was dark out with us leaving so early for our trip.... and raining.....  so everything was put into the car, my PIC pulled in and we headed out for our 3+ hour trip to Columbia in the rain..... Along the way we stopped at Buc-ee's and picked up a breakfast and headed to the show. With road construction all around Columbia we did not arrive to the show until shortly after the opening at 10AM but we were happy we made it... 

We filled out the door prize ticket they give you and looked at the program they hand out and we were not too happy.... usually at these shows vendors will have coupons or sales. Maybe buy 2 get one free for the first hour or two of the show or they will have different specials throughout the day. This is the first show we have attended where there were NO specials/coupons/sales or freebies. We looked at the vendors set up and there were not too many of those.... We shopped the CTMH booth but that seller's prices were too high for us as many of these items sell for less on Ebay. We walked around and we stopped at The Ton booth - they were the only vendor that had a show special - spend $300.00 and get a free tote bag but only one per day..... Certainly no tote bag for me....  I did buy a few things from them but I will say their prices are high. They have their version of the popular postage stamp sets with matching stencils and dies but their prices are $5.00-$7.00 higher than Waffleflower who also sell the postage stamp products. This is what I bought from The Ton:


I also shopped the Northwoods/Verses stamp booth and picked these up:

We also stopped at the Eyelet Outlet booth and then we were finished. Called DH and he said he was in the parking lot so we headed to the car. Our plan for this day was to shop the stamp show in Columbia and then drive another hour and a half to shop at a recycle/reuse crafts store in Greenville that we have shopped at in the past when we went to the show in Columbia. Last year we shopped that store and I bought a few things there -- a stamp set, metallic thread, wooden stamps, steel ruled dies but that was it.... 

We arrived at the ReCraft Creative Reuse Center store in Greenville around 2:30PM after DH had stopped at a classic car place also in that area. Since we arrived so late in the day I certainly was not expecting what we found!! I saw a heat press and I sent a photo to my DSS to see if she wanted that but she said it was the same size as the one she already had... I walked over to the paper crafting section and they had a sign to fill up a small bag of wooden stamps and pay a flat price. I was looking through the stamps when my PIC asked if I wanted any ink pads?? I do not buy ink pads from these places unless they are in mint condition or sealed - she said these ink pads were sealed and brand new.... so I looked and there were a lot of the Distress Oxide ink pads that were new and sealed so I checked those against my list I had of my colours and I picked up those for $4.00 a pad. For these inks alone I saved well over $100.00 buying them yesterday there than if I had bought them online and plus then I would have to pay shipping.... I also got two of the Iris bins for $2.00 each, a few wooden stamps, some Simon Says Stamps stamps/die set bundles, and a few dies. Here are the Oxide ink pads:

Also picked up a sealed ink pad from Catherine Pooler, Sage. Here are some of the stamps/die bundles:

Bunny stamps/die set is from the SimonSaysStamps "Just for You" release and these are brand new and the set was $8.00. Another SSS bunny die - $1.00:

Next to the bunny in that photo is a holly/berry die set from My Favorite Things (MFT Stamps) and that was $4.00 but inside is two sets of that die set so I am giving the extra die set to my PIC. Picked up a Halloween stamps/die set from SSS:


WaffleFlower holiday lights die set:


I picked up a package of the Stik-It sheet from Ken Oliver as well as a stamps/die set from PaperTreyInk. This set has flower stamps, a second sheet of leaves and stems stamps, and then the matching die set as well:


My PIC also found the clear bottle holder by Scrapbook.com for me - it was new in the box:


I also picked up a few of the wooden stamps and a couple of them are garden related as I am working on a project for Spring and these stamps are perfect:


As I was looking through the stamps and die sets I also looked for items I pulled out that my PIC maybe would be interested in -- she wants to make a postage project using a stencil and I told her that Waffle Flower sells small stamp sets that have the stamp price stamps, or a holiday postmark, etc.. When I was going through all these sets I did find two of the WaffleFlower postage stamp sets for her - $1.00 each! Plus not only did she get them for a great price but she did not have to pay shipping from an online order! So I must say I was certainly happy with all I found but that was NOTHING compared to my PIC and her finds!

She found 76 BRAND NEW, still sealed, Simon Says Stamp ink pads for $4.00 each! With what she paid for those at this store she said she saved over $265.00 just by buying the ink pads for $4.00 each and not having to pay for shipping. (Those ink pads sell for over $7 each online)  She also picked up other things she was happy to find and off to the register we went with all this stuffs... The cashier told us they had just put all the ink pads and stamps/die sets out and that we really scored with this stuff --- my PIC and I were thrilled that that late in the day we would be able to find such great items to bring home to our craft rooms!

I took all the wrappers off my Oxide ink pads and swatched the inks using scrap white card stock from the stash. I use card stock rather than a label so I have a true shade of the inks:


Put all the ink samples on the ink pad cases:


Put all my new ink pads on my new Scrapbook.com acrylic ink pad holders:


Once I started buying the Oxides I bought a set of the blending brushes on sale with the coloured handles and I keep those in a cup near the inks. My other blending brushes have black handles and I bought the coloured snap on plastic clips for those so I know which brush is for which colour. Keeping the Oxides blending brush separate so they will not get mixed up with the regular Distress Inks I have and the blending brushes I use for those as well other inks. 

Will have to say we both agreed we did so much better at the ReCraft store than the stamp show!! After we left there we headed to Olive Garden and then the drive home.... left in the dark for the show and got home in the dark from our trip....... Happy to get to spend the day for our craft rooms but I am thinking this is the only show I may go to this year as they are getting smaller and smaller... also -- 

Franticstamper.com  is closing her store and having some closing sales and she said she will be adding more items to the closing sale as she gets closer to her closing date. My recent Happy St. Patrick's Day card I used her Shamrock cover plate die and I have a lot of her brand die sets. Great designs and great quality! Sorry to see her close but more and more this is happening...... 


Wednesday, February 12, 2025

Heart Gift Bag Die Set

 www.happycraftershop.com   came out with new die sets for Valentine's Day and I bought her Heart Gift Bag die set to make two Valentine's Day treat holders:

The dies cut out so well - the red card stock is from the stash and the kraft card stock on the right is by PaperTreyInk and it is a thicker card stock. The die cuts out the base and side pieces, then you cut out two heart shaped pieces - front and back - for the bag and the handle is part of that die so all one piece. It also has a layering piece for the front/handle for the bag and I also cut it out for the back of the bag:


I made a few treat holders for these and I put tissue, the treat holders and chocolates in the bags:

To decorate the front of the bags I used a heart die and cut out a red heart from red glittered card stock. I also used two bow dies from the stash to add bows by the handles. Once the bags were filled with treats for Valentine's Day I put them in 5" x 11" cellophane bags (from candy aisle at craft store) and tied the bags closed with red ribbons:


Such a cute treat holder for Valentine's Day and it could also hold embellishments or a small gift or a die set, etc.. Nice size treat holder! Another fun die set!

Sunday, February 9, 2025

St. Patrick's Day Card

Recently I posted a tip by Natalie on her YouTube channel "NB Cards" for adding liquid glue to thin die cut pieces without the mess.... I tried out her tip and was so happy it worked.... so fast forward to making St. Patrick's Day cards.... Long ago I had bought the "Shamrock Card Panel" cover plate die set from Frantic Stamper to use for St. Pat's cards. Only problem is the lines on this die set are very thin and adding any type of adhesive to this die cut piece to adhere to a card front was not easy.... so I gave up and stored this die set in the stash until I could figure out something... Happy I saw her tip because I used it on my card today. Here is a photo of the card:

To start this card I cut and scored a dark green card stock at the top for the card base. I then tried out the smoosher Natalie uses on her YouTube channel for my background base. With that done and dried in between each colour of ink I trimmed it to the size I wanted for the card front. Set it aside. 

Here is a photo of the Frantic Stamper Shamrock cover plate die:

I cut this Shamrock die out of white card stock. Then I used a frame die set from the stash and also cut that out of white card stock:

Here is a photo to show her tip for adding liquid glue to my Shamrock cover plate die piece: 

Used the brown craft mat, squirted out a little liquid glue, and used a silicone brush - bristles cut close to the handle. Bounced the silicone brush into the glue and then bounced this all over the back of the shamrock die cut piece to add adhesive. Put this glued piece on top of the smooshed background card front. With that put together I used tear and tape and put my white framed die cut piece over the shamrock piece on the card front. Rinsed the silicone brush off in water and all glue came off. Set this card front aside to dry. 

Used this die set by Karen Burniston for the holiday greeting and cut it out twice from green card stock. Cut the shadow piece out of vellum:

I cut out two of the shamrock pieces from gold poster board from the Dollar Tree and used liquid glue to add them to the greeting piece. Used liquid glue to put greeting layers together and then to add them to the vellum shadow piece. Once all glued I put this on the card front. Added green gems for some sparkle and shine to the card front:


Happy I was finally able to put the Frantic Stamper Shamrock cover plate die to use and happy with the smoosher technique and also the liquid glue silicone brush tip. Thanks to Natalie for sharing her tips and tricks for card making!


Happy Valentine's Day Card

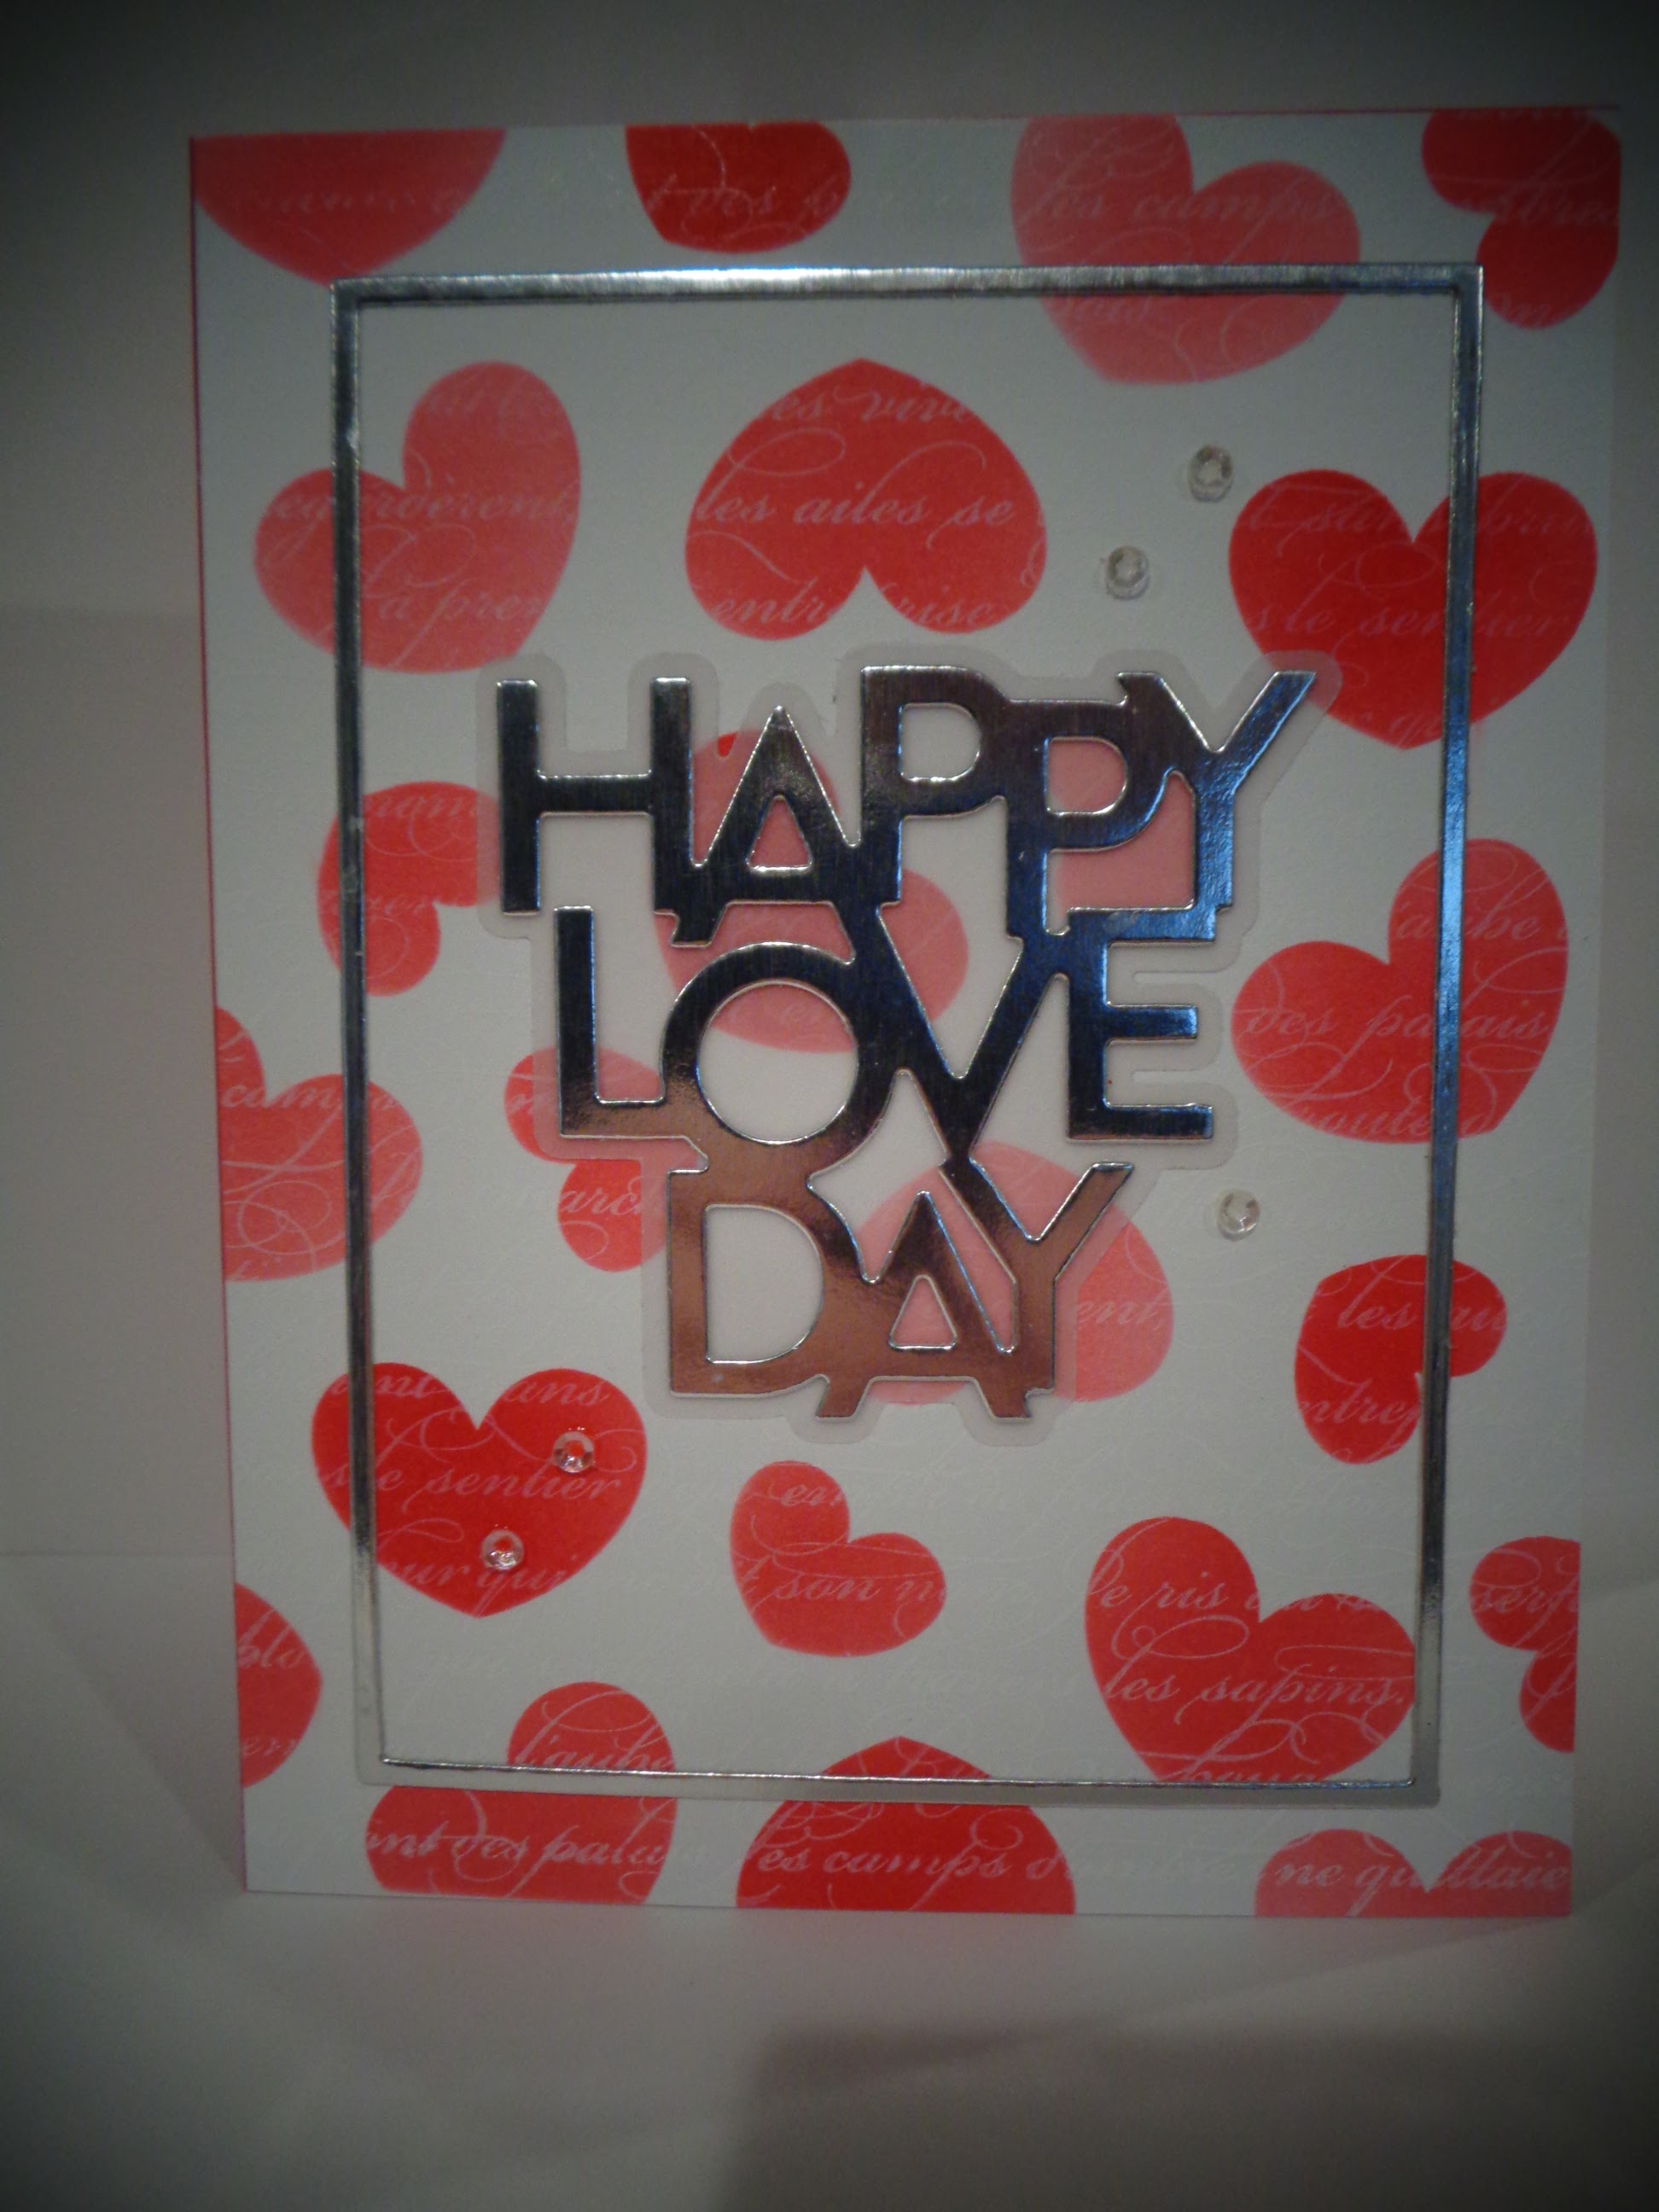
This year I used the new bundle from Concord & 9th by Kristina Werner "Happy Love Day" for my Valentine's cards. She has done a lot of work with Simon Says Stamp in the past and I was happy to see she was now releasing her own product line with Concord & 9th. The bundle has a four piece stencil set, the greeting die set, and a small stamp set. Here is one of my cards:

Her stencil set has the four heart stencils for layering and these stencils are 6" x 9". This is nice because you stencil a larger piece and when done you cut it in half and it will measure 6" x 4 1/2" which gives you two finished pieces for card fronts. Once the stenciled hearts were done I went through my stash of background stamps and found a French script stamp and I inked that with white ink and stamped it over the stenciled hearts. Set these aside to dry. 

Used the Ellen Hutson framed die set and cut out my silver frames from foiled poster board from the Dollar Tree. This is a very thin frame so how to put it on the card front so it is straight and not wavy? 

I cut and scored my red card stock base at the top for the card. Trimmed my heart stencil card front piece to the size I needed for the card. To put the silver frame on the card front and to be sure it was straight I used the center piece this frame die cut out and laid that onto the stencil piece - then I added glue to the back of the frame and laid that over the center piece to keep it straight. Once the thin frame piece was on the card front I removed the center of the frame piece:

Set that aside to dry and I cut out the "Happy Love Day" greeting from the silver poster board and for the shadow piece I used vellum from the stash. Use liquid glue to put those together. Used liquid glue and put the card front on the red card base. Used the same glue to add the greeting to the center of the frame:

The above photo shows the greeting added and it also shows the white background stamp stamped over the stenciled hearts. I stenciled all my cards using this stencil/stamp/die bundle set and half the cards after I stenciled the hearts on I used a small circles stencil and added red circles to the stenciled pieces and here is what that card front looks like:


Happy these cards came together quickly and easily with stenciling a larger piece of card stock at one time. For the inside of the card I used a wooden stamp from the stash and I stenciled one of the red hearts above the stamped image:


Love the larger sized stencil set -- love the fat, curvy hearts and how easily it was stenciled and when done I cut it in half for two card fronts. Certainly saves time ..... ONLY thing I wish this stencil set had was numbers on each stencil so you know which order to stencil them in but I used a black Sharpie marker and numbered them myself. Easy cards to put together for Valentine's Day!

To complete the cards I added holographic sequins from the stash:


Saturday, February 8, 2025

Another shopping nudge while tagging along . . .

This morning hubby wanted to run some errands so I decided to tag along but I asked if we could stop at a nearby Restore where he was running an errand to see what they had.... this store never has craft items but a lot of household and building items. We have shopped this Restore before -- my biggest find there was the set of Royal Doulton Mosaic Garden china  I picked up for one dollar a piece and that certainly made me and my china cabinet happy..... but today I came across a first.....

I walked in the store and on the shelves by the front door was lots of paper crafting supplies -- I went through the stacks of 12 x 12 card stock pads and picked up a few of those -- they also had sealed Stampin Up card stock packs and all pads of card stock and packages of card stock were one dollar each:


Also two mats from Fiskars - one dollar each:

There were two bins of stamps - wooden stamps a dollar each and stamp sets from Close To My Heart also marked a dollar each. I picked up two wooden stamps and one of the CTMH stamp sets:

Also brand new Xyron refills for $1 each so I picked those up for my small Xyron:

Also in one of the bins of misc items were die sets for 50 cents:


The die sets I picked up are by CottageCutz as well as a couple from My Favorite Things (MFT stamps) again for 50 cents each. I picked up a loose die for a pillow box and under that is a Christmas stocking die set. Here is the stack of stuffs I picked up and certainly happy I tagged along for errands!


Now to put it all away..... just finished re organizing my card stocks so hoping it will not take long to get things in their new homes.....

Tuesday, February 4, 2025

Finishing up the Valentine's Day Treat Holders - - -

All my treat holders/bags for this Valentine's Day are all made using this printed card stock from Triplicate that I found on Amazon:

When I decided what treat holders I would make for this year I decided to hit the stash first and see what colour paper gift bags I had on hand from the Dollar Tree. I came across bags that are a brick red and when I saw this paper pad I thought it would be perfect for all my projects this year. I had made my list of projects I wanted to make using my altered clipboard for Valentine's Day so that I could keep track of things I wanted to make..... was just about to start on my last treat holder when.....

www.happycraftershop.com  changed all those plans..... I saw they had a new release out for Valentine's Day and she has the Heart Gift Bag die set and I knew I had to order that right away! Here is a photo of the front of the die packaging:

The backside of the packaging has the stitched lining die pieces for both the bag and the sides. It also has the side pieces and two heart shaped tags..... Here is a photo of just two of the Heart Gift Bags I have put together for this year:

The printed card stock works well with the solid darker red card stock as well as the kraft card stock on the second bag. The kraft card stock is from PaperTreyInk and this die set cut right through that thicker card stock with one pass in the Big Shot with no shims. The nice thing about this die set is both the lining piece for the printed card stock cuts out the front of the bag as well as the handle piece and being all one piece it is easy to put onto your solid bag base. Here is a photo of the red one, front and back:


And the kraft bag:


For the fronts of the bags I used a heart die set and cut out a heart using red glittered card stock. The bows on each bag front are die cut from red foil card stock and I used a bow die set from Scrapbook.com, their brand. 

This bag will hold a lot and would be good to hold embellishments, small die sets, lots of chocolates, etc. The width is approx 5 inches across the front and approx 5 1/8 inches high - from the bottom of the bag to the top of the handle.  Very cute treat holder and very easy to assemble. This is my first die set from the "happycraftershop" and happy I saw it for Valentine's Day treat holders!


Sunday, February 2, 2025

Valentine's Day Treat Holders

Here are some of the treat holders I am working on for Valentine's Day. I bought the Heart Top Box from the new release at My-Creative-Time.com:

This is a four piece die set and very easy to decorate and assemble. You cut the box die out twice for the front and back of the box and the die set has two panel die pieces for the front and sides of this box. Here are photos of the box and showing the side panels:


I used PaperTreyInk kraft card stock for the boxes and the panels are papers from a vintage pad of paper by Triplicate that I bought on Amazon. I used red washi tape from the stash to decorate the top of the box. All I have to do is fill the box with chocolate treats and add a tag.... I used the lollipop die set from MFT Stamps for my Tootsie Pop holder and I used the Sizzix Rosette die for the rosette. The cream doily was die cut from a small doily die from my stash:


Here is a photo of the lollipop die set as well as the Rosette dies I used:


Also my accessories for when I make the rosettes:


First I have a dauber handle tool that I use to make my rosettes with - I punched out a small circle from my brown craft mat and glued that to the bottom of the dauber handle tool. When I use the hot glue to make my rosettes I press down on the top of the rosette using this dauber tool and I do not have to touch the hot glue on the rosette. This next photo shows the circles I have made as patterns for my tulle I use on the rosettes:

I keep the different sized circles in a bag so when I need a certain size I can easy lay it on the tulle and cut out my circle to fit whatever size rosette I make.

Added sparkle red tulle to the front of the rosette and metallic red thread behind the die cut heart I added to the center. This next treat holder was so easy to assemble:


The die set to make this box that holds four Hershey Nugget candies is:


This Art Impression die set has small pieces to die cut card stock pieces for the side panels of the box but I wanted to use scrap pink gingham card stock I had on hand so I just measured the panels and cut out my pieces and put them on the box panels using liquid glue. I used SimonSaysStamp Cotton Candy card stock for my boxes and I die cut a heart from the box top for a window. I used clear sheet to line that cut out piece. To keep boxes closed I used a little velcro dot. 

For the small pillow box treat holders I used a die set from FunStampersJourney to make the box and I used red card stock for those:


Here is a photo of the die set


The hearts I put on the fronts of the pillow boxes are the hearts I had cut out of the pink boxes for the windows:


Still have to add embellishments but mostly done with treat holders and the bags they will go into. Happy to have the Heart Top Box die set from MCT - nice size and free standing!