Sunday, February 20, 2022

St Pat's Cards

 Not a huge fan of St. Patrick's Day -- I do make cards but I do not make treat holders and such. Earlier this year I had ordered the Gnome die set from Jaded Blossoms. For Valentine's Day they sold a die set for the original Gnome die set - Valentine Gnome Add On I believe it was called. I did not order that add on set but.... 

When I saw the St. Patrick's Day Gnome Add On die set I placed my order. Here is a photo of that set:


A recent stop at Hobby Lobby and I picked up a new St. Patrick's Day card stock print for my cards for this year:


The shamrock print was more of an emerald green and I knew I had solid emerald green card stock for my card stock bases in the stash so I was happy to find this print. Using my scraps I decided to cut out the gnome for St. Pat's. With this die set having so many tiny die pieces I decided not to cut the die pieces apart but to keep it as a one piece die set:

Die cut the gnome base, hat, nose, shoes, and beard from the original die set for the gnome. From the St. Pat's set I die cut the hat, pot of gold, hands, and shamrock using scraps. Assembled the gnomes and here he is:

I have the Diagonal Stripes hot foil plate in my stash from Spellbinders and I wanted to use that for background for the gnome. To start with I cut the emerald green card stock for the card base with it scored at the top. Used a piece of white card stock for the card front and trimmed the shamrock printed card stock for the card front. Put the card pieces together using the ATG. With all my gnomes die cut and assembled I decided to foil a background frame piece. 

Using the Hammermill card stock I used the Glimmer hot foil machine and Spellbinders diagonal stripes hot foil plate and their gold foil for my background piece. Once the white card stock was foiled I set that aside. Using the PinkFresh solid hot foil plate I used the same piece of foil I had just used on the white card stock background and foiled that onto a new piece of white card stock - once that was done I peeled off the wasted foil piece and this was all that was left of the wasted foil:


Here are two cards I made using the same piece of gold hot foil:

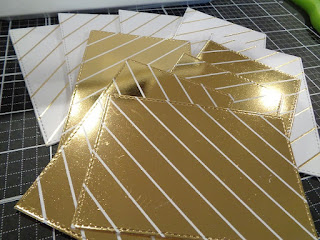
The card on the left was the first piece that was foiled and the card on the right uses the wasted piece of the gold foil left from the first card. For the foil panels once I did all the foiling and then used the solid plates for the wasted foil pieces I used the Stitched Stax Rectangle die set from MFTStamps to die cut the foil panels behind the gnomes:
The one thing about the solid hot foil plate is because it is solid it not only holds the heat longer but it is also a heavier hot foil plate. My magnetic pick up tool from Spellbinders can not lift and hold the solid hot foil plate off the machine over to the rubber cooling mat that comes with the machine. So off to the kitchen I went and now when I lift the solid hot foil plate off the machine I use a spatula to lift it up and over to the cooling mat:

Definitely an improvement using the Hammermill card stocks for hot foiling. Also I use the "hinge" method to keep my hot foil plates straight and where I need them to be on my card stock. Will say PinkFresh has many really nice hot foil plates but I had a hard time trying to buy their Perfect Sentiments - Holiday hot foil plate with matching die set..... Everyone had it sold out or on a back order. I wanted to buy both the hot foil plate and dies together but finally gave up on locating any sets anywhere..... decided I would try to buy the die set from one place and hot foil plate from another.... 

Was able to buy the die set from a seller on Etsy and then bought the hot foil plate from EllenHutson.com during one of her 20% off sales. That will probably be my next hot foil project so I will have lots of holiday greetings ready for cards and treat holders for Christmas. Very happy I was finally able to buy these two products for holiday hot foiling..... 


Also my PIC (stamping Partner In Crime) had gifted me the foil trimmer from Spellbinders and that is what I trim my foil pieces with and it cuts down on static and keeps the foil flat when trimming it to the size you need:

Also -- this a size comparison photo of the Jaded Blossoms Gnome I used on my St. Patrick's Day cards and the Gnome from SimonSaysStamps release awhile back:


Happy the St. Patrick's Gnome arrived this week and has already been put to use in the craft room. DH wanted to stop at Harbor Freight this week so I picked up a couple of plastic bins for organizing smaller items in the craft room:

I like the smaller boxes inside also snap closed so it will keep smaller beads or bling together in an organized space.... never know what I can find at Harbor Freight for the craft room..... Off to clean up and start on Easter projects this week - will post those once I get them done.... 

Foil Friday - - -

 Spellbinders Glimmer Hot Foil machine joined my craft room long ago but when I used it I was not happy with the wasted foil left over from the projects/cards I had foiled.... and there the machine sat.....

Fast forward to now -- here and there I have watched videos on YouTube for hot foiling with many tips and tricks and all. . . Then came the solid hot foil plate from PinkFresh from Heather. I watched videos using the solid hot foil plate and thought I would give it a try hoping it would do as they said using the waste pieces of the hot foil. 

I ordered the solid plate with other hot foil products from PinkFresh:


When my order arrived I put my hot foil plates in the plastic sleeves that I bought on sale from EllenHutson.com. I use a red Sharpie and marked the top of the packaging - D means there is a matching die with that hot foil plate and I keep that die in the plastic sleeve with the plate. The S means there is a matching stencil and that is also in the plastic sleeve with that hot foil plate. 

Using the Tiny Hearts hot foil plate from PinkFresh I made a sample piece using the Glimmer Hot Foil machine:


For this sample piece I used no extra shim just to see how my Big Shot would work with the hot foiled piece. 

Clearly by the sample I saw that I would need one card stock piece as a shim to add to my sandwich for my Big Shot machine. I added the shim piece and again used the Tiny Hearts hot foil plate with gold foil for the front of my Valentine Cards:


Watching all the YouTube videos on hot foiling I learned the best results with foiling is using the Hammermill card stock. I ordered my card stock from Amazon. When it arrived I cut a good amount of the sheets into four pieces and I keep them in a covered box with my foil supplies and machine on the Raskog cart I have set up for hot foiling. My gold foil is from Spellbinders and the red heart is glittered card stock that I die cut with a large heart die. The "love" is a hot foil plate from SimonSaysStamps and I bought the matching die set for that and I keep them together in the plastic sleeve I keep my foil plates in. 

My second Valentine's cards I made this year I used the hearts stencil from Maker Forte and this was my first purchase from them:


Their stencils are larger than an A2 card so you can stencil a larger area if you want to using their stencils. Here is my card:

The stencil design almost looks dimensional and that the smaller hearts are just floating on the design. Their stencils are nice quality and they are made in the USA. Fast shipping as well. Two fun card designs using new products in the craft room.....

Crafting assignments - -

 Decided this year I am making a plan to work on holiday items throughout the year for BOO Day, Thanksgiving, and Christmas. This post is my first for Christmas for this year:


This first project is a triangle treat holder from I-Crafter:

This is an easy die to cut out and assemble and this was the first Santa Box:

The die set has pieces for the face, cheeks, eyes, nose, beard, and holly/berries:


I had seen a video on YouTube featuring this Santa Box die and I had not heard of the I-Crafter line before. For my Santas I used holly/berry stickers I had bought after Christmas on sale at Hobby Lobby so I did not die cut those out. To close the box you use a piece of ribbon or twine after you add your treats or small gift. Used card stocks from the stash for the boxes. Cute treat box for the holiday!


Valentine Gift Bags

 These are the gift bags I made for Valentine's Day:


I used kraft gift bags from Hobby Lobby for the bags. For the patterned card stock for the bag fronts I used only prints that I had in my stash. For the tic tac board - I used 1/4" wide strips of glittered silver card stocks. For the "XO"s I used an alphabet die from the stash and die cut the letters out of silver poster board sheets from the Dollar Tree. The glittered red hearts were die cut using a die set from the stash and the card stock was in the stash:


Used a sheet of adhesive pearls from the Dollar Tree that I cut into strips to fit around the front printed card stock on the bag front. Put all the letters and hearts on the bag front using tear and tape. 

To hold the "Happy Valentine's Day" greeting strip (stamp from the stash) I used wooden clothespins from the Dollar Tree. I used a small paint brush and covered the front of the clothespin with ModPodge and then put a piece of washi tape on that and covered that with ModPodge:


Once the ModPodge dried I had DH drill a tiny hole on the top edge of the clothespin to hold my dangle. You need the hole near the edge of the clothespin so that the dangle will hang freely. If you center the hole the dangle will not hang correctly. Using chain and charms/beads from the stash I made a small dangle for each clothespin. I used different washi tape for the clothespins.  The red gingham bow is ribbon from Hobby Lobby and I tied that into a double bow using the Bow It All. Used hot glue to add the bow to the clothespin. Easy bags to put together and another good use of the alphabet die set in the stash and all the printed card stocks in the stash..... Inside the bags are various treat holders filled with chocolate treats for Valentine's Day. 

Saturday, January 15, 2022

Izzy, fuzzy slippers with sweatpants . . .

 Expecting winter storm Izzy to stop by tonight and tomorrow so I am happy it is the weekend and that I am off work until next Weds..... So working in the craft room in fuzzy slippers and sweatpants waiting for her to arrive.... Happy to say that a couple of my online orders arrived today -- YAY! Just in time for a long weekend with bad weather....

First -- all of these orders are my first orders with these online stores and happy they arrived quickly after I ordered them....  To begin with when the Cottontail Embossing Powder Tool was released it was sold out all over the place. Luckily I found two of them on the online store of Catherine Pooler. I had never ordered from her before but I was happy to finally find this embossing tool from Rabbit Hole Designs so I ordered one for me and one for my PIC (stamping Partner In Crime):

Also with my first order they gave me a free purple ink pad as a thank you gift. 

Another first order is the Stick and Stamp Mat from Brutus Monroe. I have shopped their booth at different stamp shows but I had never ordered from their online store. Again I ordered two of these mats - one for me and one for my PIC - and I also ordered the cleaner for this mat they sold as a bundle:

This mat fits the regular size MISTI and it can hold card stock in place, holds a stencil in place, and is good for use with a background stamp so you just don't get the edges of the stamped image on your card stock piece. There is a video on YouTube showing how to use this mat with the MISTI and by itself. 

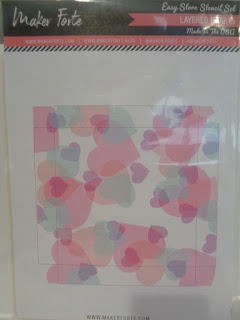
Finally -- my last order that arrived today is from Maker Forte (Hedgehog Hollow).  I ordered the Layering Hearts stencil set. They make all their own stencils on sight so they are made in the USA:


These are not the standard 6x6 stencils either. Their stencils are 8 1/4 wide by 6 7/8 high. Each of their stencils have the stencil name on it:

also the stencils all have pre made holes at the top for storage - either to hang or to put in a binder:

Rather than number their stencils this Hearts stencil set has a small, medium, large, and extra large stencil in the set so you know which order to stencil them in. I also received a free single hearts stencil as a thank you gift -- just in time for Valentine projects!! 

Also ordered a background stamp from them:

Stone Age background stamp that makes an interesting background for a card. Looking forward to using this stamp on upcoming projects..... 

Happy me that I have new products in the craft room -- just in time for bad weather and time off from work!  Stay safe!


Sunday, January 9, 2022

Christmas Thank You Card

 Here is the thank you card I made for my PIC - stamping Partner In Crime - for all the wonderful crafting items she gifted me at Christmas and she loves purple:

I used the Nordic Snowflake stencil from Taylored Expressions for the snowflake design on the white card front. Here is a photo when I finished stenciling:

I used the Wendy Vecchi craft mat and magnets for the stencil. For this card I used purple ink and a blending brush:

To keep the ink pad in place I cut a piece of drawer liner that I keep in the same bin with the stencils so when I stencil all my supplies are together. Once the stenciled piece was done I trimmed it to the size I wanted for the card front. Using a rectangle frame die from the stash I die cut a white frame to put over the snowflake piece for the card front.

The card base is purple card stock cut and scored on the side. Put the stenciled piece with the frame on the card base using the ATG. Die cut a small snowflake using a snowflake die and white glittered card stock. Put this on the card front using a mini glue dot and added a holographic gem from Sunny Studios to the center of that:

Using a "thanks" die from the stash and cut it out of silver foil poster board from the Dollar Tree. Then cut it out of purple card stock. Using liquid glue I glued these two 'thanks' together off setting the silver 'thanks'.  Used foam tape to put the "thanks" on the card front. 

Saturday, January 1, 2022

Sign me up!

 Taylored Expressions came out with their "Create-In-Quads" stencil system before Christmas and their first set was Mistletoe.  I watched the videos and like the concept but I felt Mistletoe was too limiting and did not buy it... but then....

She put out the Create-In-Quads Snowflake set -- sign me up!!! This is a stencil set that uses a larger stencil sheet and each stencil set makes up 4 card fronts. The Snowflake set has 4 stencils. Each stencil is numbered so you know which order to use them. With this being a larger stencil set I had to decide how I would store it and I decided to use the plastic job ticket sleeves that I bought at Staples long ago to store my solid 8 1/2 x 11 card stocks. I used the label maker to label the stencil set:

On the back of their packaging tells you about the stencil set and a sample of what each stencil looks like. I have used this stencil set twice and I am in love -- made 8 cards using this system this morning. Here is my stencil "system" -- I use the stencil mat from Wendy Vecchi that I have used for my stencils for some time -- some crafters use spray adhesive on their stencils to hold them in place while they are applying their inks but the stencil mat with magnets works fine and I do not have to go outside to spray the adhesive on my stencils. Here is a photo of my 'set up':

I have the card stock on the stencil mat with magnets. Next to that I have a piece of drawer liner left over from kitchen drawers and I keep my ink pads on that to keep them from sliding around on the work table. This photo was taken after I started the turquoise card fronts I was working on.  Here is a photo to show the stencils as I was adding the inks:


Once I finished with each stencil I used a baby wipe and gently wiped the inks off and set it aside. Continued on until all four stencils were finished and wiped down. Here is a photo of the turquoise set finished before it was cut apart for card fronts:


sorry for the blurr.... Once this colour combo was done I decided I would change it out and work with totally different colours -- used my 2nd to last sheet of Taylored Expressions Kraft card stock for this next stenciled set of card fronts:


For both stenciled card fronts I used Distress Inks for my card fronts -- except for the white snowflakes on the kraft card fronts. Here is a photo of both sets cut apart and ready for card bases:

Some card bases are scored on the side and some are scored at the top. I embossed and stamped matching greetings for the cards and put the card fronts on the cards:


On the turquoise cards I used these Distressed inks in this order:

Stencil #1   Mermaid Lagoon
Stencil #2   Wilted Violet
Stencil #3   Tumbled Glass
Stencil #4   Peacock Feathers

Here is the second set of card fronts finished:


For these card fronts I used these Distress inks in this order:

Stencil #1   White pigment ink
Stencil #2   Barn Door
Stencil #3   Festive Berries
Stencil #4   Hickory Smoke

The stencils are clearly marked so it is easy to see you are lined up correctly. Taylored Expressions sells packs of pre-trimmed card stocks for this stencil set but I used card stock from my stash and trimmed it to the 8 x 10 1/2 size I would need for stenciled card fronts. Once the blending is all done just trim your larger stencil piece into 4 pieces for your card front that measure 4 x 5 1/4.  So easy and quick to make 4 card fronts that have the same theme but are not the same card over and over again. 

Happy Taylored Expressions has this "Quads" line in stencils and hoping for future patterns as well! Will also say once I finished with the stencils I rinsed them off in the sink with cold water and all inks came off easily -- the white pigment and the reds of the Distressed Inks. Clean up is quick and easy and the stencils are good quality and not too thin with all the detail they have on the snowflakes. 

For my cards I used a banner die set I have in the stash for the greetings and I added holographic gems from Sunny Studio to the centers of some of the snowflakes on the card fronts. I also die cut from scraps small snowflakes using a small snowflake die I got for free with my Sunny Studio order. For some of those little snowflakes I used glittered card stock from the stash... Quick and easy stencil system and am looking forward to other future releases for this line . . .