
Have followed a demonstrator Deb Valder for sometime. I started following her when she was a demonstrator for Stampin Up and now she is a demonstrator for Fun Stampers Journey. This card is inspired by her video on YouTube:
/www.youtube.com/watch?v=nwlf3p_1e04
I own the Spooksville die set from Fun Stampers Journey so I took my inspiration from her card and used what I have on hand to make my card:

For my card I used black card stock from Paper Trey Ink cut and scored at the top. Orange card stock from the stash was used for the front. The card front piece is white/GP.
Cut the white/GP to the size I would need for the card front. Using an EK Success 2 1/2" circle punch I punched out a large Post It note. I put this circle onto the white/GP piece near the bottom like she has on her card. Using distress inks - Squeezed Lemonade all over the card front with Dried Marigold at the top of the card front and Carved Pumpkin at the top edge of the card front. Using black ink I sponged the edges of this piece. Set it aside to dry.
Using the Fun Stampers Journey die set Spooksville I die cut the black house from black #110 weight card stock from Mikes. Also die cut this out of orange card stock to give me the window pieces. Here is the back of the black die cut house piece showing the small pieces of transparent Scotch tape I cut and put behind the windows - then I put the small orange window pieces on the front of the card and the tape holds them in place:
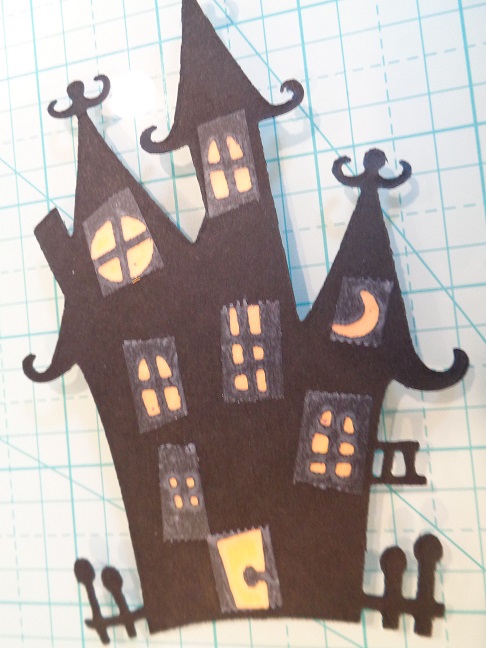
and turned over to show the front of the house die cut piece:

For the tree die cut piece I wanted that to have a little dimension so I die cut the tree twice from the #110 weight black card stock from Mikes. Using Stick It tape I put the tree die cut pieces together. Using an Impression Obsession ghosts die set I cut out the ghosts using white glittered card stock. Used a small circle punch and scrap black card stock and punched out circles to put behind the ghost faces to show their eyes and mouth better. Some circles had to be trimmed since two of the ghosts are so small and I used liquid glue to put the black circles on the back of the die cut ghosts. For the bats I used a multi bat punch from EK Success and punched them out of black glittered card stock.
Used the ATG and put the distress ink card front onto the orange card front piece and then put these onto the black card stock base. Like Deb did on her video I put the house and tree pieces on the edges of the card front. Using scissors I trimmed off the pieces that hung off the sides of the card front. Using a stamp from the Stampin Up stamp set Spooky Fun I stamped the greeting onto scrap white card stock using black ColorBox ink. Die cut that greeting piece using the Stampin Up Bitty Banners die set. Sponged the edges of the greeting piece using black ink. Put double layers of glue dots behind this and put it on the top right corner of the card front.
For the ghosts I also used double layered glue dots to put them on the card front - the double layered glue dots raises the ghosts off the card front but they are not as high as a pop dot would be:

For the bats I pinched their wings upward and used liquid glue to put them on my card front:

Fun die set for Halloween. Thanks to Deb for sharing her card and ideas on her video. Easy card to assemble using die cuts.
1 comment:
Lots of fun details!
Post a Comment