Tuesday, January 23, 2018

Sky Sympathy Card


Always hard to make sympathy cards . . .  but this card was very hard as it is for DH's best friend of over 40 years - - his wife passed away Sunday evening so hard week for DH for sure.

Wanted to make a simple card but wanted to include blue since it was his wife's favorite colour:


Black card stock base is #110 weight black card stock from Mikes. Light blue card stock is Stampin Up Bashful Blue and white is GP.  Used black Staz On ink for the Stampin Up Lovely As A Tree stamp. Cut out a rectangle die that gave me a rectangle window. Used Post It notes and this rectangle die cut piece over the stamped tree image using washi tape to hold the frame in place. Sponged Stampin Up Bashful Blue ink over the stamped tree image using more ink at the top of the card and a lighter touch towards the ground of the trees.

With this sponged I removed the masking and rectangle frame. Using a stamp from the Stampin Up stamp set Thoughts and Prayers for the front of the card and another stamp from that stamp set for the inside of the card. TFL

Saturday, January 20, 2018

Bunny Keepsake Treat Holder


Bought the Stampin Up Curvy Keepsake die set at a stamper's garage sale for $5.00.  Made two favorite treat holders using this die set:


The pumpkin with witch hat and the scarecrow treat holders.  Had seen lots of other projects made using this die set but basically they are all the same. Then I saw this idea on Pinterest and I do not know who it originated with to give them credit. Also could not find directions so I will explain how I made these holders. They will hold a small chocolate bunny for Easter (Lindt) once the stores stock their Easter candies. Here are the holders I made:


These holders use half of the Curvy Keepsake die and you are able to make three holders from one sheet of 8 1/2" x 11" card stock. I did not want to use the #110 weight card stock from Mikes because it was too thick but the Whisper White card stock from Stampin Up is too flimsy. So for my treat holders I used two pieces of white card stock from Paper Trey Ink.

To cut out the holder I cut my piece of card stock in half at 5 1/2. Placing the part of the die I needed to cut out on my white card stock I used washi tape to hold that in place in the die cutting machine:


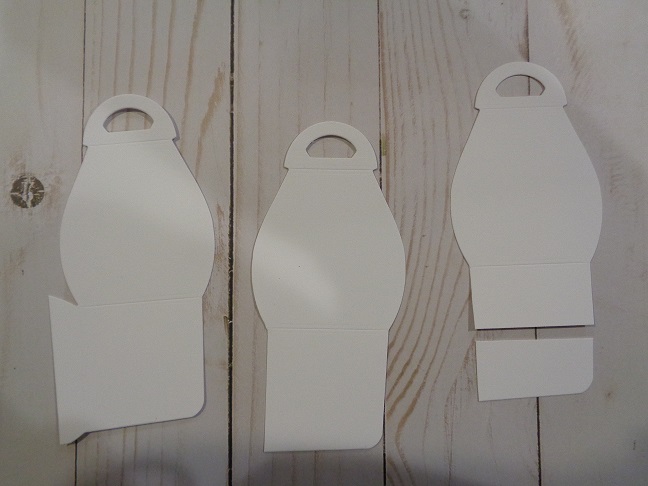
I cut out 3 pieces from each piece of the card stock. This photo shows these die cut pieces - on the left is the piece out of the die cutting machine. The middle photo shows the die cut piece after I used scissors to trim the unwanted piece on the left side. The far right photo shows that I trimmed the bottom of the die cut piece 1" below the scored line:


Using a 1 3/8" circle punch I punched out a circle from three of the holder fronts for my window:


To get the scalloped circle for around the window front I punched out a 1 3/8" circle from card stock and then punched over that using a 2" scalloped circle punch:


Put my scalloped circles on all the holder window fronts using a glue pen. For the clear window I used package packaging for the windows and used a 2" circle punch to punch those out. Put them on the backside of the window piece using red sticky tape:


For the fronts of my holder I used a grassy border punch from M Stewart and punched out scrap green card stocks. Put the grasses on the window front using red sticky tape. Used a small Marvy oval punch and punched out ovals from scrap card stocks for the eggs. Sponged the edges of those and put them behind the grassy pieces using glue dots. For the brown bunny I used a small bunny die and cut them out of flocked brown card stock that has white/GP behind it. Used liquid glue to put the white pom pom tail on the bunnies:


Here is a photo of one of the holders to see the flower, bunny, eggs, and bow on the holder front:


Here is a photo of the back of the holder:


For now I have a mini clothespin holding the holder closed but once the chocolate bunnies are added I can keep it closed using velcro or glue dots. The clothespin can also hold my Easter greeting as well.

Easy holder to put together once I figured out the how-to's. Another good use of the Stampin Up Curvy Keepsake die set for a holiday treat holder.  Thanks to whoever made this first and shared their idea!  TFL

Hopping ahead . . .


Working on the Valentine treat holders and last trip to the big W I found a Reese's peanut butter egg and they also had the Cadbury Eggs. Looked for other Easter candies but the Cadbury Eggs and jelly beans were all they had at this time.  Bought a few of the Reese's peanut butter eggs for Valentine's and decided to make a treat holder for that egg like the holder I had made for Ferraro Rocher and that also was used to hold a Cadbury Egg. Here is a photo of one of the holders for Valentine's Day and one for Easter:


To make this holder you need a piece of  2" x 11" card stock. Score it with the long side at the top of the score board: 3 3/8, 5 1/2, 6 1/4, 8 1/4 and again at 9. Cut your printed card stock for the backing to your holder 2" x 3 3/8". I used the ATG and put the print on the end of the scored piece that was scored at the 3 3/8" line. With the print on your scored piece use your bone folder and crease all scored lines. Then use your tag topper punch and punch the printed end of your scored piece. For the circle that the candy sits in you need to use a 1 3/8" circle punch.

I used pink card stock in this photo to show this circle on a white scored piece:


The pink circle is put in place with a glue dot and this is used to be sure my circle will be centered on my holder. Here is a photo of this circle punched out:


With the circle punched I then folded the scored piece at all scored lines and used tear and tape to put it together. Added a greeting banner to each holder -- for the Valentine holder I used a piece of holiday washi tape across the front of the holder. For the Easter holder I just cut a piece of the printed card stock to match the print on the back of the holder. Just pay attention if you should be using a directional print for your holder as I did for the Valentine holder. The hearts are all going in the same direction so be sure your pattern is not upside down or sideways.

Also for the Valentine holder I used the Stampin Up Ornate Tag Topper punch for the holder back and for the Easter holder I used the Scalloped Tag Topper punch:


Also -- these eggs are heavy so for the Valentine holder I used #110 weight black card stock from Mikes and the yellow card stock for the Easter holder is from Stampin Up.  Easy holder to put together and you can make a few from one piece of card stock. TFL  **More photos and detailed instructions for this holder here:

https://cardcornerbycandee.blogspot.com/search?q=ferrero+rocher+holder


Monday, January 15, 2018

Valentine's Bag with Treats


Recently reorganized my printed card stocks in the craft room and decided I have enough double sided card stock for Valentine's Day to make my own treat bags. Had seen this video by Amanda F. on Youtube awhile back:

https://www.youtube.com/watch?v=Vdut6pUKnYc&t=699s

She gives you patterns for many different sized gift bags but for the two Valentine's Gift Bags I made I used two pieces of 8" x 8" double sided card stock. The finished size of my bags are 5" high by 4" wide.

Here is a photo of two of the bags after I made them:


To decorate the front of these gift bags I used paper doilies from the dollar store and cut one in half and used glue to put them on the bag fronts. Added red foil hearts to the front of the doily piece using a Spellbinders heart die set to cut the hearts out:


Inside the bag is red paper shred from the dollar store. I made a Tootsie Pop holder using the pattern by Nancy on this video:

www.youtube.com/watch?v=MWV0oFtONRE

The dark red Tootsie Pop holder I made using her measurements but the pink Tootsie Pop holder I had sized down a bit. Using a plastic jar with lid from the dollar store I filled that with red paper shred and various chocolate candies. Cut out a 2" circle from the printed card stock to put on the jar lid using the ATG. Tied twine around the top of the jar and that is held in place using a glue dot. The printed band around the center of the jar is washi tape.

Here is a photo to show the Hershey Nugget holder I made and a holder I made for two of the Ghirardelli candies:


For the nugget holders I used printed card stock for the sleeve that slides over the nugget tray. The nugget tray is made using solid card stocks and this size holds four of the nugget candies and here is my pattern for the solid tray:


Use a piece of card stock 6 1/4" by 3 1/2". With the 6 1/4" edge at the top of the score board I scored this piece at 1/2", 1", 5 1/4", and 5 3/4". Turned this with 3 1/2" edge at the top of the score board and scored that at 1/2", 1", 2 1/2", and 3".Using the bone folder I creased all my scored lines well. Using scissors I cut the corners of my box -- this is what that looks like with corners trimmed away:


Then using the pattern for the sleeve I made for my original holder I cut out the printed pink card stock and made the sleeve for the tray:

 Cut the print to: 4 3/4" by 4 3/8". With the 4 3/4" edge at the top of the score board I scored it at: 1/2", 2 1/8", 2 5/8", and 4 1/4".   

Using Tear and Tape I put the printed sleeve piece together. Wrapped each nugget candy with a piece of card stock 1" x 3 1/8" and put these wrappers onto the nugget candies using glue dots. Here is a photo of my nugget holder using this pattern using a clear window sheet for the sleeve -- made these up last year:


This nugget holder with clear sleeve top is from FrenchieStamps.com and she had a video on Youtube but I had to make my own measurements for it to slide.

For my Ghirardelli pattern I made that myself.  For the tray inside that holds two of the Ghirardelli candies I cut a piece of solid card stock 3" x 3" and scored it at 1/2" on all four sides. Snipped the end corners and put this tray together using glue dots.

For the actual holder:

Cut a piece of solid card stock 2" x 8". Scored this with the long side at the top of the score board at:
1 1/2", 2 3/8", 3", 5", 5 5/8", and again at 6 1/2". Once this was scored I used the Stampin Up Scalloped Tag Topper punch and punched out each end. Used the bone folder to crease my scored lines. Using various washi tapes I put washi tape on the front of the holder and trimmed the edges even with the sides of the holder. Put two Ghirardelli candies in the tray and placed that inside the holder. Do not use adhesive or glue dots to hold this in place in your holder or it will not slide out. With the tray and candies inside I used double sided tape to close the holder. Added ribbon and twine at the top of the holder. Easy holder to put together.

Glad to use more of my printed card stocks to make the gift bags. They are not too small or too large to hold a couple of the treat holders and chocolates for Valentine's Day. They also help to use up the vast ribbon collection --- haha.  Thanks to all the ladies for sharing their ideas for these fun treat holders!    ALSO ---

DH had built my new wooden work island and I had since asked him to make me a stand for my glue bottles that I use most so that the bottles are upside down and easy to reach for. Here is a photo of that holder he made for me using a scrap staircase post and cutting circles in it to hold the bottles:


Over time have seen other crafters storing their most used glues this way so I wanted one for my craft room. Did not have a real pattern but I told DH what I wanted and this works great -- it is heavy enough not to fall over when I put the glue bottles in the holder or take them out to use and it can hold other types of glue bottles I have on hand so it will get lots of use for sure.  TFL

Monday, January 1, 2018

Thanks Thank You Card


Here is a photo of a thank you card I made:


Pink card stock base is #110 weight card stock from Mikes. White is GP and floral and striped card stocks are from my stash.

For the "Thanks" greeting I used a die I had received as a free gift from Taylored Expressions from an order I made with them. I cut it out of scrap pink card stock and wanted it to have some dimension so I made my own "klipboard" using the top tab from a kleenex box. I cut out the pink card stock and then cut out the box tab - used glue to put the two together:


Set the word die cut pieces aside to dry and worked on the rest of the card. Cut and scored the pink card stock base with the scored line at the top. Cut the white/GP piece for the card front. Cut the floral and striped card stocks to the sizes I needed for the white card front. Put those together using Scotch tape on the wrong sides of those. Put them onto the white/GP piece using the ATG.

Using a large scallop edge die I cut out a piece of pink card stock for the card front. Trimmed the sides of this piece to be even with my card front. Took a piece of scrap white/GP and cut that a bit larger than the die cut piece. Used a glue pen and put the die cut "Thanks" onto the scrap white/GP piece. Put this onto the scalloped piece using the ATG. Put this across the card front using the ATG. With the card front pieces done I put them onto the pink card stock base using the ATG. Added pink crystals from the stash to either side of the die cut "Thanks". Here is a photo to show how the card board behind the die cut word gives it a little dimension for the card front:


This photo shows part of the inside of the card where I put the striped card stock on the bottom of the white/GP piece on the inside:


Wednesday, December 20, 2017

Christmas M&M's


Had seen these packs of the red and green Christmas M & M candies at the dollar store and I picked up two packs:


Wanted to use these candies in a treat holder but did not want to use the long, thin cellophane bag to put them in since I have done that more than once.... checked around and found treat holders by Patty Bennett on her blog -- here is the link to that:

http://www.pattystamps.com/pattys_stamping_spot/2017/12/quick-and-easy-holiday-treat.html

She used this idea from "Pootles" who is a SU demonstrator in the UK.  I made six of these candy treat holders - three I used a circle punch for the bag top and three of them I used the Stampin Up Ornate Tag Topper punch - here is a photo to show what they look like using the circle punch at the bag top:


All holders I used the double sided printed card stocks from Stampin Up. This next photo shows the three treat holders I used the Ornate Tag Topper punch for:


The Ornate Tag Topper punch shapes the top of the bags and it also punches a hole like a tag would have. I wanted this small hole so I could close the bags using twines from the stash. With the curved bag tops I used a small circle punch and punched a hole in the center for my twine.

How many times we order dies from an online store and they enclose a free die with your order if you have spent a certain amount of money? Too many times these online stores send you a "thanks" or "thank you" die for free. I have too many to mention.... :0(     .... but one time I placed an order from Taylored Exprssions and with my order they enclosed a free die. Happy me that the free die is this little circle tag die with a tree inset!! When I made these candy bags I thought that die would be perfect for the top of the treat bags:


I cut out the small tree die using scraps and mixed and matched them to match the printed card stocks I was using -- here is a photo to show all the M & M treat holders and their tree tags. The greeting is stamped onto scrap white/GP using Stampin Up Cherry Cobble ink and I used a stamp from the Stampin Up Hostess set Good Greetings. Really like these treat holders because they are free standing and do not use too much card stock to put them together. Thanks to Patty for sharing her treat holders and for Pootles for sharing her pattern on Youtube:


Here are a couple other treat holders I made for the gift bags I put together this year:


Used the Stampin Up Candy Wrapper die for the above treat holders. These hold the Hershey Santa Hat chocolate kiss candies. The red center to the snowflakes are "bling" I picked up at the dollar store. Used a snowflake punch for the snowflakes. This next holder is a favorite and it holds three of the Hershey Nugget candies:


Also made matchbook holders for Fun Size M & M's:


and of course I made some Snuggets:


Snowman face stamp is from Morningstarstamps.com -- Pam sells a small snowman face stamp as well as a larger one. These two stamps are a MUST have for your craft room!!

Fun to put the gift bags together for the gals at work -- here are photos of the gift bags when I decorated them before I filled them up:


Fun playing Elf this time of the year! TFL

Monday, December 11, 2017

Want some cheese with that whine???


Want some cheese with that whine??? comes to mind.... Everything works until it doesn't and when it doesn't you want it fixed or changed... and NOW....

Long story - moved into this house and having a craft room without a guest bed in it (can't they stay in a HOTEL???) was a treat.... did not have cabinets but I checked on Craigs List and found a set of cabinets from a lawyer's office that was being demolished at a good price... but... when we went to see the cabinets there was a catch -- we had to take all the cabinets that were removed in order to get the ones I wanted... No problem -- I had craft room cabinets and DH had cabinets for his work shop area in the garage.... cabinets we did not use we then sold on Craigs List and that problem was solved.

In my craft room DH had put two of these floor cabinets back to back and he built a top for them using the used counter tops that came with the cabinets.. It is a good sized island and although it has served it's purpose it no longer works.... I now own quite the die collection and I have them lined up in refrigerator bins on a counter in the craft room.... they take up a lot of room and I want the counter top space back.... the island cabinets have two doors on them but I do not store things in them that I use all the time... like the dies..... so all I said....

I had mentioned to DH last week that although I liked the size and height of my island in the craft room the cabinets just were not working anymore... I told him I would prefer an island that is like a wooden workbench but something that has open shelves and can take the weight of my die collection... but I wanted the top to be the same size as the counter top he had built for the island in the craft room.... of course our house is constantly under construction with him working on this or that so although I asked about a new island I did not expect anything would happen until far in the future. He has a habit when I ask for him to build or change something that he has me draw a picture for him on a napkin or paper towel or whatever is nearby.... no request for a photo but I figured after the holidays he would come down to the craft room and do his measuring and ask questions and such....

So ... imagine my surprise when I got home from work today he called me out to the garage to see my surprise custom island he built today!!! :0)


First the top can be moved -- he did not know if I wanted the overhang to be on one side or both sides or what so that can be moved -


The above photo shows when I move the top to the front for an overhang and the next photo shows the top when I have the overhang on the back side:


He used left over oak stair posts for the corner posts of the island and this next photo shows left over oak flooring he had that he cut down to size for the front and sides of the shelves:


This next photo shows the front of the oak flooring pieces:


He has sliders under the legs but he can add casters if I wanted those on it. He put a backing on it and he remembered everything I had asked for!!! The top comes off so it will be easy to get it into the craft room once he finishes sanding it and putting the poly on it to seal the wood. Once the new island is in place he can attach the top or leave it so it can easily slide if I want it moved. With the weight of the oak it will stay in place.  He even put extra braces under the shelves and top to take the weight of the dies and anything else I would be using the island for. Here is a photo of the shelf attached to the oak stair post:


This island is the same width and height of the island I have now so it will be a perfect fit to replace my present island. Of course here I go again re-organizing the craft room but WELL WORTH IT this time!!! Happy me!!! Of course now I have to re-think my craft room and storage and such but this is going to be such a major improvement in here!! Nice Christmas present for me for sure.... Fuzzy Slipper Happy Dance in my craft room tonight!! :0)


Sunday, December 10, 2017

Gift bags


Bought some of the white gift bags sold in sets of 3 at the dollar store to decorate for Christmas. Here is a photo of some of the bags:


Here is a photo of the gift bag I did last year:


For the bags this year I did not do any stamping. I had seen a new holly printed card stock at Hobby Lobby that I bought and I used that on the front of the bags:


For the front panel I cut and scored a piece of kraft card stock from Mikes to fit the front of the bag. Cut the holly printed card stock a bit smaller and put the holly print onto the kraft card stock using the ATG. Put these onto the bag fronts also using the ATG. Set these aside.

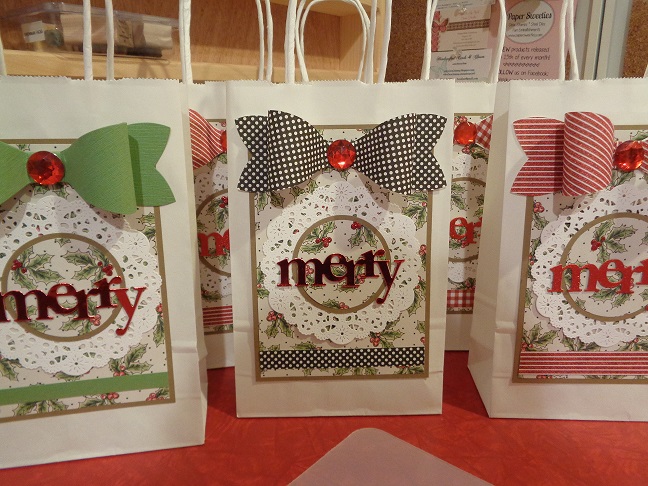
For the bows on the gift bags I used the gift bow die from Stampin Up and various prints from my stash. With the bows all cut out I assembled them using tear and tape. Put a bow at the top of the bag front panel using the tear and tape. Cut a small piece from each bow print and put those at the bottom of the bag front panel using the ATG.

For the white doily I used a Cheery Lynn doily die and cut out my doilies using white/GP card stock. For the center of the doilies I used two circle punches and punched out a kraft card stock circle and a holly print card stock circle. Used the ATG to put the circles together and then onto the center of the doilies. Put the doilies onto the bag front panel using the ATG.

The "merry" was die cut from both red foil card stock from the stash and a red shimmer card stock from Mikes. I wanted these to be stiff and have some weight to them so once again I use the tab from a kleenex box to make my own "klipboard". I die cut the red "merry" words and then used the die and cut out the words from the kleenex box tab:


Using TomBow glue I used a small paint brush and brushed glue over my card board die cut letters. Did one "merry" at a time - once the card board word was covered with glue I put the red word on that to set up. With those all done I set them aside to dry. Here is a photo to show the kleenex card board on the back of the letters:


This thin layer of card board not only makes the letters more sturdy but it also gives the front of the bag some dimension without being too heavy like a wooden word or decoration could be. Once the words were on the bag fronts I used a red Stickles and put Stickles on some of the the berries in the printed circles in the center of the doilies. Set them aside to dry.

With the bows on the bags I decided they needed some sparkle and shine and I had picked up red gems from the dollar store and put one in the center of each bow using a large glue dot. With the Stickles dried I used micro mini glue dots and put the "merry" on each doily piece. Cut a piece of white card stock to set inside the bag on the bottom to make it more sturdy. Will add paper shred to the bags and treats next week. Here are a couple of photos of some decorated bags:


Now I have to make the tags and tie on some jingle bells for some festivity. Then fill them up and that will be another finished holiday project.   TFL