
Bought some of the white gift bags sold in sets of 3 at the dollar store to decorate for Christmas. Here is a photo of some of the bags:
Here is a photo of the gift bag I did last year:

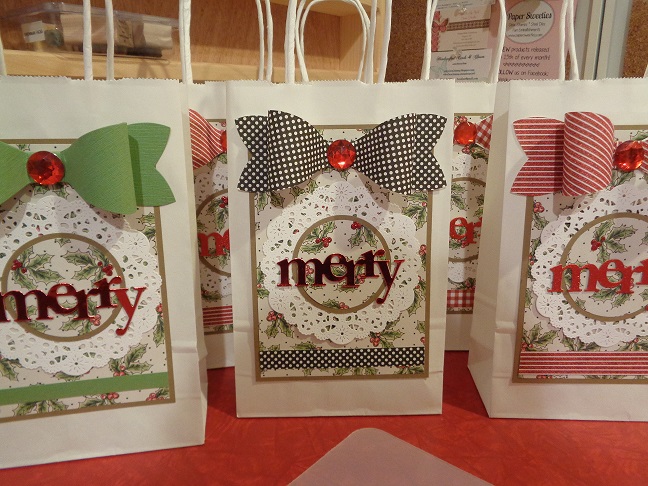
For the bags this year I did not do any stamping. I had seen a new holly printed card stock at Hobby Lobby that I bought and I used that on the front of the bags:

For the front panel I cut and scored a piece of kraft card stock from Mikes to fit the front of the bag. Cut the holly printed card stock a bit smaller and put the holly print onto the kraft card stock using the ATG. Put these onto the bag fronts also using the ATG. Set these aside.
For the bows on the gift bags I used the gift bow die from Stampin Up and various prints from my stash. With the bows all cut out I assembled them using tear and tape. Put a bow at the top of the bag front panel using the tear and tape. Cut a small piece from each bow print and put those at the bottom of the bag front panel using the ATG.
For the white doily I used a Cheery Lynn doily die and cut out my doilies using white/GP card stock. For the center of the doilies I used two circle punches and punched out a kraft card stock circle and a holly print card stock circle. Used the ATG to put the circles together and then onto the center of the doilies. Put the doilies onto the bag front panel using the ATG.
The "merry" was die cut from both red foil card stock from the stash and a red shimmer card stock from Mikes. I wanted these to be stiff and have some weight to them so once again I use the tab from a kleenex box to make my own "klipboard". I die cut the red "merry" words and then used the die and cut out the words from the kleenex box tab:

Using TomBow glue I used a small paint brush and brushed glue over my card board die cut letters. Did one "merry" at a time - once the card board word was covered with glue I put the red word on that to set up. With those all done I set them aside to dry. Here is a photo to show the kleenex card board on the back of the letters:

This thin layer of card board not only makes the letters more sturdy but it also gives the front of the bag some dimension without being too heavy like a wooden word or decoration could be. Once the words were on the bag fronts I used a red Stickles and put Stickles on some of the the berries in the printed circles in the center of the doilies. Set them aside to dry.
With the bows on the bags I decided they needed some sparkle and shine and I had picked up red gems from the dollar store and put one in the center of each bow using a large glue dot. With the Stickles dried I used micro mini glue dots and put the "merry" on each doily piece. Cut a piece of white card stock to set inside the bag on the bottom to make it more sturdy. Will add paper shred to the bags and treats next week. Here are a couple of photos of some decorated bags:


Now I have to make the tags and tie on some jingle bells for some festivity. Then fill them up and that will be another finished holiday project. TFL
3 comments:
so cute! What a great idea, so creative! If you could please, who is the merry die from?
Hi Charlene -- The "merry" die is from the Paper Trey Ink Wonderful Words holiday die set. Thanks for your nice comment on the gift bags and your blog visit! Happy Holidays! Candee P
These are beautiful Candee. I love each one of them. Hugs, Brenda
Post a Comment