
Tuesday, July 9, 2019

Pocket Watch Bears


Had seen this project by Carol Hurlock:

http://chocolatecraftsandbearsohmy.blogspot.com/2013/09/cottagecutz-pocket-watch-beary.html

She has lots of projects on her blog but also many videos on YouTube.  She has an envious amount of dies in her stash and what she does with her dies is inspiring. I especially like how she uses a die for more than what the packaging shows.

I made two of the Pocket Watch Bears and they can be used as an ornament, a 3-D tag, or to hang on the handle of a gift bag. First is a photo of the dies I used for my bear project:


Here are the bear projects:


For the pocket watch base I cut it out of white #110 card stock from Mikes. Using a printed card stock from Hobby Lobby I cut out a circle of that using a Spellbinders circle die. I used the ATG to put the printed circle onto the white pocket watch die cut piece. Then I cut out 4 more of the white pocket watch die cut pieces for the layers. I used the same Spellbinders circle die to cut out the centers of the 4 extra white die cut pieces.  Using Turbo glue from Aleene's I glued the 4 cut out circles onto the solid white pocket watch die cut piece with the circle print on it stacking them so they are on top of each other. Set this aside to dry.  Here is what they looked like when I set them aside to dry:
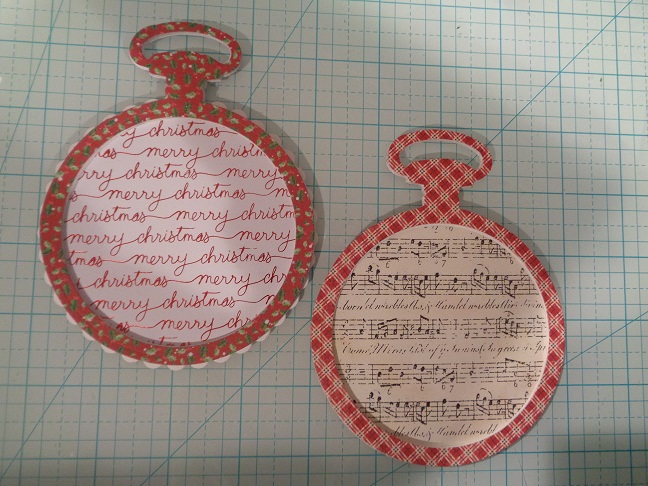

On the back of both of my pocket watch pieces I used matching card stocks for the front of my watches and I left these die cut pieces solid:


I did not put the solid pieces on the back of my watch die cuts right away. The pocket watch on the left I decided to add a scalloped circle die cut piece so while that stacked watch piece was drying I die cut a scalloped circle and then used the ATG to put the stacked pocket watch piece onto the scalloped circle. I used the Turbo glue to put the solid pocket watch die cut pieces onto the backs of the layered pocket watches. (Carol had used a snowflake wreath around her pocket watch but I do not have a die like that so I used the scalloped circle die instead on one of the watch pieces and I left the second one plain).

Using the bear die from Cottage Cutz I cut two of those out and assembled the bears. I used a black thin Sharpie for the bear eyes and once dried I added a dot to the eyes using a white gel pen. I do not have the two bow dies she used so I die cut out the two bows and then used a smaller bow die for the printed bows on my pocket watches. Added a red crystal from the stash to the center of the bows.  For the poinsettias I die cut those from solid card stock. Used green card stock for the bough pieces as well as the mini holly vines. With the flowers and greenery cut out I laid them out and spritzed them with Pearls Shimmer Mist to give them a little sparkle/shine:


Once those were dried I trimmed the greenery pieces and put them together using Glossy Accents and set them aside to dry. For the "joy" on one of the watch pieces I die cut that out of gold foil card stock (AKA mirror card stock). I used the white #110 weight card stock and cut it out again and put these two pieces together using Stick It Sheet to give the word some dimension:


The heavier white card stock helps these thinner letters to keep their shape on the project.  I added a gold crystal from the stash to the poinsettias.

Here is a photo to show the Merry Christmas card stock I picked up at Hobby Lobby this week:


In the photo you can see the words have a foil finish which gives this piece some shine. For the other piece I used the music printed card stock from Hobby Lobby for the background:


Here is a photo to show the "fur" on the bear's hat is from white glittered card stock:


With all my pieces cut, put together and dried I decorated my watch pieces.  First I put pop dots behind the bear and put him at the bottom of the watch. Then put my poinsettia pieces with greenery on the stacked frame piece and then added the double bow pieces.  Using holiday ribbon I tied a piece at the top of the watch.

Here are more photos:


A big thanks to Carol for sharing her cute Pocket Watch Bears and for all the inspiration on her blog and YouTube videos!!  TFL

Wednesday, July 3, 2019

July 4th Cards


Here is a photo of the cards I sent out for the 4th of July:


This card is on a base of navy card stock cut and scored at the top. Used a piece of white/GP for the card front that I embossed using a stars embossing folder. Used the ATG to put the embossed piece on the card front.

For the flag I used an All Night Media striped stamp and stamped that onto white/GP card stock cut larger than the stamp. I used red ink for that. Using a ruler I drew a light pencil line around the stamped striped piece about an eighth of an inch and trimmed the card stock to the size I needed. I measured that and cut a piece of navy card stock a bit bigger to put the striped piece on. Used the ATG to put them together.   Using a square punch I punched out a navy card stock square and put this onto the striped piece using the ATG. Used a Marvy star punch for the white star and put the star onto the navy square using a large glue dot.

I used pop dots and put the flag piece onto the embossed card front. With that done I decided to use clear Wink of Stella over the white star. Some cards have a sparkly star and some of the stars I just left white. This photo shows the Wink of Stella over the star:


Since it is DH's birthday tomorrow I am posting my July 4th card today. If you should be celebrating tomorrow enjoy and be safe!  Happy 4th!!

Put the blame where it needs to be . . .


Put the blame where it needs to be. . . .   and so I shall.... My PIC (stamping Partner In Crime) is the one that started this so I guess I need to put the blame on her.... ;0) 

I had never heard about the craze of using make up brushes for inks/stencils/and such for paper crafting... But happy to say my PIC did and she gifted me a couple of the make up brushes awhile back when she first heard about them.... Videos were all over YouTube using these miracle brushes for inks/stencils and such and now more and more online companies are offering the brushes or their version of the make up brushes -- with stands you can buy to store them in -- for an additional fee . . . . 

I had seen a video by the Frugal Crafter, Lindsay W, on Youtube and she was showing items from a recent stamp show she had attended. She went over the make up brushes and below her video was a link to a set of these brushes on Amazon -- for $14.98 and they are made by the same company that is a big seller of these brushes. . .  More than one online store sells their version of these brushes for $50 and another $17 for their stand to hold them....

Cute but not going to work for me -- both cost and space wise I do not have room on my work table for any other stand/holder etc.... Once I had seen Lindsay on her video off to Amazon I went and I ordered two sets of the brushes -- one for me and one for my PIC.  I also ordered us the egg shape cleaner for these brushes and that was $3.98 for a set of two. Now we both own the ten piece brush set and the two silicone cleaners... We are good to go....

But storing them -- I want my brushes near by and I want them standing up to help the bristles. What worked in the past.... has worked again.... here is a photo of one of the Raskog carts I have by my work table:


This is the top compartment of the IKEA  Raskog cart and the clear divider is also from IKEA. This divider holds my ATG, Post It notes, adhesive, markers, my teflon bone folder and wallpaper seam roller, and then the make up brushes. In the section in front of the makeup brushes are the two silicone cleaners I bought for them. Here is a better photo of the brushes:


This is a can from stewed tomatoes that I washed and when dried I covered it with dotted gift wrap I have on hand. (My can opener takes the lid off with no sharp edges on the cans). These cans are a perfect size for what I use them for in the Raskog cart and they keep the brushes upright and do not damage the bristles. Easy enough to wash out and put the gift wrap on the can to dress it up. Price is great so money I saved on a spinning brush rack can be used for more crafting items!!! ;0)  haha

A BIG THANKS to my PIC for telling me about these great brushes!!!

Wednesday, June 26, 2019

Mini Bowdabra Tool


Ordered the Mini Bowdabra Hair Bow Making Kit from Amazon for upcoming holiday projects. I do not own the original larger Bowdabra so I was happy to be able to buy a smaller version for smaller projects. The kit comes with the smaller Bowdabra plus the gold twine/wire as well as the measuring plate so you can be sure your loops/sides of your projects are even. Here is a photo of the new addition to the craft room:


This measuring plate slides over the top of the Bowdabra and one side is measurements in inches with the other side in centimeters.  You can use the Bowdabra with or without the measuring plate. First project I wanted to try is for my BOO Day treat bags. I wanted to use tulle in layers and I added pipe cleaners and a silver toned button for the centers of the two embellishments:


The orange and black one on the left has four tulle layers which you can see from the side of it:


For the back of these I used black painted clothespins from Mikes that will be used to attach these to the BOO bags:


Another shopping find -- recent trip to the Dollar Tree I found the foil poster board sheets that are sold in a package:


These sheets will come in handy for upcoming holidays with the colours in the package:


Not all the Dollar Trees in my area carry the same items so when I saw these packs at the store I bought a few so I will have plenty for holiday projects and such. Also while I was out I stopped at a Hobby Lobby store and certainly that was worth the trip .... because:


These are sealed paper pads from Prima that were in the Clearance Section -- regularly $11.99 per pad and I paid $2.99 per pad. Happy me I made the stop at Hobby Lobby for sure! 

Certainly have been busy in the craft room and I will post more items and photos of other items when I can get the photos done. TFL

Wednesday, June 12, 2019

Serious Accessories . . .


Upcoming road trips for my PIC (stamping Partner In Crime) and myself.... June is the stamping expo show in Chantilly, Virginia.... July is the SSAT stamp show here in Raleigh, NC .... Then the warehouse sale at the IO warehouse - Impression Obsession . . . in the fall.

Since my DSD had recently given me some crafting totes for my upcoming shows I would be shopping that she had made I asked her to make a set of three totes for my PIC -- who is a "purple person" who loves anything purple.... she also used to teach Scrapbook classes at a local Mikes store and she also attends crops for her scrapbooking. She makes cards as well but her first love is to scrapbook. My DSD and I picked out the three sayings for the three tote bags and she just finished the bags and brought them over yesterday. Here are photos of the bags:


and the second tote bag:


and the third tote bag:


My DSD also made her key chains for each of the tote bags. This gold key chain has her name on it and the tag is very sparkly:


The camera did not capture the shine of the gold vinyl used for the sicissors and hearts and such on the tote bags.  These tote bags are washable so I am sure they will see lots of stamping shows and crops she takes them to. Certainly a BIG thank you to my DSD for sharing her talents for my PIC and myself!! Chantilly here we come!!!  ;0)

Sunday, May 19, 2019

Thank You Card


Used two new-to-me Stampin Up background stamps for this thank you card.


The card stock base is Highland Heather card stock from Stampin Up cut and scored at the top. For the striped piece I used white/GP card stock. Using a light purple ink I inked the Stripes background stamp and laid the card on top that. Using my hands I pressed the card stock into the inked stamp to get it onto the white/GP piece. Set that aside.

For the floral piece in the front center of the card I decided what size I wanted that piece to be. I trimmed a piece of white/GP for that. I wanted to have a white border around the floral printed piece so I put painters tape on all four sides of the white/GP.  I used the light purple ink again and inked up the Floral background stamp and laid the taped white/GP onto the inked stamp. Once again I used my hands to press the card stock into the inked stamp pattern on the white/GP piece. Set that aside. Here is a photo of that stamp:


Cut the black card stock to the size I needed to fit behind the stamped floral piece. Wanted to have the "Thank You" to be on a black banner so I cut a piece of scrap black stock larger than the banner die I used. I used VersaMark ink and white embossing powder to emboss that. Die cut the banner out.


Using the ATG I put the stamped stripe piece onto the card stock base. I removed the painters tape from the stamped floral piece and put that onto the black card stock using the ATG. Used foam tape to put this piece over the striped card stock base. Using foam tape I put the banner piece on the left side of the floral image. Added holographic sequins to the card front to add some sparkle and shine. TFL.

Wednesday, May 15, 2019

Early bird gets the worm . . or the new craft products!


In April I received a copy of the new seasonal catalog from Close To My Heart. I flipped through the catalog and decided I would need to make a list. Ordering for this May-August 2019 catalog began on May 1st and I wanted to be sure to place my order before any of the products I wanted were on back order or sold out..... Made sure to order everything on May 1st and happy me my order arrived yesterday in the mail!!

Close To My Heart has a customer appreciation program where if a customer spends $50.00 they can choose from a variety of stamp sets to buy for $5.00 each.  Always nice when a company shows appreciation for their customers!

Here is a photo of this new catalog:


This is the 35th year for Close To My Heart and on the front of this catalog they used various products they sell lined up to make the "35". Clever cover design.  Inside the catalog are lots of products to buy but this is my first order and I am sure there will be another one made in the summer:


This first stamp set with a matching die set was the main reason I placed my order the first day of the catalog being active. It is the "Where Happiness Blooms" set. Here is a closer photo of the stamp set packaging to show the watering can with tulips as well as the single tulip have outlines around them. The outlines show which stamps have matching dies in the set:


Their stamp sets are in plastic envelopes with the photo packaging in front of the stamp set. Their dies arrive on small magnet sheets in clear envelopes in with the stamp set. This packaging makes it very easy to store them and they do not take up a lot of space. Other stamp sets I bought:


The background stamp set on the left is Timeless Textures and the stamp set on the right is Gillin' & Chillin" and I plan on using that for summer cards ahead.

This last stamp set I bought was for the confetti stamp and it will be perfect for a birthday card:


Next to the birthday stamp set is lace border die - $8.95. That will work well for cards and gift bags. Plus it has a lot of detail. Happy my order arrived from their new catalog already. I order my Close To My Heart products from this website:

donnaschaeffer.ctmh.com

First card I will be making using these new products is the Where Happiness Blooms with the watering can and tulips. Hope to have that posted this weekend. I like that it is a step-stamping stamp set and should be easy to line up using the stamp stamping tool.  Always a good thing when new products bring you new inspiration....

Sunday, May 12, 2019

Horse trough and Mother's Day


Was taken out to breakfast this morning for Mother's Day and was given gift cards -- YAY!! One for Mikes and another for a restaurant.. Yummy.... But my DSD knows I am going to a big stampers sale in Chantilly, VA in June with my PIC (stamping Partner In Crime) so she designed and made me three tote bags for the show:


Each tote she has a key chain and tassle hanging off the handles. This first tote is nice because I also sew so she included that as one of my crafts. This next bag:


This tote has vinyl letters and they have a lot of shimmer:


This third bag is my favorite because of what it says:


This key chain is blank and she said she can put anything on it that I would want or I could leave it blank. These tote bags are thick and have a good sized gusset on the bottom/sides so they will certainly help at the Chantilly show!! ;0)     Happy me she made these for me!! She explained they are washable and should last me.... I am just happy she shared her crafting talents for me!!

Then I just finished working with the two horse troughs I had bought long ago to use as planters. DH drilled drainage holes on the lower sides and he put small rocks on the bottom and I planted some Geraniums, Zinnias, and Dianthus in them and topped them off with mulch. I only have two of them and they are round so once the flowers fill in there will be some pretty flowers for the backyard.

Happy Mother's Day to all mothers today and hoping you have a relaxing day!   TFL

Sunday, May 5, 2019

May I remind you?


Yesterday I picked up two new to me Stampin Up die sets at a used stamping sale.  Decided to post how I store my Stampin Up die sets. Here is the photo of the two die sets I bought:


These are the Cups & Kettle and Garden Grown die sets. As with most Stampin Up die sets there are small accessory dies in the set and it is not easy to remember all the pieces in that set. Many times we buy these die sets and use them right away for a project and then they are put away for later use.  Working on other projects you may not remember which die set has what die pieces you may be able to use for a current project. Here is a photo to show how I store my Stampin Up die sets:


I store all my Stampin Up die sets on magnet sheets. I store the magnet sheet in a clear plastic envelope (the same envelopes I use to store my cling and clear stamp sets).  In the envelope with the magnet sheet of dies I store the paper packaging - this gives me the title of the die as well as how many pieces are in that die set. I also print out a photo of the die set pieces to put in these envelopes. With the die sets in the envelopes I store all my Stampin Up die sets in a bin together and they are filed alphabetically by title.

When I am needing a die set or maybe flipping through the die sets for inspiration I can see the die set pieces in each set on the front of the envelope so I know what pieces/shaped dies are in that set.  The die piece photo reminds me what pieces are in which die set. Here is a photo to show other dies:


For each die set that I buy I take it out of the plastic envelope it is sold in.  I use a label maker and clear label tape and make a label with the die set title on it. I put the clear label on the paper packaging that comes with the die set.  I peel off all the die pieces from the inside paper packaging and put them on a magnet sheet for storage. Then I print out a photo of the die set and trim that to fit inside the clear envelope.  I put the magnet sheet with die pieces in the envelope with the paper packaging in front of that and I put the photo of the die set in front of that.  Not only does this help to remind me what pieces are in a die set but also if a stray die piece ends up in my magnet bowl on my work table when I am finished with that project I will know which die set it came from.

As a new or new-to-me die set comes into the craft room I put them in these envelopes so the label and such is all done before it is put in the bin with the other Stampin Up die sets for the first time.  TFL

Sunday, April 14, 2019

Bunny Easter Cards


This post is about some of the Easter cards I have made for this year. For this card I used the Stampin Up Buffalo Check background stamp as well as their Bunny Builder Punch. The greeting "Happy Easter" is from the new kit from Queen & Co for their Easter projects.  I used different colours for the cards but made these all the same:


For all the bunnies I used the tail the punch punches out for the bunny and I used flocked white card stock for those. But for this one card I used a white pom pom for the tail:


To begin with I cut all the white card fronts and the white inside piece. Then I cut the black card stock for the fronts and also cut and scored the card stock bases.  I tried to match the card stock bases with the colour inks I used for stamping.

For the Buffalo Check across the fronts of the cards I laid the Buffalo Check background stamp on the work table, stamp side up. Using painter's tape I taped off the part of the stamp I did not want to get ink on:


With the tape across the stamp I tapped the ink pad on the stamp over and between the blue painter's tape to ink a section of the stamp. With that section inked I removed the painters tape and laid the white card stock front piece on top of the inked stamp and pressed it onto the stamp using my fingers to press the white card stock into the stamp to get the inked image onto the white card stock. With that done I cleaned the stamp and taped and re-inked the stamp for all the colours I was using.

Once I had the Buffalo Check pattern on the white card stock I also inked the Easter greeting stamp in the same ink colour and stamped the greeting below the plaid section. With all the stamping completed I assembled the cards. For the bunny I punched him out of Paper Trey Ink kraft card stock and sponged the edges with a light brown ink. I put the bunny on the card fronts using large glue dots. Added a white tail to each bunny to complete that.

Wanted some sparkle on the card front so I added some holographic white sequins on the front. I tried to use pastel colours rather than the brights or regals.  TFL

Sunday, April 7, 2019

Stitched Easter Baskets


Used the Stitched Basket die set from Lawn Fawn for a few of the Easter treat holders I have been making.  Here is a photo of the back of the die packaging to show this basket made:


Here is a photo of some of the baskets I made:


I had watched a video on YouTube on how to assemble this die set and as she did in the video I lined my baskets with printed card stock. I also decided to cut a strip of the printed card stock and put it on the center of my handles. Here is a better photo to show the bow and the handles using the printed card stocks that I lined the baskets with:


In the baskets I put paper shred from the dollar store and a chocolate bunny and a dark and a regular chocolate candy by Dove. Just a little candy treat for the holiday.

Also this weekend my PIC (stamping Partner In Crime) and I went to a small sale where a few stampers were selling items they no longer wanted or used. My PIC was able to find 6 or 7 Cricut programs that she did not already have to add to her rather large collection of programs and a couple of other items.  For me I bought a used IRIS box for 12x12 card stocks for $1.00 (thanks AnneMarie). I also bought these items from another seller:


Both items are Simon Says and brand new - $2 for the die set and $3 for the new Easter stamp set. I also bought the stamp and die set from Mama Elephant "Reindeer Games" for $8.00:


We were happy with the things we found but certainly not expecting too much after last weekend's finds!! We both commented we are STILL putting that stuff away in the craft room.... haha     TFL