Saturday, February 2, 2019

Bow dies


Recent shopping trip to Mikes I found two silver shimmer card stocks I liked. I picked up a thinner one and a thicker one to use for bow dies for Valentine projects. I have the small, medium, and large bow die sets from Pink and Main and they have turned into my favorite "go to" bow dies.

Earlier this week I received an email from Pink and Main about new products they were releasing and they now have an extra large bow die set. I ordered that the day I got the email and it arrived yesterday. Here is a photo of the Pink and Main bow dies and the bows I made using the thinner and thicker sliver shimmer card stocks:


Here is a photo of the bows to show the sizes:


The new larger bow die set makes a bow that will work well on gift bags and larger projects. With the thicker silver shimmer card stock these dies cut well and the stitching on the die shows on the card stock:


I also picked up red heart crystals from my last shopping trip to Hobby Lobby so I will add those to the center of the bows for Valentine's Day.  IRL  these silver shimmer card stocks are very sparkly and the weight of the card stocks give the bows a nice shape.

My PIC (stamping Partner In Crime) and I are going to the SSAT stamp show in Columbia, SC in two weeks and we will be shopping the Pink and Main booth for their other new products. Always fun to shop at the stamp shows and see all the card/project display boards and product lines. TFL

Sunday, January 6, 2019

Altered project


This year I will be making different projects I have seen that I have wanted to try and make but never had. Decided I would start with a project I have wanted to do for a long time. . .

These are called Altered Paper Clips and I am using my paper clip vertically rather than horizontally as many of the altered clips are. Here is a photo of my Altered Paper Clips:


The first one I made:


The image of the vintage woman and the seed packet I founded on the internet and you can print them out for free. I used the computer printer and printed them out onto white/GP card stock. Set these aside.

Have seen many of the altered paper clips online but I did not want to make a small one. For the base of my altered clips I used the Memory Box Sideshow Tickets die set. This is a photo of the die set:


The size I used was the second smallest die. For the above ticket I used cream #110 weight card stock from Mikes. I cut out two tickets - one for the back of the paper clip and one for the front. This photo shows the front ticket piece and the printed card stock ticket I will put onto the front ticket:


I used the ATG and put the printed card stock onto the ticket base. Using a pink distressed ink I sponged the edges of the ticket front. With that done I put the paper clip onto the back ticket base and attached this to the ticket front pieces using red sticky tape. With the ticket pieces together I could now decorate the front.

I used scissors to cut out a photo of a woman I liked and a seed packet I wanted to use. I do not have the 'torn edge' scissors to give the photos of the woman the torn edge look but I have a die set for that from Frantic Stamper. I die cut the four sides of the photos and then sponged the edges of them using distressed inks. Set those aside.

For the "love" and word stamps on my altered clip pieces I used an old stamp set from MFT.  I cut them out using scissors. The red crystals are from my stash. I cut out two sets of three circle red crystals and put one set at the top of the ticket and the other set at the bottom. Wanted to add cheesecloth to the ticket so I cut a small piece of cheese cloth and I laid that onto scrap copy paper. I dabbed this cheese cloth using an applicator and distressed ink to give it the pink colour. Using TomBow glue I put glue on the front of the ticket and laid the cheese cloth onto that and pressed it down so it would stick. Set it aside.

Using a pearl from Hobby Lobby I added a pearl to the bottom of my ticket pieces and in this next photo I show this pearl on the second ticket I made:
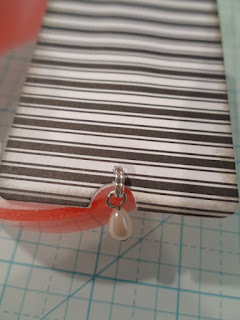

With the pearl in place I now decorated the front of the ticket. For the seed ticket I laid the seed packet photo over the cheese cloth and put that on the ticket using tear and tape. For the photo of the lady I cut out a small cream doily using an old Cheery Lynn doily die. Cut that in half using scissors. Lightly sponged the edges using the pink ink.  Used scrap cream lace and cut off some of the edging of that and put the photo on top of that using red sticky tape.  Then I put this on top of the half doily piece using tear and tape.  Wanted her photo to be higher for dimension so I used foam tape behind her. Put her on the ticket over the seed packet piece. Added a red crystal heart to her photo and also to the seed packet.  Put the "love" greeting on the ticket front using glue dots. To finish the ticket I tied a piece of red ribbon at the top. Here is a photo of the other ticket I made:


For this ticket I used a floral card stock print that I just bought at Hobby Lobby from Prima. The black and white card stock is from my stash. This ticket is a base of white #110 card stock from Mikes. I also used the white card stock to cut out a Cheery Lynn doily die piece and cut that using scissors to fit behind the floral ticket piece - for this altered paper clip ticket I used the floral print and cut out the smallest ticket die in the die set for a smaller ticket.

Once again for the vintage lady photo I used the torn edge die for the edges of the photo piece. I had bought a hard cover dictionary at the thrift store for a quarter and I tore a piece of a page out of the book to put onto the ticket front. For this ticket I also used cheese cloth but left it the white it comes as. Used liquid glue to put that onto the ticket front and also put the dictionary page piece onto the ticket with that glue.  Set that aside to dry.

For the photo piece of the lady I added a piece of black ruffled trim from my stash trimmed to fit behind the photo.  Put the floral ticket piece onto the ticket front using tear and tape. Then put the lady photo piece over that also using tear and tape. Once again the stamped words are from the old MFT stamp set and I used black in from Close To My Heart for those. Cut them out using scissors and put them on the ticket front using tear and tape. Added pink crystals from my stash to the upper and lower corners of the ticket front.

For the pink rose -- had that in the box of supplies for the tussy mussy's I had made and I used clear TomBow glue on the tips of the rose and sprinkled it with glitter. Set it aside. Using scrap green card stock I punched out two sprig pieces using the sprig punch from M Stewart.  Put the rose onto the sprig pieces using hot glue. Also used hot glue to put this rose onto the ticket front. Added a piece of black satin ribbon at the top of the altered paper clip ticket piece.

I will use these altered paper clips to slide on the top of the gift treat bags I am making for Valentine's Day. I am happy with the size I made these and each one is different but even tho I am currently working on some more.... they are addictive!!! But fun and good to use scraps of different things I have on hand. Happy I have tried to make something new and for making something other then cards, tags, or treat holders.... TFL

Tuesday, January 1, 2019

Rose Garden Thank You Card


Stampin Up recently posted new items to their Clearance Rack section and I ordered the Rose Garden Thinlits die set. The price was 40% off the regular price so I was happy I was able to get this die set at a cheaper price. My order arrived last Friday and today I was able to make a thank you card using my new die set:


Had always liked this die set but did not like the price - and I also did not need the matching stamp set so did not buy the bundle when it first was for sale.  But since the release of this bundle set many cards have been posted using them and so it goes.... Happy me that the die set was on sale - -

This card is on a card stock base of Stampin Up Real Red, cut and scored on the side. The white piece is GP cut at 4" x 5 1/4" and I die cut out the rose and leaves die from that. Put the solid right side of the white/GP die cut piece onto the red card stock base. Using clear TomBow glue I put glue under the rose and leaves piece and put this onto the card front fitting it into the solid white die cut piece. Using a stamp from the Close To My Heart stamp set "Card Captions" I stamped the "thanks" onto the solid white card stock using Stampin Up Real Red ink.

With the stamping done I added a white mixture of sequins from Pretty Pink Posh to the card front. In this next photo I tried to show the sparkle and shine of these sequins but the photo does not show it well:


Some of the sequins in this mix are clear, white, or have a mirror finish to them so IRL they are very sparkly. The Rose Garden die cuts very well and I had no problems with the die cut pieces falling off my die cut piece by themselves. Happy to add this die set to my collection and esp happy I paid a sale price!  TFL

Monday, December 24, 2018

Gift bag topper


Bought a used die by Sizzix For Stampin Up "Clear Oval Accent" for $2.00 from another stamper. Knew I would use it for a treat bag topper for Christmas this year and here are a couple of photos of this die in use:


This next bag topper I added a paper doily to it:


This is a large die and for the treat bag topper I used the die piece folded in half. Here is a photo of the die and a piece of copy paper I had die cut for my pattern:


With the copy paper die cut piece I folded it in half width wise so I would have the center of the die cut piece. Using a pencil I made a small line on the center fold so I would know where the center of this die cut piece was:


I die cut my red card stock for my treat toppers that I would need. I laid the copy paper die cut pattern piece over the red card stock pieces and marked the center of the red die cut pieces using the center pencil line on the copy paper pattern:


With the center marked on all the die cut red pieces I was able to score them down the center on the score board. Once scored I used a bone folder to crease the scored lines. These red pieces would fit over the top edges of my treat bags. For the greeting I used a stamp from Close To My Heart and stamped that onto white/GP card stock using red ink. Used a 2" circle punch and punched out the greeting piece. Put these circles onto the red die cut pieces using the ATG.

For the bows I used the SU Bow Builder punch. The Christmas tree is a punch from Hobby Lobby and I used glittered card stocks for the trees. For some of the treat bags I added red crystals from the stash. With the red die cut pieces decorated I put them on the front of the treat bags using tear and tape. The folded red die cut piece goes over the top edge of the front of the treat bags. Once that was done I put my smaller treat holders inside the bags and added paper shred to the bags.

For the bag with the doily after I had decorated the red die cut piece I put a white paper doily under the decorated end of the die cut piece using tear and tape. Then I put this onto the treat bag. With all the treat bags filled I added a regular sized candy cane to the bags and hung one of the snowman tags on the candy cane - here is a photo of the snowman tag:


Happy to be able to pick up the Oval Accent die for $2.00 earlier this year. Am sure it will get more use in future projects as well.

Sunday, December 23, 2018

Christmas Cards

Here are some photos of Christmas cards I made for this year:


For the card with the ornaments I used two Stampin Up stamp/die sets. Some of the cards I used the detailed circle ornament die from the SU Embellished Ornaments over a plain circle die cut piece. For other ornament cards I used the same detailed ornament die and I used the solid ornament die from the SU set Ornament Keepsakes. Here is a photo to show the two different ornaments:


The green ornament on the left is over a die cut circle piece. The red ornament is over the solid die cut ornament piece:


The above photo shows the difference between the two ornaments. Having the silver ornament base show around the red ornament piece gives the ornament dimension. Did not know these two die sets would work together until I tried it out. All the sprigs on these ornaments were made using a punch from M Stewart and I added crystals from the stash to the center of the bows on the ornaments when the cards were complete.  TFL

Christmas Treat Holders


This post will show some of the treat holders and projects I made for this Christmas season:


Tags from the office supply store that I turned into snowman tags using a snowman face stamp from Morningstarstamps.com with a curved tab punch for a hat and holly stickers from HobLob:


And Santa Nuggets with a tray:


The mason jar box treat holder:


Pillow boxes:


Candy Cane Seeds made with individually wrapped peppermint candies:


Santa Tootsie Pop Holders:


Snuggets:


Free standing Ghirardelli treat holders:


and the Snowman Hanger to hang on a gift bag handle or a tree:


Always fun to work on Christmas projects! Now working on de - redding and de - greening the craft room!  TFL

Einstein has left the building . . .


Love when I see a card out in the "internet universe" only to not be able to find an original post or the how-to's or anything.... but it is what it is.... Here is my version of that card and the how-to's to how I put mine together:


Wanted to make this card since it seemed simple to put together and it has a rustic look which I wanted. Where to begin?

I already had the snowflake die used for the white snowflake for the center of the card so thinking I was set to go the process began.... Die cut my snowflake using #110 weight card stock from Mikes. With that cut I measured the width/length of the snowflake so I would know what size circle behind it I would need. I used the Layering Circles die set from Stampin Up and die cut a white circle using white/GP card stock for the larger white circle. Using a smaller circle die from that die set I cut out a green printed circle, a red printed circle, and an ivy printed circle. Figured to get this circle look for the card I would die cut the printed circles, find the center of the circle on the back side using a ruler, and then cut these circles into quarters and WA LA !! I would have my pieces for my printed circle to go behind the snowflake.... Great idea but wrong! Here is a photo of the first attempt to this circle:


Looked great and should work... until it didn't -- not all the pieces would line up to make a perfect circle so off to plan B....

This time I used copy paper and die cut the same larger circle I used for the white circle on the card. With the copy paper circle die cut out I folded it in half and then into quarters - using that folded copy paper circle in quarters and a pencil I traced the quarter circle shape onto the backside of the printed card stock. Took it to the trimmer and trimmed it on the pencil lines.  Did this twice with the ivy print and once for the green and then the red which gave me the four circles. Here is that photo:


To put these printed pieces together first I had cut a second larger circle from white/GP to use as a base and I covered that with the ATG for adhesive and then put the four quarter pieces onto that. With all the pieces on the circle base I used the smaller circle die I needed for this printed circle and die cut that out:


After my printed circle was cut:


By making the printed circle larger than what I needed and then cutting it down to the circle size I would need using the smaller circle die this circle would have even edges and have a more finished look. With this printed circle cut out I put it onto the white/GP larger circle using the ATG.

For the snowflake I die cut the white snowflake out of the heavier weight white card stock from Mikes. For the light brown snowflake I used a smaller snowflake die and cut it out of the SU Crumb Cake card stock to match the card stock base for my card. Layered the two snowflakes using glue. Set these aside.

Using the SU Banners die set I die cut a banner that was a bit smaller than my white circle behind my snowflake/circle piece. Die cut that using white/GP and stamped a greeting on that using red ink* from Impression Obsession and the stamp is also theirs.  For the card stock base I cut and scored a piece of the Crumb Cake card stock at the top. Using a pencil and ruler I made a light pencil line across the front of the card base. Using a piece of the red printed card stock I cut that to about 3/4" wide to put across the card front using the pencil line to keep it straight.  Put that onto the card front using the ATG.

Put the greeting banner onto the red printed strip piece with tear and tape. Put the circle die cut pieces over the top of the banner using the ATG. Put the snowflakes piece onto a pop dot and put them in the center of the printed circle piece.  Using a small snowflake die I cut out snowflakes from white glittered card stock. Put three small snowflakes onto the card front using glue dots.  Added a red crystal to the center of the snowflakes piece. This card turned out well once I figured out how to make it . . . but clearly no Einstein in this craft room!! ;0)

* Red ink - My plan for this card was to use a darker, richer looking red ink for the greeting. Figured my best bet would be to use my Stampin Up Cherry Cobbler ink to match the red on my prints. Here is a photo of both my Raspberry Ripple and the Cherry Cobbler ink pads:


Now a photo to see them opened:


SOOOO not happy with the bumps and mess on each of these ink pads. I do not understand what is wrong with either of them - I do not store my ink pads near a window or the heat or air conditioning vents or on their sides. They are stored in a stamp pad holder from Organize More and I store other brands also in this holder and none of the other brands have ever done this so clearly it is the formula that SU uses for their "new" foam ink pads. But happy to say the red ink from Impression Obsession is a good Christmas red and it worked well for this card. Needless to say these two ink pads are no longer usable for me...


Family of Flakes


LOVE the Snowmen face stamps from Morningstar and I always make the Snuggets that are Hershey Nuggets for every one for Christmas... I sometimes also make Snowman face tags to hang on gift tags or gift bags, etc.... This year I wanted to use my small Snowman face stamp for another project and I am very happy how they turned out -- first here is the link to buy the Snowman face stamps from Morningstar -- I own both the small and larger face stamps but for this project I used the small one:

http://morningstarstamps.com/stamps/snowmen.html

To start this project I wanted to make something that I could hang from the handle on a gift bag. I also wanted to use items I already had on hand in my craft room and here is what I made:


The photo above shows two of the wooden "Snowman Hangers" that I made - I named them that because they can hang off the handle of a gift bag or even be hung on a tree or something. To start with the only wood for crafting I had in my craft room are the wooden craft sticks that are 1 inch wide and approx 8 inches long.  I had no pattern to go by but decided I wanted them to be approx 3 inches long from the curve of the stick to the bottom of the snowman.

Using crafting scissors I measured the 3 inches and cut the craft stick. Did not like that it was so thin so decided to cut another 3 inch stick and glue them together to make them thicker. Once dried I decided that would be the way to make them but.... wanted to be able to hang these Snowmen Hangers so I would have to get a piece of twine on the stick for hanging. . . Decided the best way to do this would be to have a hole in the top of the stick - the curved end under the hat - for the twine.  Using a scrap piece of the craft stick (single layer) I used a small hole punch and gently punched a hole for the twine. I was happy the hole punch did not cause my stick to crack or break! With this all figured out I started all over --

Using the full 1 x 8 craft stick I used the hole punch near the curved ends of the stick for the twine to go through. (I measured this so the holes on all the craft sticks would line up).  With the holes made I glued the two long sticks together to make my snowman thicker using wood glue. Once the glue dried (does not take long) I asked DH if he would cut my sticks into 3 inch lengths and he did - I made a lot of these and he could cut them faster than I would be able to. With all the snowmen cut to length I used white craft paint and painted the front of the snowman. Once dried I painted the back of him.

Here are some photos to show how I added the twine to my dried double layered snowmen:


I used an awl to get any paint out of the holes for the twine to run through on the front and back pieces of my snowman. I used a large eyed needle to put black thread through the hole for the twine. I ran the twine (approx 10 inches long) over the black thread before I pulled the black thread through the holes -- this photo might show this better:


With the twine through the holes I used Memento black ink and stamped the small Snowman face stamp on the craft stick about a 1/3 of the way down from the top curve of the stick.  Then I cut the hat for the snowman. His hat is a finger tip from a black pair of soft gloves from the dollar store.  To attach the hat to the snowman stick I used tear and tape on the front of the stick and the back of the stick.  I put the twine through the large eyed needle and put it through the center top of his hat:


With the twine through the top of the hat I peeled off the tear and tape paper backing. I flipped up the bottom of the hat to give it a brim and positioned the hat were I wanted it. Once it was in place I pressed the hat into the tape to hold it on the snowman. Using an orange marker I coloured in his nose.

Below his face I added more tear and tape to the front and back of the snowman stick to hold my ribbon/scarf piece. Cut the plaid ribbon a little longer than I wanted and wrapped it from the back of the snowman to the front of him. Pressed it in place. Snipped off the ends of the ribbon I did not need. To dress up this ribbon scarf I used a small snowflake die and die cut a snowflake from white glittered card stock. Put the snowflake on top of the ribbon where the pieces over lap. Added a red crystal to the center of the snowflake on the ribbon.

Here is a holiday family photo including the new members -- ;0)   haha:


So all in all being "flakey" is fun and the small Snowman face stamp is perfect for all the projects I put together! TFL

Monday, November 26, 2018

Another 30 . . .


Last year a gal at work asked me to make 30 holiday tags for her Christmas gifts for her family. Here is a photo of some of those:


Once again she asked me this year for another 30 tags and here are photos of the tags I just made:


Best way to make multiple tags is to die cut all the tag shapes out in various colours and sizes and prints so as you are working along all your bases are ready to go. Was happy to use so many of my dies/stamps/washi tapes/trims for these tags. First I thought it would be hard to come up with 30 different tags -- especially since I did not duplicate any from last year -- but I had made a few extra before I realized I had finished the 30 I needed! Fun to make a project that goes together quickly....