Sunday, October 6, 2019

Road trip with my PIC


Yesterday my PIC (stamping Partner In Crime) and I headed out in the dark for a used stamp sale that is held once a year that we have shopped in the past.  For both of us we really did not have a "must have/find" list but we were sure we would find something we did not know we "needed" . . .   ;0)

Here is a photo of the set up in the parking lot:


We arrived a little early and many of the sellers were already set up or setting up and they let us shop when we arrived. My PIC was able to get a great deal on Close To My Heart brand new photo albums so she was happy to find those.... that was probably her "big find" whereas with me I came across a bit of this and that and I was happy.

About a month ago my Big Shot machine decided it cut it's last die.... sniff..... but since I had bought that machine used to begin with (SU pricing for new is too expensive for this crafter), I guess I could not complain as I had used it for a few years.... This one seller had a Big Shot machine at her booth and she said to make her an offer and so I did -- for $10 I brought this home:


Dusty from storage but a clean up will work. DH said he can put the handle back on it and I can use this Big Shot or he will take the gears out of this one for the Big Shot I already have.... either way I will be back in the Big Shot die cutting business soon . . .   this same gal also had a big bag of BOO Day stuffs for $15 .... she said she was open for all pricing so I offered her $10 for the BOO bag and I brought that home as well:


Inside this bag is chipboard pieces, stickers, washi tapes, ribbons/trims, bone shaped alphabet stickers, tags, etc.... Great additions just in time for my BOO Day projects I am working on. . .

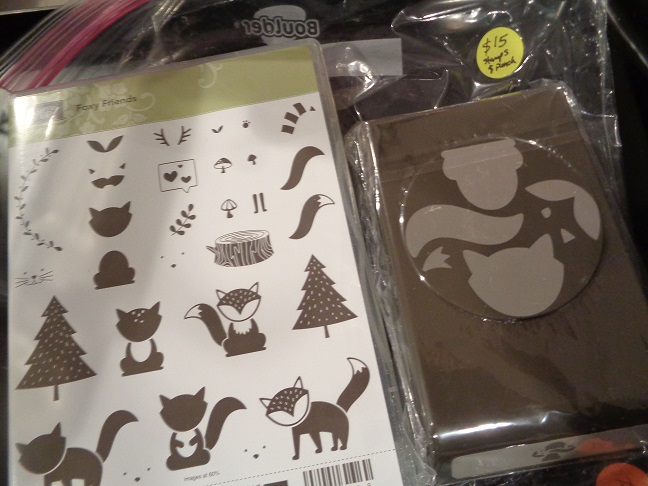
I will say it is seeming like Stampin Up is passing it's prime.... don't think one of the booths was not selling SU stamp sets, card stocks, tools, trimmers, inks, dies, etc..... I shopped all the booths and had seen this bundle at one booth but the stamp set was well-loved and the clip to keep the punch closed and flat for storage was broken - that set was $15 and I did not get it since the punch clip was broken... but happy to say I found the same bundle at another booth - brand new stamp set and new punch in the original packaging for the same $15 price:

At another booth I also found another new bundle:


Also bought two die sets - one was $2.00 and the other $3.00:


They are the Lantern Builder and Four Seasons die sets.  Also came across packages of the Really Reasonable Ribbons for $2.00 a piece and was able to find a couple to bring home:


and a couple of stamp sets:


with two other items:


Holly background stamp from Just Rite Stamps and a Sizzix die set for $3.00:


And a used bundle:


and two brand new Sizzix dies of the month sets:


Was happy I did not bring one piece of card stock home.... so happy about that....  After we left there we decided to stop for lunch before we headed home and happy where we ate lunch is near a Hobby Lobby.... here is my big purchase from their Clearance Section:


$2.00 for a bag of the bakers twine -- in the back of this bag is silver and gold bakers twine and those will work for Christmas craft projects....  Fun day shopping for new to me additions to the craft room.... now to get it all unpacked.....  hahaha

* * *   UPDATE * * *

Used Simple Green and cleaned up the new to me Stampin Up Big Shot machine and happy to say it works well:


Once I tried out the machine and it cut well all I had to do was pop off the black Sizzix tool caddy from my old Big Shot machine and put it on this one. Everything is back in place on the die cutting cart and off to die cut more BOO Day projects~~happy for $10.00 and a good cleaning all works well!

1st, 100th, FINALLY!!


** Photo transfer issues so will put on some photos from the camera rather than the ones on the phone**


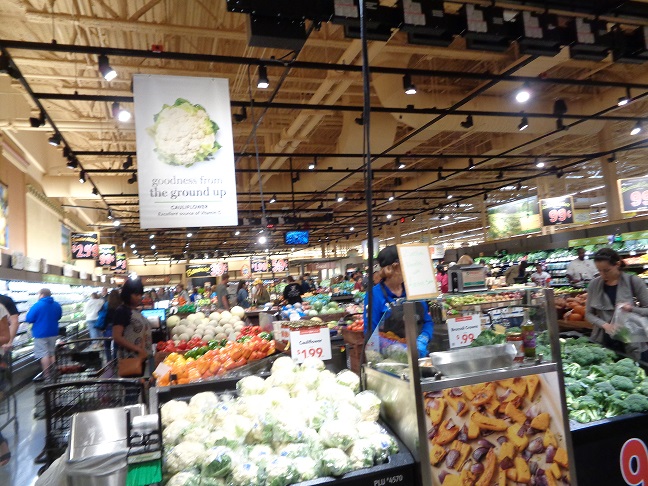
WOO HOO!!!   FIRST Wegmans in North Carolina!! 100th of their stores!!  Wegmans has ARRIVED!!   Grand opening of the new Wegmans last Sunday in Raleigh, NC..... I waited two days and went on Tuesday.... here are photos:

So happy to have a Wegmans nearby again.... Wegmans has always done a "bit more" for their customers -- IE:  Apple signage in produce has the name of the apple, what the taste/texture is and maybe what it is best for - snacks, baking, cooking, etc:


Over in the Meat Dept they have plastic bags to slip your packaged meats in and their signage above that will tell you their pricing VS two other popular competitors in your area:


Plus they have a fresh Floral Shop, Bakery, various food bars, Cheese Shoppe, deli section, fish section, and on and on:

and so much more... you can order a pizza from the pizza shop, a sub from the sub shop, stop at the Sushi Bar, etc..  If you can't find it in this store then I am guessing you won't need it..... plus it sells a lot of groceries/brands the locals don't..... A fun stop for sure.... and as a shopper not only you get to have a fun shopping experience.... but in the end your grocery cart also gets a ride:

This is my grocery cart getting a ride on the cart escalator next to me on the way to the car in the ramp garage -- free parking (and shade - haha)..... LOVE they are here now and happy the DSD is on their management team at this store!! YAY!!


Wednesday, October 2, 2019

Autumn Cards


Late sending out the Autumn cards for this year....but when it is 96 degrees outside Autumn does not come to mind...

For the cards this year I used Autumn printed card stocks from my stash as well as a collage die. For the "Autumn" die cut piece I used a die set from Karen Burniston.  I die cut the word from glittered card stock. I also die cut this word from the pull top of a kleenex box to give the word some stiffness as well as depth. I covered the kleenex pull tab piece with Sticky Sheet and then die cut the words. Adhered these words behind the glittered words:


Here are photos of the cards with the various fall prints:


 For the glittered leaf I used an EK Success single leaf punch. The card base for this card is the #110 weight Kraft card stock from Mikes.  Had never used this before and it is a good weight for card bases. TFL

Saturday, September 28, 2019

Altered Dollar Tree items


Had seen a video on YouTube by  "Jody's Craft Room"  using the Halloween thin wooden shapes from the Dollar Tree altered so I thought I would give it a try. . .   Here is a photo of these thin wooden shapes before I started:


I already had craft paints on hand so I used colours I have. Dies I used are from my stash from various manufacturers. Small Halloween wooden shapes are from Hobby Lobby:


One of these shapes is the spiderweb I used on the ghost. Flowers were also from Hobby Lobby when their PaperStudio brand was on sale for fifty percent off. For the "BOO" and the eyes/mouth for the ghost I used black glittered card stock from Hobby Lobby. For the black card stock for behind the pumpkin I used #110 black card stock from Mikes that I cut with scissors to fit behind the pumpkin. To make a pattern I laid the pumpkin on a sheet of white/GP card stock and traced around it with a light pencil line. I used scissors to cut that shape out cutting about 1/4" inside the shaped line so that the black piece could not be seen on the edges of the pumpkin. Here is a photo of the pattern piece:


I used liquid glue to put the black card stock behind the pumpkin. Here is a photo of my altered items and a big thanks to Jody for her inspiration! 


Bling it on -- decided to add a couple of touches to these altered items. For the pumpkin I die cut "Happy Halloween" from black foil card stock and put that on the upper left side of the pumpkin:


I also used clear Wink of Stella over the petals on the flowers for some shimmer:


For the ghost piece I added clear Wink of Stella to the die cut fence piece at the bottom:


Set these aside for holiday decorating now that they are finished.  TFL

Sunday, September 22, 2019

The work out. . .


Certainly the glass craft mat on my work table is getting quite the work out lately -- so much so that I had to clear it off to clean off glue and residues from craft products:


Used a kleenex and Goo Gone and cleaned off all the glue residue and such off the glass We R Memory Keepers mat on my work table. Once the mat was cleaned off I used a baby wipe and wiped off the mat to get any Goo Gone off of it. With that done I dried it off with a paper towel and back to work for the mat:


Lots of projects are "in the works" in the craft room ---


Still don't understand why when I watch a FREE video on YouTube that it costs me money on Amazon?????  hahaha.... wondering if Amazon actually owns YouTube???????     ;0)

Went to a larger Dollar Tree this week in an area I don't usually get to shop in - they were setting up a full Craft Section and happy me I was able to located something to bring home.....


They sell craft paints, chip board shapes, glass bottles, glitter, glue remover, scissors, an exacto knife with different blades, Aileene's glue, sequins, etc.... the gal setting it up said the larger stores will all have this section so something to keep checking out to see what all they will be carrying.....

Also -- DH was driving us earlier this week to a Hobby Lobby and we ended up behind a tractor trailer with the cutest bumper sticker on the back door -- I took a photo with my phone but it is not very clear -- the bumper sticker reads "Blinky thing means I am turning"......   I read it and DH did not know what I was laughing about so I had to take that photo to show him and I told him what it said.  Cute sticker....

I am supposed to be finishing my fall cards and get those mailed out this week but wanted to share about the Dollar Tree and such.   TFL

Saturday, September 14, 2019

Wicked Hershey Bar Treat Holder


My SU order for the "wicked" die set arrived this week and I wanted to put it to use right away. I had seen this video by Lisa on YouTube:

https://www.youtube.com/watch?v=woq0p8h7bnU

She has a very easy pattern for this treat holder using a piece of 6x6 card stock or if you use a sheet of 12x12 card stock you can make four treat holders. Some companies offer a die for the Hershey bar treat holder but just using a score board will give you the same results. Here is a photo of two of the treat holders I put together that have the candy bars inside:


Here is another photo to show when you pull on the ribbon bow the candy bar is exposed:


I made other treat holders but will wait until we are closer to BOO Day to put the candy bars in the holders. (DH has already eaten one of the sample candy bars in the photo.... ;0)   This way I will have fresh treats for the holiday).

Here is a photo of the other treat holders I made but they are still flat and not closed:


Since I will not be putting the candy bars in these other holders until the end of October I typed up the directions Lisa gives on her video to keep in the storage pouch for this project with the holders I have ready and pieces/parts that are extra:


Having the directions inside with the holders that have to be assembled will remind me what to do to finish them -- where to put the tear and tape to close it, to use the crimper on one end, to sponge the edges, and to add the sequins, etc.. A big thanks to Lisa for sharing such an easy treat holder and happy I was able to use some of the prints from my 6x6 holiday paper pads!

I will say with Stampin Up discontinuing their Sizzix Big Shot machine and chatter out there suggests they are changing their dies and you would need a new machine to use the new dies I did not order from their holiday catalog.  I have far too many dies already to have to switch to a new die cutting machine for some other dies..... But in Lisa's video she used the new "wicked" die set and she easily cut them out using the Big Shot machine so that sold me on ordering this die set. So thanks to Lisa for the inspiration!

Sunday, September 8, 2019

Amazon share


With me working on BOO Day projects as well as Fall/Thanksgiving and Christmas projects lots of "project piles" were showing up in the craft room.  These piles were getting out of hand and inspiration to finish was fading .... fast.....

My new arrival from Amazon arrived earlier this week and already piles are fading.....   I bought these plastic snap closure envelopes off Amazon in a set of 30 envelopes:


These envelopes are approx 9" x 13" and you can see through them so no labeling is required. Here are two of these envelopes in use for my ongoing BOO Day projects:


I have all the pieces for the BOO Day treat bags in one envelope and in the other are die cut pieces I will be turning into treat holders for BOO Day.  Here is a photo to show the detail of the envelope:


The snap closure keeps all the small pieces inside the envelope and you can get a lot of items in these envelopes. These envelopes would be perfect for crops and classes and anywhere else you would need to take your paper craft projects with you. In this envelope I have all the pieces to my treat holders except I have not yet cut the insert pieces to make these into a treat holder.  But when I have the time to do that I can put them in the envelope for assembly and filling later.

Another good thing about using these envelopes for projects in progress is nothing on the work table will get lost in the "project piles" or stuck somewhere they should not be.  Plus I keep these filled envelopes together in a basket and this keeps the work table cleared off - which seems to be an ongoing challenge for this crafter...   ;0)       Also sometimes my time is short in the craft room so with the envelopes and all the pieces/parts together I can work on one of the projects that is already started rather than start another one. 

Amazon sells a variety of these clear plastic snap closure envelopes in different quantities and sizes but I bought the larger quantity in this size because I plan to use these envelopes for projects and also for storing some other items in the craft room.  This is another good purchase off Amazon for the craft room - esp with helping getting things organized - which certainly is an on going project in itself for this crafter . . .

Saturday, September 7, 2019

Hey Ghoulfriend!


BOO Day treat bags -- have started those and still working on them but have four of them done and here they are:


and also:


Bought the paper bags from the Dollar Tree.  Witchcraft die is from Sizzix. Miscellaneous holiday printed card stocks are from the stash.  Used various black trims from the stash as well as the sequins. "Wicked" is a Sizzix die and I used glittered rust card stock from Hobby Lobby for that. Cheesecloth is from Mikes.

When I cut out the witch I decided to "dress" her to show the detail of this die. For the black cat I used flocked black card stock so the cat has a soft texture. The white die cut piece the witch is on uses a die from AliExpress. It cuts a smaller framed piece but I wanted to use the die for the bag front so I measured the width of the die and cut white/GP card stock to that width. I measured the front of the bag and decided the length I wanted the white framed piece to be and I cut all white pieces to that length. I then die cut the ends of the white pieces only to give the top and bottom edges some dimension. With all the white die cut pieces done I sponged the edges of the white pieces using black Memento ink. Used a small background stamp and stamped all the white pieces with black ink.

Using various prints from the stash I cut them large enough for the front of the paper bags and a bit larger than the die cut white/GP pieces. I used tear and tape to put the prints on the bag fronts. Using liquid glue (I used Beacon 3 in 1 glue) I put the 'dress' on the witch. Set those aside to dry. Using various black trims I put the trim on the left side of the printed pieces on the bag fronts trimming those to the length I would need. Some black trims I added silver sparkle gem strips to to give the trim some sparkle and shine. Using the same liquid glue for the witch dress I added the witches to the white pieces. Set them aside to dry. For some of the bag fronts I added cut white cheesecloth and other bags do not have it. I trimmed the cheesecloth to the size I wanted for the bag fronts.

With the trim on the bag front I used tear and tape and put the dried white pieces to the bag fronts over the cheesecloth pieces. I did not use adhesive for the cheesecloth since it is so thin. The tear and tape holding the white bag fronts to the bags will hold it in place.  Used Glossy Accents and added sequins to the white pieces around the witch - carefully leaving space to add my cat later. Used red tape to add the black cat to the witch fronts.

These bags will be used to put Halloween treat holders in so they are just the right size to hold a few of the treat holders.  Have a few more to finish and then onto another project. TFL

Monday, September 2, 2019

Dollar Tree Stop


Stopped at the Dollar Tree over the weekend and picked up a few things for projects I am working on.  I had seen this sign and decided to pick that up knowing I would be adding to it:


Decided to add a fall coloured bow and two pumpkin buttons I had in my stash:


Also picked up a couple of packages of thin wooden painted and glittered pumpkin stickers. Earlier this year I picked up a used Fun Stampers Journey Pillow Box die at a sale.  This is a small pillow box that measures 2" x 3".  Wanted to use the pumpkin stickers on the fronts of the pillow boxes but did not want to use the pumpkin stickers as they were.  I had picked up layered sunflower stickers on sale at Hobby Lobby so I added those to the pumpkins. The layered sunflowers have a pop dot between the two flower layers as well as a pop dot on the back of them. Using both of the pop dots would make the Sunflowers too high for my pumpkin fronts so I peeled the pop dot off the backs and used hot glue to put the sunflowers onto the pumpkin fronts. I also used a sprig punch from M Stewart and punched out sprigs to put behind my sunflower stickers.  For the sprigs I used gold foil poster board from the Dollar Tree. For the belly bands around the pillow boxes I used scrap autumn themed card stock. Here are the pumpkins:


Here is a photo of the pillow boxes with the billy bands in place:


And the pumpkins on the pillow boxes:


An easy treat holder for Autumn ready for chocolate treats. Happy I found this small pillow box die at a great price and with it making a small pillow box it will be a treat holder for just a few treats. TFL

Saturday, August 31, 2019

Time's Up . . .


Time's up. . .   Summer has come and gone, online sales have brought more products into the craft room, craft stores have had "lowest prices of the season" -- whatever that means, and so it goes... but time is up.... Time to stop working on all the projects I have started and find the top of the work table DH built me in 2017....  to put all new to the craft room products away, to stop trying to re organize or move things around.... Seems I have spent more time doing things in the craft room that do not end with completed projects... So this weekend I decided I will finish all the sorting, taking product out of packaging and putting things away where they belong.

Here is a photo of the top of the work table that I honestly have not seen in awhile but am glad it is still there!


Decided to keep my Bow-It-All on the work table top so I can get to it easily for use:


I put the Stamparatus on top of the MISTI in the same slot to free up a slot for the Bow-It-All in the white storage bag. Next to these items is a clear bin from Bed Bath & Beyond that holds refills for the ATG. Above the Bow-It-All is a cabinet storage rack from Walmart that is plastic coated. This rack can be used in the kitchen to hold pan lids.  I use it to hold my score boards - Two M Stewart boards, (one is for the craft room and the extra is for classes), also two of the Scor-Pal regular sized score boards - one for inches and the other is centimeters. Also have a mini Scor-Pal - again for classes. I also keep my small Fiskars trimmer in this rack. Here is the other side of the work table:


This side of the table has the Pamper's Chef tool caddy on a lazy susan from Bed Bath & Beyond with a Post It note holder and the holder for my stamp cleaning cloth. I keep my white/GP card stock in one slot and the bottom slot has the white #110 card stock from Mikes. I use a lot of white card stock so keeping it handy on the work table works well. The holder that has the slots I picked up long ago at a Restore. It was used under kitchen cabinets over a mini desk area to hold desk items. I am happy when DH built my work table that he knew I would want to keep using this piece so he made sure it would fit on the work table.

Happy I have found the table top once again and things are put away. Hope to finish the rest of the craft room over the weekend so next week I will be all set to get back to the BOO Day, Fall and Thanksgiving, and also Christmas projects I have already started....  Sometimes we just have to stop and clean and sort items so we can begin again with a clean work table for our creativity.  TFL

Thursday, August 1, 2019

New arrival to the craft room


Happy to say my Bow It All - V.3  arrived and is now in the craft room.  Had seen lots of crafters using this tool on YouTube videos and blog postings so I decided to buy one for myself. Amazon sells these and with Prime shipping that is free and in a couple of days it arrives!

The first bow I wanted to make was a Double Looped Bow so using gingham ribbon from:

www.reasonableribbon.com 

They have a good variety of ribbons and such with good prices. With upcoming BOO Day (Halloween) projects already started in my craft room I thought the black and white gingham bows would be good additions. Here is a photo of the box:


Inside the box is the bow working board in a zippered bag and a all the tools needed to use the bow maker:


On the sides of the bow working board you can store all the ribbon pegs and the wrench to tighten your ribbon pegs. You can keep the ribbon spools, the plastic "helping hands", and the scissors in the zippered bag for storage. This tool comes with a how-to booklet as well as a thin supplement booklet so you can begin making bows right away.

The first bow I made is the Double Loop Bow and here is a photo of that:


Easy peasy!! This is going to be a good addition to my craft room since now I will be able to make a variety of bows but also a very small bow all the way up to a large bow. There are lots of videos on YouTube for the how-to's for this product for inspiration but I especially am happy I can also use up my one sided printed ribbons to make nice bows with both sides of the print showing on the bow. When you are making your bows you are also looking at the front of the bow the whole time so you can straighten your ribbons or loops out before you tie it off and remove it from the pegs.

You can also use this tool to make tassels and pom poms so lots to use it for.  Have to make a spot on my workbench table to keep it nearby as I am sure with the upcoming holidays my ribbons will be getting used up -- finally!! ;0)