Saturday, January 15, 2022

Izzy, fuzzy slippers with sweatpants . . .

 Expecting winter storm Izzy to stop by tonight and tomorrow so I am happy it is the weekend and that I am off work until next Weds..... So working in the craft room in fuzzy slippers and sweatpants waiting for her to arrive.... Happy to say that a couple of my online orders arrived today -- YAY! Just in time for a long weekend with bad weather....

First -- all of these orders are my first orders with these online stores and happy they arrived quickly after I ordered them....  To begin with when the Cottontail Embossing Powder Tool was released it was sold out all over the place. Luckily I found two of them on the online store of Catherine Pooler. I had never ordered from her before but I was happy to finally find this embossing tool from Rabbit Hole Designs so I ordered one for me and one for my PIC (stamping Partner In Crime):

Also with my first order they gave me a free purple ink pad as a thank you gift. 

Another first order is the Stick and Stamp Mat from Brutus Monroe. I have shopped their booth at different stamp shows but I had never ordered from their online store. Again I ordered two of these mats - one for me and one for my PIC - and I also ordered the cleaner for this mat they sold as a bundle:

This mat fits the regular size MISTI and it can hold card stock in place, holds a stencil in place, and is good for use with a background stamp so you just don't get the edges of the stamped image on your card stock piece. There is a video on YouTube showing how to use this mat with the MISTI and by itself. 

Finally -- my last order that arrived today is from Maker Forte (Hedgehog Hollow).  I ordered the Layering Hearts stencil set. They make all their own stencils on sight so they are made in the USA:


These are not the standard 6x6 stencils either. Their stencils are 8 1/4 wide by 6 7/8 high. Each of their stencils have the stencil name on it:

also the stencils all have pre made holes at the top for storage - either to hang or to put in a binder:

Rather than number their stencils this Hearts stencil set has a small, medium, large, and extra large stencil in the set so you know which order to stencil them in. I also received a free single hearts stencil as a thank you gift -- just in time for Valentine projects!! 

Also ordered a background stamp from them:

Stone Age background stamp that makes an interesting background for a card. Looking forward to using this stamp on upcoming projects..... 

Happy me that I have new products in the craft room -- just in time for bad weather and time off from work!  Stay safe!


Sunday, January 9, 2022

Christmas Thank You Card

 Here is the thank you card I made for my PIC - stamping Partner In Crime - for all the wonderful crafting items she gifted me at Christmas and she loves purple:

I used the Nordic Snowflake stencil from Taylored Expressions for the snowflake design on the white card front. Here is a photo when I finished stenciling:

I used the Wendy Vecchi craft mat and magnets for the stencil. For this card I used purple ink and a blending brush:

To keep the ink pad in place I cut a piece of drawer liner that I keep in the same bin with the stencils so when I stencil all my supplies are together. Once the stenciled piece was done I trimmed it to the size I wanted for the card front. Using a rectangle frame die from the stash I die cut a white frame to put over the snowflake piece for the card front.

The card base is purple card stock cut and scored on the side. Put the stenciled piece with the frame on the card base using the ATG. Die cut a small snowflake using a snowflake die and white glittered card stock. Put this on the card front using a mini glue dot and added a holographic gem from Sunny Studios to the center of that:

Using a "thanks" die from the stash and cut it out of silver foil poster board from the Dollar Tree. Then cut it out of purple card stock. Using liquid glue I glued these two 'thanks' together off setting the silver 'thanks'.  Used foam tape to put the "thanks" on the card front. 

Saturday, January 1, 2022

Sign me up!

 Taylored Expressions came out with their "Create-In-Quads" stencil system before Christmas and their first set was Mistletoe.  I watched the videos and like the concept but I felt Mistletoe was too limiting and did not buy it... but then....

She put out the Create-In-Quads Snowflake set -- sign me up!!! This is a stencil set that uses a larger stencil sheet and each stencil set makes up 4 card fronts. The Snowflake set has 4 stencils. Each stencil is numbered so you know which order to use them. With this being a larger stencil set I had to decide how I would store it and I decided to use the plastic job ticket sleeves that I bought at Staples long ago to store my solid 8 1/2 x 11 card stocks. I used the label maker to label the stencil set:

On the back of their packaging tells you about the stencil set and a sample of what each stencil looks like. I have used this stencil set twice and I am in love -- made 8 cards using this system this morning. Here is my stencil "system" -- I use the stencil mat from Wendy Vecchi that I have used for my stencils for some time -- some crafters use spray adhesive on their stencils to hold them in place while they are applying their inks but the stencil mat with magnets works fine and I do not have to go outside to spray the adhesive on my stencils. Here is a photo of my 'set up':

I have the card stock on the stencil mat with magnets. Next to that I have a piece of drawer liner left over from kitchen drawers and I keep my ink pads on that to keep them from sliding around on the work table. This photo was taken after I started the turquoise card fronts I was working on.  Here is a photo to show the stencils as I was adding the inks:


Once I finished with each stencil I used a baby wipe and gently wiped the inks off and set it aside. Continued on until all four stencils were finished and wiped down. Here is a photo of the turquoise set finished before it was cut apart for card fronts:


sorry for the blurr.... Once this colour combo was done I decided I would change it out and work with totally different colours -- used my 2nd to last sheet of Taylored Expressions Kraft card stock for this next stenciled set of card fronts:


For both stenciled card fronts I used Distress Inks for my card fronts -- except for the white snowflakes on the kraft card fronts. Here is a photo of both sets cut apart and ready for card bases:

Some card bases are scored on the side and some are scored at the top. I embossed and stamped matching greetings for the cards and put the card fronts on the cards:


On the turquoise cards I used these Distressed inks in this order:

Stencil #1   Mermaid Lagoon
Stencil #2   Wilted Violet
Stencil #3   Tumbled Glass
Stencil #4   Peacock Feathers

Here is the second set of card fronts finished:


For these card fronts I used these Distress inks in this order:

Stencil #1   White pigment ink
Stencil #2   Barn Door
Stencil #3   Festive Berries
Stencil #4   Hickory Smoke

The stencils are clearly marked so it is easy to see you are lined up correctly. Taylored Expressions sells packs of pre-trimmed card stocks for this stencil set but I used card stock from my stash and trimmed it to the 8 x 10 1/2 size I would need for stenciled card fronts. Once the blending is all done just trim your larger stencil piece into 4 pieces for your card front that measure 4 x 5 1/4.  So easy and quick to make 4 card fronts that have the same theme but are not the same card over and over again. 

Happy Taylored Expressions has this "Quads" line in stencils and hoping for future patterns as well! Will also say once I finished with the stencils I rinsed them off in the sink with cold water and all inks came off easily -- the white pigment and the reds of the Distressed Inks. Clean up is quick and easy and the stencils are good quality and not too thin with all the detail they have on the snowflakes. 

For my cards I used a banner die set I have in the stash for the greetings and I added holographic gems from Sunny Studio to the centers of some of the snowflakes on the card fronts. I also die cut from scraps small snowflakes using a small snowflake die I got for free with my Sunny Studio order. For some of those little snowflakes I used glittered card stock from the stash... Quick and easy stencil system and am looking forward to other future releases for this line . . .


PIC Presents for Christmas

This post shows photos of the great Christmas gifts my PIC (stamping Partner In Crime) gifted me this year.  Happy to say nothing she gave me did I already have so happy to add everything to the craft stash for use in 2022!

Three Close To My Heart stamp sets, bling and trims for future projects -- hoping to use the rose coloured bells for Valentine's Day....


Bead Smith mat, Poppy Flower die, and three new sets for my Glimmer Hot Foil.. Happy she gifted me an alphabet set for hot foiling -- this is my first alpha set so am sure I will get use from those!!.. Once again she spoiled me with lots of things I did not know I needed and love!!!  ;0)

Also -- here is a photo of two gift card holders I made but inside is a gift of cash rather than a gift card:


Day after Christmas I was running errands and stopped at a Dollar Tree store I usually do not get to shop at and was happy to find these:

Lots of crafters use the Dollar Tree "popcorn tulle" and I could never find the white, red, pink, or blue that I had seen crafters use for their projects.... was happy to find the red and pink at this store in their Valentine's Day section -- bought the red they had left and two of the pink. Glad we made a stop there for sure... Just wish all Dollar Tree stores would carry the same things!  

Hoping everyone had nice holidays and Happy New Year for us all in 2022!

Sunday, December 26, 2021

What's Inside?

 This is a photo of the gift bag I made for my PIC and I will show what I put inside for her Christmas gifts... 

I used the front of a greeting card from the Dollar Tree for the front of the bag with striped card stock from HobbyLobby. Made the silver poinsettias using IOStamps dies. Snowflakes are very dies from the stash. Made the red satin bows using the Bow It All. "Merry Christmas" is a die from the stash and I used red mirrored card stock for that. Here are photos of some of the treat holders I had made for inside the gift bags:


I have shopped enough of the stamp shows with my PIC (stamping Partner In Crime) and taken enough card making classes with her to know what she may like.... many stamp shows we get back in the truck for our trip home only to share what we ended up buying at the stamp shows and more times than not we have the same items be it stamps or dies or card stocks or bling.... We have not been able to shop the stamp shows last year due to cancellations and we have not been able to get together for shopping or classes or anything.... but I knew when I saw things I wanted to buy for me that it would be safe to order one for her. Since I could not be with her when she opened my Christmas presents I decided to make her samples of her gifts using the items I had also ordered for myself.  My samples were made using scrap white card stocks and inks that were on the craft work table at the time. Here are photos of the stamps I bought for us both:


This is a Christmas background stamp from Taylored Expressions. This next photo is the ShipLap background stamp from IOStamps - Impression Obsession:


Early in the season Sizzix had a release video on YouTube of their new products and this next product of theirs is exclusive to HobbyLobby. I figured it would sell out quickly at the stores so I bought ours from their online website -- and with my order I qualified for free shipping so that was a good thing:


The sample for this product I used red mirrored card stock and even with the 3D Impressions embossing folder my sample did not crack:


This next photo is of a stencil from Taylored Expressions -- Folksy Firs:


and my new favorite snowflake stencil is the Nordic Snowflakes from Taylored Epressions:


I also gave her a holiday stamp set:


This die set from MFTStamps:


I had bought it for the traditional colours:


but after it arrived I saw on YouTube a crafter used blender brushes for the colours behind the letters:


To wear on her jacket or ugly Christmas sweater I made her a pin:


For the pin I used things from the stash - chains, charms, and beads. On the right side is a snowman with a mittens charm and at the bottom is a snowflake charm. On the right side is a bells charm, an angel, and a heart at the bottom. 

For BOO Day my PIC had made this Ferrero Rocher holder for me:


She gave me the info where she had seen this idea and I tracked it back to the originator and I made a HO HO HO Ferrero Rocher box for her - this is what the first one I made looked like:


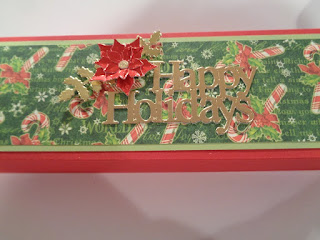
Here is a photo of the box I had made for her:


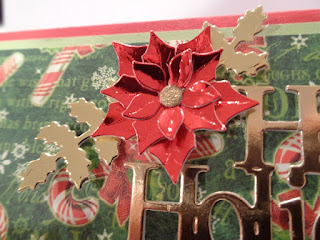
For the poinsettia on the box top - Sunny Studio sends you a small die when you order from them and I wanted to use that small die for my poinsettia and I used the two smaller dies from the small poinsettia die set from IOStamps -- the Sunny Studio die is the flower and center die in silver:


I used red mirrored card stock and for the center I used gold glittered card stock:


The solid circle piece for the center of the flower fills it in nicely and the glittered card stock gives it some sparkle against the red mirrored card stock.  Fun flower to put together and just the right size for this box top project. 

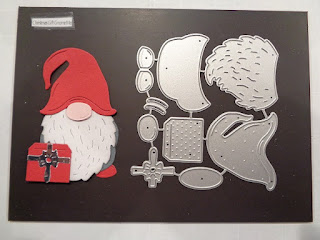
While packing up holiday products I came across a new die I had ordered Black Friday week. It has clear packaging and no photo with it so before I put it away I made a sample die cut of the die:


Used card stock scraps for him and put him together with glue dots so it was quick and easy to put him together. Many small piece dies like he has I keep the die set as one piece rather than to clip it apart. I put the label from his packaging on the magnet sheet and I put him on the sheet using glue dots and put him in his storage envelope for next year:


This way next year I have a sample of what this die set is, what it looks like, and the size it makes. The red present in front of him die cuts separately so he can be used without that piece. Happy to finally see the top of the craft workroom table again... but probably that won't be for long.... haha


Saturday, December 18, 2021

End of Season . . .

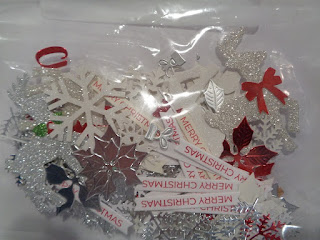
 Cleaning up the mess in the craft room and here are the last of the Christmas projects in a baggie:

Putting them away for next year in the Christmas trims and bling box. Nice to see the top of the work table again!! When I put this photo on the computer I decided to show some progress photos of projects I did for this year. Here are photos of the Snuggets in the works:

First I cut all my white card stock pieces 1" x 3 1/8" for the nugget wrappers. I cut them 1/8" longer so that I can have the adhesive stick to the card stock rather than to the candy wrapper. Once they were all cut I stamped then small Snowman face stamp on them using black ink. Using an orange marker I added orange to the noses:

To help the wrappers fit on the nugget candies better I run each one over the edge of a bone folder so it will curve around the candies easier:

I put the wrappers around the candies and used two glue dots to adhere them. Once all the candies were wrapped it was time for their hats -- I used the fingertips of the bath gloves sold at the Dollar Tree:

I made a light blue card stock tray for my Snuggets and put them in pretzel bags sold in the candy making aisle at the craft store. Closed the bags with twine and tied silver bells on them. Next for the Santa Belt nuggets I used red card stock for the wrappers -

The wrappers are small so to make this an easier assembly project I cut a piece of red card stock 3 1/8" wide by 11" long. I used a pencil and a ruler and marked the center of the length of the card stock. I cut a piece of black card stock 1/4" wide by 11" long. Used the ATG and put the black card stock stripe down the center of the red card stock:

With that in place I took this to the trimmer and cut it at every inch - this gave me my wrapper pieces that measure 1" x 3 1/8":

For the Snuggets I used the solid chocolate Hershey Nuggets. For the Santa Belt nuggets I used the solid chocolate and also the Almond nugget candies. The Almond nuggets are wrapped in gold wrappers so for those I did the Santa belt buckles in gold to match the wrappers. For the belt pieces I used glittered card stock and a circle punch. The center is black card stock and I used a small circle punch for those. I made a black card stock tray for the Santa Belt nuggets and packaged them like this:

Again I tied these closed with twine and tied on red bells. Both the Snuggets and Santa Belt nuggets can be done quickly in an assembly line style and everyone always smile when they see them...

Easy peasy --- Candy Cane Seeds:

Here are some photos of other HO HO HO boxes I had made for the Ferrero Rocher candies:

Favorite season for holiday projects but certainly am thinking I pulled out everything in the craft room to make them because the craft room is certainly a mess!! But fun to use older and not so old items to make the treat holders. But for now... back to cleaning and organizing as I go.... again.... or is that still???