Saturday, February 24, 2018

A rose is a rose . . .


Have always liked the cards, journal covers, scrapbook pages, and other projects that Heartfelt Creations creates using their rose and other flowers stamps and die sets. Watched a few videos on how to shape the flowers once they are stamped and die cut to make these realistic flowers... but for a card maker that mails out many cards putting flowers on all my cards would not work for me. . . I had bought a couple of their floral stamp and die sets and decided I could make flowers for tags or gift bags or treat boxes, etc. . .

Went to a stamp show last weekend in Columbia, SC and Heartfelt Creations had a booth there of all their products and project samples:


Had recently seen that Heartfelt had a new stamp and die set for Poppies so I picked that set up while I was at their booth. Lots of shoppers there so while I was waiting in line to check out I was near the demo table and I saw them demo their new flower molds -- these molds do all the molding of the flowers for you so all you have to do is stamp, die cut, and run your floral pieces through your die cutting machine in this new mold and your floral pieces/stems all will have creases and lines for dimension and your flowers can now be assembled. . . .   Sounded too good to be true to me but when I got home I watched this video by Cheryl B on Youtube:

www.youtube.com/watch?v=UaGnB0oCpTM&t=985s

This video not only shows how to use the flower mold but it also shows how she layered and decorated her card front. I watched the video for the molds and came away with lots of tips from Cheryl.  Many times when you shop the vendors at these stamp shows they will give you a coupon for a discount on your next online order from them which Heartfelt did. Once I had seen Cheryl's video I ordered my Rose Mold from Heartfelt. They shipped it the next day and by Thursday I had my new floral mold. They have a couple different flower shaping molds for sale but my first one is for roses since I have the Classic Rose stamp and die set:


Here is their new Rose Shaping Mold:


the back of the packaging shows how this is used:


You stamp, die cut, and colour your flower pieces and leaves/stems and then put them in this mold. Lightly spritz it with water -- put the top on the mold and run this through your machine. There is only one way for the lid to the mold to go on the base so it is very easy to use. Once your pieces have been molded you can set them aside to dry -- does not take long. Then let the layering begin.....

Here is a photo of my first roses I have made using my new Rose Shaping Mold:


With this being my first set of flowers I decided I would use white/GP (Georgia Pacific white card stock sold at Walmart). Was not sure if this card stock would work in the molds with the shaping and such but it worked beautifully with no rips or tears. To make this project I used the egg cartons I bought off the Clearance Rack from Stampin Up and spritzed blue ink onto it using a spritzer filled with rubbing alcohol and re inkers:


Just did a light layer to add colour to the egg carton and set that aside to dry. The paper they use for these egg cartons is very porous and you have to be careful not to get them too wet.  Stamped my flowers using the Stampin Up Bashful Blue ink and cut them out using the matching die. I did this twice so I would have two full sets of flower pieces since I was not sure how many flowers I would be making. Once the flower pieces were stamped and die cut I inked the flowers and edges using the Bashful Blue ink and a sponge. Set those aside. For the leaves I stamped them using Stampin Up Old Olive ink and before I cut them out with the matching die I sponged the stamped images using the Old Olive ink and then die cut them out.

Liked the card Cheryl had made for her video. She used a detailed oval die from Heartfelt Creations for her birthday card but I do not own that die. (How did THAT happen???? haha)  But I liked the lattice work on her card and so I used her ideas for that for my egg carton top. For my lattice piece behind my frame I used the Spellbinders Fancy Lattice die and cut out a piece of white/GP.  I cut out a full piece of this lattice die. For my frame on my box I used a stitched square die for my white frame:


Laid this frame over the die cut lattice piece and using a pencil I traced around the square frame so I would know where to cut my lattice piece for the size I needed -- I trimmed the lattice piece inside the pencil lines so this would not show on the edges of the frame piece. I used thin red sticky tape around the back of the square frame and put this onto my trimmed lattice piece:


With the lattice piece behind the square frame piece I put wider red sticky tape on the back and this will hold this framed piece onto the top of my egg carton:


Peeled off the red strips and put this framed lattice piece onto the egg carton top gently pressing down to get the red sticky tape to stick to the carton top. I laid the two leaf pieces I was using for the carton top  over the framed lattice piece so I would know how much of the framed lattice would show. Using a white Pearls pen I added white pearls to some of the intersections of my lattice piece. Cheryl had used Nuvo drops on her oval framed piece but I like the sparkle and shine of the white Pearls pen on mine.

With all my floral pieces shaped from the mold I began to put them together. I used Aleene's Quick Dry Tacky glue to put my floral pieces together. Decided to make a large rose and two tiny roses for my egg carton top. With those glued and shaped I set them aside to dry.  Using scrap white/GP I stamped "easter greetings" from Reverse Confetti using the Bashful Blue ink. Used a ruler and pencil to make a line above and below my stamped greeting. Trimmed this piece on the pencil lines and used the banner punch from Stampin Up to punch the banner end. Lightly sponged the blue ink on the banner piece and ran this over the bone folder to give the banner a 'wave' look.

With my roses dried from gluing I spritzed them and the leaves pieces using Shimmer Mist Pearls to give them all some sparkle and shine:


With those dried I now could put my pieces onto the top of the egg carton -- I used glue dots to put the leaf pieces on and glue dots to put the flowers on top of the leaf pieces. With those on the egg carton I then tucked the greeting piece under a leaf and put the greeting piece on also using glue dots.

LOVE the flower mold -- can not believe I made a rose!! :0)   The mold is very easy to use -- I have the Stampin Up Big Shot machine and I use the mold with a clear plate under it and a clear plate on top of it and it went through the machine with no problems. Each machine is different and Heartfelt Creations has a list of machines and "sandwich" for using their molds on their website so you can see how to use these molds in your machine. Can not believe how easy and FAST these flowers went together..... now trying to figure out how to put a flower on the birthday card for DH for July.... haha. A BIG thank you to Cheryl B for sharing her video and how-to's for this great new product from Heartfelt Creations...  off to make more flowers in all colours.... ;0)

Sunday, February 11, 2018

Two Valentine Cards


Clearing out photos on the camera for our trips this week and realized I did not post these two Valentine cards on the blog -- so here they are:


Card stock base is #110 weight black card stock from Mikes. Heart print is the Paper Studio from Hobby Lobby as is the polka dot card stock.

Cut and scored the black card stock with the scored line at the top of the card. Cut a piece of the black hearts print to the size I needed for the card front. Set that aside. Used a holiday saying from the MFTstamps stamp set Homespun Hearts and stamped that onto scrap white card stock using Stampin Up Real Red ink. Used the Stampin Up banner punch for the two ends of the greeting banner. Cut a piece of the black polka dot print to fit behind the greeting banner. Put the polka dot print across the black hearts print  near the bottom and put these onto the black card stock base using the ATG.

For the Tic Tac Toe board I used the Tic Tac Toe die set from MFTstamps that I recently bought at the Paper Muse store in Matthews, NC.  Used scrap black and red card stocks to cut out the grid, X's, O's, and red hearts. Cut a piece of white/GP larger than the black grid piece and used a glue pen to put the Tic Tac Toe board together. Cut a piece of red card stock to fit behind this piece and put the two pieces together using the ATG. Used pop dots to put the Tic Tac Toe piece onto the card base. Used glue dots behind the Valentine greeting banner to put on the card front.

This next card -

Lots of stamps used for this card:


Card stock base is Stampin Up Crumb Cake card stock scored on the side. Red is from Mikes and the cream card stock for the card front is Stampin Up Very Vanilla.

Cut and scored the card stock base. Cut the red card stock to the size I needed. Cut the Very Vanilla for the card front. On the Very Vanilla piece I first stamped the Stampin Up Cheesecloth background stamp using the Crumb Cake ink on part of the card front. Then stamped various stamps from the Stampin Up Work of Art stamp set as well as their Gorgeous Grunge stamps again using the Crumb Cake ink on the piece randomly. Used a small heart stamp from my stash and inked that and stamped off and then stamped the Very Vanilla piece. After all stamping was done I put the stamped card front onto the red card stock using the ATG.

With all the background stamping done I wanted to add twine to the card front.  Problem is when using twine it can make your card front have a bump on both sides where you have your twine attached. I wanted to minimize that bump so I taped the twine to the back of the card after I untwisted the twine - only on the back of the card - on each side. There is still a bump but it is flatter now than if I had not untwisted the twine on the back of the card front:


With my piece of twine across the front of the card I then stamped a stamp from PSX "with love" onto scrap Very Vanilla card stock using Real Red ink. I only wanted to use the word "love" from that stamp so I covered "with" with a piece of painters tape and inked the stamp. Peeled off the painters tape and stamped the "love". With that done I used the Stampin Up Bitty Banners die set and cut out the "love" banner. Sponged the edges of this banner using Crumb Cake ink. Cut off one end of the banner using scissors and put this onto my card front using the ATG:


Cut off another piece of twine and tied a bow. Put the bow onto the card front using glue dots. For the three larger hearts on the card front I used the Stampin Up Hearts A Flutter stamp set with matching die and stamped and cut out my hearts. Sponged the edges of those. Using stacked glue dots I put these hearts onto the card front:


Both cards were easy to put together using dies and stamps. TFL

Sunday, February 4, 2018

Brusho Valentine Card


Had seen this card from France Martin AKA Frenchie Stamps on Youtube:

https://www.youtube.com/watch?v=inK7leZ1_s4&t=14s

I have never used Brushos before but Stampin Up was now selling a set of 5 of the Brushos for $30.00. That seemed high to me and since I liked Frenchie's card I figured I would use the Brushos again so shopped around.... found a set of 12 colours on DickBlick for $32.97 so I ordered a set from them:

www.dickblick.com/products/brusho-crystal-colours/

Here is a photo of my Brushos once I removed them from the box and got them ready for use:


As Frenchie explains no two cards will look the same. The Brushos react to water and depending on how much water you use or the card stock you use the Brushos can be different each time. Not having used these before I paid attention to her tips on her video and here is my card:


For my card -- my card stock base is Lipstick Red card stock from SimonSaysStamp. The watercolour card stock is Canston. For the gold speckles on the card front I stamped a background stamp from the Stampin Up stamp set Gorgeous Grunge using VersaMark ink. I used Stampendous Jeweled Gold embossing powder and heat set that. With the embossing done I misted this piece with water and sprinkled the Brushos on -- very little Brushos goes a long way. Set this aside to dry.

Now for the heart and "love" die set Frenchie had used on her card. . . .   That is from the Stampin Up die set Sunshine Wishes. I have bought other die sets over the years from Stampin Up but I will say this die set turned into a nightmare ... ... ... grrrrr  .... First it felt like the dies would bend trying to take them off the paper packaging ... I tried to remove them slowly but even then the paper and tape residue came off on some of the die pieces... only thing to do? Get the Goo Gone....

Took all the die pieces and put them in a plastic pan from the dollar store I have in the craft room and I spritzed the Goo Gone onto the dies. Let it sit for about 15 minutes and then I was able to get the paper packaging and the tape residue off the die pieces. Then I had to wash them with dish soap to get all the Goo Gone off the dies.... once dried I put them on a magnet sheet and they were ready for use. Here is a photo of this die set:


With those ready to be used I cut the heart die out of a scrap piece of the Lipstick Red card stock that I had Stick It sheet on the back.  For the "love" word I cut that out of gold foil card stock that I put Stick It sheet behind.  Also wanted the "love" word to be thicker on my card front than the heart so I also cut out the word "love" from a card board tab top to a kleenex box -- 'klipboard'. With the "love" word pieces cut out I was ready to assemble the card.

Using the ATG I put the Brushos card front onto the Lipstick Red card base. Peeled off the Stick It sheet behind the heart and put that on the left front side of my card. With the card board and foil words cut out I peeled the Stick It off the gold foil word and put it on top of the card board word. Using a glue pen behind the card board word I put this over the heart on the card front over one side of the heart. Here is a photo (not great) of the "love" word over the heart to show it is higher:


This next photo shows the sparkle and shine the embossing powder gives the card front:


IRL this card has a lot of sparkle and shine which plays nicely against the Brushos background. A big thanks to Frenchie for sharing her card and for making the use of Brushos on a card front look easy!! AND IT IS! :0)    TFL

Stenciled Heart Card


Card stock base is white from Paper Trey Ink. Red card stock is Mikes and stenciled piece and frame are white/GP.

Cut and scored the white card stock base with the scored line at the top. Set that aside. For the stenciled hearts I used a piece of white/GP cut larger than what I wanted for the frame piece. Using the MFTstamps Hearts Background stencil I taped that over my white/GP piece with the tape covering some of the hearts on the stencil. Used a Post It Note cut into small pieces to cover one of the hearts on the stencil:


Used pink distressed ink and covered the stencil hearts using a heavier hand on the outside of the stencil and a lighter touch closer to my covered heart. When finished covering the stencil with the pink ink I removed the Post It Note pieces to expose the un-inked heart. Used other Post It Notes to place around the one heart to keep the distressed red ink off the other hearts:


With the Post It Notes removed and all the blue tape I then used a stamp from Avant-Garden from Stampin Up and the pink distress ink and stamped the background onto the stenciled hearts piece very lightly.

Used a frame die and cut out a frame to go over the stenciled piece. Laid the frame over the stenciled hearts and marked the stencil piece so I could trim that to the size to fit behind the frame. Used red sticky tape to put the stenciled hearts onto the back of the frame. Cut a piece of Mikes red card stock a bit bigger than the frame piece and put the framed stencil piece onto this red piece using the ATG. With all pieces together I used the ATG and put them onto the white card stock base.

For the banner greeting -- I used a dollar stamp from Mikes -- it is an older stamp from when the dollar stamps were a dollar! haha   I used Stampin Up Real Red ink and stamped this onto a scrap piece of white/GP card stock. Trimmed it to size and used the Banner Punch from Stampin Up for the banner ends. Added small red crystals from the stash to each end of this banner. Ran the banner over the edge of the bone folder to give the banner piece a wave so it is not so flat on the frame. Used micro mini glue dots, double stacked, to put the banner piece across the framed piece:


Inside the card I used washi tape with multi hearts on it in the colours I used for the stenciled piece:


 Easy card to put together for Valentine's Day. TFL

Tuesday, January 23, 2018

Sky Sympathy Card


Always hard to make sympathy cards . . .  but this card was very hard as it is for DH's best friend of over 40 years - - his wife passed away Sunday evening so hard week for DH for sure.

Wanted to make a simple card but wanted to include blue since it was his wife's favorite colour:


Black card stock base is #110 weight black card stock from Mikes. Light blue card stock is Stampin Up Bashful Blue and white is GP.  Used black Staz On ink for the Stampin Up Lovely As A Tree stamp. Cut out a rectangle die that gave me a rectangle window. Used Post It notes and this rectangle die cut piece over the stamped tree image using washi tape to hold the frame in place. Sponged Stampin Up Bashful Blue ink over the stamped tree image using more ink at the top of the card and a lighter touch towards the ground of the trees.

With this sponged I removed the masking and rectangle frame. Using a stamp from the Stampin Up stamp set Thoughts and Prayers for the front of the card and another stamp from that stamp set for the inside of the card. TFL

Saturday, January 20, 2018

Bunny Keepsake Treat Holder


Bought the Stampin Up Curvy Keepsake die set at a stamper's garage sale for $5.00.  Made two favorite treat holders using this die set:


The pumpkin with witch hat and the scarecrow treat holders.  Had seen lots of other projects made using this die set but basically they are all the same. Then I saw this idea on Pinterest and I do not know who it originated with to give them credit. Also could not find directions so I will explain how I made these holders. They will hold a small chocolate bunny for Easter (Lindt) once the stores stock their Easter candies. Here are the holders I made:


These holders use half of the Curvy Keepsake die and you are able to make three holders from one sheet of 8 1/2" x 11" card stock. I did not want to use the #110 weight card stock from Mikes because it was too thick but the Whisper White card stock from Stampin Up is too flimsy. So for my treat holders I used two pieces of white card stock from Paper Trey Ink.

To cut out the holder I cut my piece of card stock in half at 5 1/2. Placing the part of the die I needed to cut out on my white card stock I used washi tape to hold that in place in the die cutting machine:


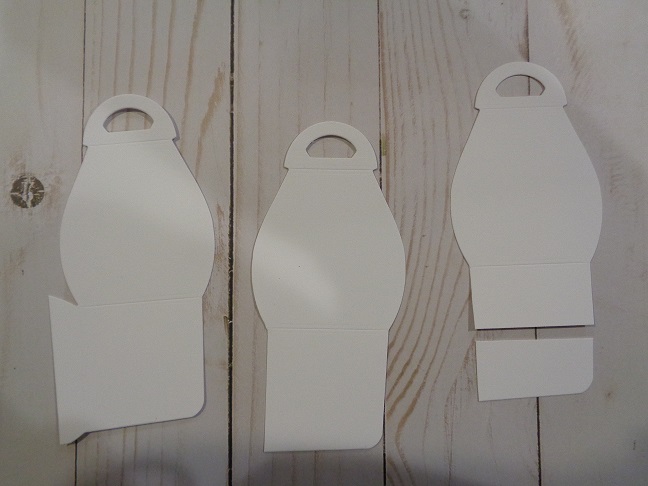
I cut out 3 pieces from each piece of the card stock. This photo shows these die cut pieces - on the left is the piece out of the die cutting machine. The middle photo shows the die cut piece after I used scissors to trim the unwanted piece on the left side. The far right photo shows that I trimmed the bottom of the die cut piece 1" below the scored line:


Using a 1 3/8" circle punch I punched out a circle from three of the holder fronts for my window:


To get the scalloped circle for around the window front I punched out a 1 3/8" circle from card stock and then punched over that using a 2" scalloped circle punch:


Put my scalloped circles on all the holder window fronts using a glue pen. For the clear window I used package packaging for the windows and used a 2" circle punch to punch those out. Put them on the backside of the window piece using red sticky tape:


For the fronts of my holder I used a grassy border punch from M Stewart and punched out scrap green card stocks. Put the grasses on the window front using red sticky tape. Used a small Marvy oval punch and punched out ovals from scrap card stocks for the eggs. Sponged the edges of those and put them behind the grassy pieces using glue dots. For the brown bunny I used a small bunny die and cut them out of flocked brown card stock that has white/GP behind it. Used liquid glue to put the white pom pom tail on the bunnies:


Here is a photo of one of the holders to see the flower, bunny, eggs, and bow on the holder front:


Here is a photo of the back of the holder:


For now I have a mini clothespin holding the holder closed but once the chocolate bunnies are added I can keep it closed using velcro or glue dots. The clothespin can also hold my Easter greeting as well.

Easy holder to put together once I figured out the how-to's. Another good use of the Stampin Up Curvy Keepsake die set for a holiday treat holder.  Thanks to whoever made this first and shared their idea!  TFL

Hopping ahead . . .


Working on the Valentine treat holders and last trip to the big W I found a Reese's peanut butter egg and they also had the Cadbury Eggs. Looked for other Easter candies but the Cadbury Eggs and jelly beans were all they had at this time.  Bought a few of the Reese's peanut butter eggs for Valentine's and decided to make a treat holder for that egg like the holder I had made for Ferraro Rocher and that also was used to hold a Cadbury Egg. Here is a photo of one of the holders for Valentine's Day and one for Easter:


To make this holder you need a piece of  2" x 11" card stock. Score it with the long side at the top of the score board: 3 3/8, 5 1/2, 6 1/4, 8 1/4 and again at 9. Cut your printed card stock for the backing to your holder 2" x 3 3/8". I used the ATG and put the print on the end of the scored piece that was scored at the 3 3/8" line. With the print on your scored piece use your bone folder and crease all scored lines. Then use your tag topper punch and punch the printed end of your scored piece. For the circle that the candy sits in you need to use a 1 3/8" circle punch.

I used pink card stock in this photo to show this circle on a white scored piece:


The pink circle is put in place with a glue dot and this is used to be sure my circle will be centered on my holder. Here is a photo of this circle punched out:


With the circle punched I then folded the scored piece at all scored lines and used tear and tape to put it together. Added a greeting banner to each holder -- for the Valentine holder I used a piece of holiday washi tape across the front of the holder. For the Easter holder I just cut a piece of the printed card stock to match the print on the back of the holder. Just pay attention if you should be using a directional print for your holder as I did for the Valentine holder. The hearts are all going in the same direction so be sure your pattern is not upside down or sideways.

Also for the Valentine holder I used the Stampin Up Ornate Tag Topper punch for the holder back and for the Easter holder I used the Scalloped Tag Topper punch:


Also -- these eggs are heavy so for the Valentine holder I used #110 weight black card stock from Mikes and the yellow card stock for the Easter holder is from Stampin Up.  Easy holder to put together and you can make a few from one piece of card stock. TFL  **More photos and detailed instructions for this holder here:

https://cardcornerbycandee.blogspot.com/search?q=ferrero+rocher+holder


Monday, January 15, 2018

Valentine's Bag with Treats


Recently reorganized my printed card stocks in the craft room and decided I have enough double sided card stock for Valentine's Day to make my own treat bags. Had seen this video by Amanda F. on Youtube awhile back:

https://www.youtube.com/watch?v=Vdut6pUKnYc&t=699s

She gives you patterns for many different sized gift bags but for the two Valentine's Gift Bags I made I used two pieces of 8" x 8" double sided card stock. The finished size of my bags are 5" high by 4" wide.

Here is a photo of two of the bags after I made them:


To decorate the front of these gift bags I used paper doilies from the dollar store and cut one in half and used glue to put them on the bag fronts. Added red foil hearts to the front of the doily piece using a Spellbinders heart die set to cut the hearts out:


Inside the bag is red paper shred from the dollar store. I made a Tootsie Pop holder using the pattern by Nancy on this video:

www.youtube.com/watch?v=MWV0oFtONRE

The dark red Tootsie Pop holder I made using her measurements but the pink Tootsie Pop holder I had sized down a bit. Using a plastic jar with lid from the dollar store I filled that with red paper shred and various chocolate candies. Cut out a 2" circle from the printed card stock to put on the jar lid using the ATG. Tied twine around the top of the jar and that is held in place using a glue dot. The printed band around the center of the jar is washi tape.

Here is a photo to show the Hershey Nugget holder I made and a holder I made for two of the Ghirardelli candies:


For the nugget holders I used printed card stock for the sleeve that slides over the nugget tray. The nugget tray is made using solid card stocks and this size holds four of the nugget candies and here is my pattern for the solid tray:


Use a piece of card stock 6 1/4" by 3 1/2". With the 6 1/4" edge at the top of the score board I scored this piece at 1/2", 1", 5 1/4", and 5 3/4". Turned this with 3 1/2" edge at the top of the score board and scored that at 1/2", 1", 2 1/2", and 3".Using the bone folder I creased all my scored lines well. Using scissors I cut the corners of my box -- this is what that looks like with corners trimmed away:


Then using the pattern for the sleeve I made for my original holder I cut out the printed pink card stock and made the sleeve for the tray:

 Cut the print to: 4 3/4" by 4 3/8". With the 4 3/4" edge at the top of the score board I scored it at: 1/2", 2 1/8", 2 5/8", and 4 1/4".   

Using Tear and Tape I put the printed sleeve piece together. Wrapped each nugget candy with a piece of card stock 1" x 3 1/8" and put these wrappers onto the nugget candies using glue dots. Here is a photo of my nugget holder using this pattern using a clear window sheet for the sleeve -- made these up last year:


This nugget holder with clear sleeve top is from FrenchieStamps.com and she had a video on Youtube but I had to make my own measurements for it to slide.

For my Ghirardelli pattern I made that myself.  For the tray inside that holds two of the Ghirardelli candies I cut a piece of solid card stock 3" x 3" and scored it at 1/2" on all four sides. Snipped the end corners and put this tray together using glue dots.

For the actual holder:

Cut a piece of solid card stock 2" x 8". Scored this with the long side at the top of the score board at:
1 1/2", 2 3/8", 3", 5", 5 5/8", and again at 6 1/2". Once this was scored I used the Stampin Up Scalloped Tag Topper punch and punched out each end. Used the bone folder to crease my scored lines. Using various washi tapes I put washi tape on the front of the holder and trimmed the edges even with the sides of the holder. Put two Ghirardelli candies in the tray and placed that inside the holder. Do not use adhesive or glue dots to hold this in place in your holder or it will not slide out. With the tray and candies inside I used double sided tape to close the holder. Added ribbon and twine at the top of the holder. Easy holder to put together.

Glad to use more of my printed card stocks to make the gift bags. They are not too small or too large to hold a couple of the treat holders and chocolates for Valentine's Day. They also help to use up the vast ribbon collection --- haha.  Thanks to all the ladies for sharing their ideas for these fun treat holders!    ALSO ---

DH had built my new wooden work island and I had since asked him to make me a stand for my glue bottles that I use most so that the bottles are upside down and easy to reach for. Here is a photo of that holder he made for me using a scrap staircase post and cutting circles in it to hold the bottles:


Over time have seen other crafters storing their most used glues this way so I wanted one for my craft room. Did not have a real pattern but I told DH what I wanted and this works great -- it is heavy enough not to fall over when I put the glue bottles in the holder or take them out to use and it can hold other types of glue bottles I have on hand so it will get lots of use for sure.  TFL

Monday, January 1, 2018

Thanks Thank You Card


Here is a photo of a thank you card I made:


Pink card stock base is #110 weight card stock from Mikes. White is GP and floral and striped card stocks are from my stash.

For the "Thanks" greeting I used a die I had received as a free gift from Taylored Expressions from an order I made with them. I cut it out of scrap pink card stock and wanted it to have some dimension so I made my own "klipboard" using the top tab from a kleenex box. I cut out the pink card stock and then cut out the box tab - used glue to put the two together:


Set the word die cut pieces aside to dry and worked on the rest of the card. Cut and scored the pink card stock base with the scored line at the top. Cut the white/GP piece for the card front. Cut the floral and striped card stocks to the sizes I needed for the white card front. Put those together using Scotch tape on the wrong sides of those. Put them onto the white/GP piece using the ATG.

Using a large scallop edge die I cut out a piece of pink card stock for the card front. Trimmed the sides of this piece to be even with my card front. Took a piece of scrap white/GP and cut that a bit larger than the die cut piece. Used a glue pen and put the die cut "Thanks" onto the scrap white/GP piece. Put this onto the scalloped piece using the ATG. Put this across the card front using the ATG. With the card front pieces done I put them onto the pink card stock base using the ATG. Added pink crystals from the stash to either side of the die cut "Thanks". Here is a photo to show how the card board behind the die cut word gives it a little dimension for the card front:


This photo shows part of the inside of the card where I put the striped card stock on the bottom of the white/GP piece on the inside: