Saturday, April 16, 2022

Easter Cards 2022

 Decided to use card bases I already had cut and scored, stored in a basket, for my Easter cards this year. I picked out the colours I wanted to use for the card bases. Then I pulled out my Easter printed card stocks for the egg shaped die cut piece for the card front. (The egg shaped piece and eyelet egg shaped piece are from a die set from Amazon for Easter). Here are a few of the cards I made:


The bunny in the center is a favorite bunny die from Lil Inker Designs. I die cut the bunnies out of #110 weight white card stock from Mikes. Sponged the edges with gray ink. The bow comes with the bunny die set - some of the bows I used glittered card stocks for and others I used solid card stock and then went over the bow die piece using clear Wink of Stella to give it some sparkle. Used silver glittered card stock and punched out a small circle that I glued onto the center of the bow on the bunny. Both the eggs pieces and bunny are on the card using foam tape for dimension. Happy to get use out of the extra card stock bases!

This and that . . .

 Anna Wight from YouTube is a designer for IOStamps (Impression Obsession) and I have wanted to buy a few of the dies she designed but a couple of them sold out before I could order. Happy me they were restocked and the one I really wanted is the Trims die set:

The die set arrived with the red cling stamps I ordered from their closeout sale last week. (For the month of April IO is selling their red cling stamps for 20% off using the code "2022" since they are closing out their vast inventory of red cling stamps).  This Trims die set went right to work cutting out the stitched ric rac die using 6x6 card stocks for BOO Day (Halloween):

This past week I reorganized my 6x6 paper pads using clear envelopes that I had bought awhile back from ClearBags to store my background stamps in. Having extra clear envelopes I decided I would work on a better system for my 6x6 card stock pads. 

Decided I do not need to store items I will not use so I took all the 6x6 paper pads and took all the sheets out off of the pads. It does not matter to me what manufacturer the papers are by so I tossed the pad cover and back leaving me with the card stock. Weeded out card stocks I know I will not use and am only storing papers I will use. I used scrap/odd pieces of solid card stocks and made tabbed dividers using the Tab punch board. Used the label maker to label the dividers. I am storing these 6x6 card stocks in an empty fridge bin I had after I weeded out stamp sets. Here is a photo of the now sorted and filled bin:

Have them organized by holiday and then by print -- flowers, plaids, etc.. Hopefully this will ensure that I will use these card stocks more often so they are not just getting stored in the craft room. While I was die cutting the ric rac pieces out I decided to die cut the two Witch dies Anna Wight designed for IO last year:

I used glittered black card stock from HobLob for the witches and I also cut them out of the black #110 card stock from Mikes. I glued the solid witch to the glittered witch to make them more sturdy. To store these until BOO Day projects are started I bought a new size of snack bags at the Dollar Tree:

Here is a photo of the snack bag packaging:

The bags are approx 3 1/2 x almost 6 and they have a zip closure. I had originally picked them up for beads and jewelry making supplies but my die cuts fit inside perfectly and will be dust free for projects ahead. Plus they are cheaper than the jewelry bags at HobLob so a good find at the Dollar Tree.... Always good when I can find a few uses from one item for the craft room....  I also store the small Impresslits embossing/die cut folders in them:


In the bag is the packaging photo piece and the folder to keep them together and dust free. Handy sized snack bag for sure. 


Sunday, April 10, 2022

IO Sale and BD Gifts

 IOStamps.com (Impression Obsession) sent out an email recently explaining they will be switching their stamps from red rubber cling to clear stamps. To clean out their inventory of the red cling stamps they are holding a sale for 20% off the stamps using this code "2022" on your order. I ordered right away and here are photos of the stamps I bought that arrived yesterday:


I bought background and sentiment stamps for the holidays ahead. They said in their email that they will continue their monthly stamp kit and their background stamps in the red rubber cling but all other stamps will be clear. Happy me that I was able to add some new stamps to the craft room at a discount!

Also -- meant to post this sooner but have not had time. Here are photos of all the items my PIC (stamping Partner In Crime) gifted me for my birthday:


Certainly have plenty of new products for more crafting projects... Lucky me that my PIC spoils me so! The little lady bugs will be cute on summer projects and cards that I will be working on soon.... Thanks to my PIC for all she gifted me and all the new inspiration to use it all!!

Sunday, April 3, 2022

Easter Bags are finished -

 Photos of some of the Easter bags I made and treat holders I made for inside:


The bow on the front of the Easter bag is from Scrapdivadesigns store and the bow die set has a small, medium, and large bow in the set:


For my bows I used the small and the medium bow dies:


Treat holders are all filled with chocolates and other holiday candies. Now to clean up all the Easter left over pieces...


Pilgrims and Rosettes

 Had seen a video on YouTube from Karolinaskrafts making mini rosettes using the Sizzix Rosettes die set #662691. There are a few dies in my stash that I have duplicates of and this Rosettes die set is one of them. The other duplicates I have is the Spellbinders Poinsettia die and a flower die set from Scrapdivadesigns. In her video explaining the how-to's for her mini rosettes she showed she was using scrap card stocks from a 6x6 paper pad. I watched the video and then decided to make my own.

For my rosettes I also used the scallop edged rosette die and my scrap of card stock from a fall themed 6x6 paper pad by Pink&Main. My scrap measures 6" x 2 1/2" approx. I put the rosette die onto the card stock and die cut these out:

Using the 6x6 card stock these rosettes are shorter than the normal rosette this die cuts out. I had 7 scallops on the die not having card stock on it. Once the rosettes were cut out I took it to the trimmer and trimmed off about 1/4" off the straight edge to make the rosette narrower than the die cut piece:

The die cuts and scores the rosette piece so I folded the strip on the scored lines. You need a 'mountain' fold on one end and a 'valley' end on the other end. To get this I had to cut one section off one of the ends of the strip:

I used tear and tape to put my rosette ends together. Used hot glue to form the rosette. Here is a photo to show the size this rosette die makes (the larger cream printed rosette) and the two smaller pumpkin coloured rosettes are the mini rosettes:

Easy rosettes to make using up more card stock scraps from the stash.... now onto the Pilgrims.... 

Long ago I picked up a small Pilgrim die by QuicKutz at a used stampers sale. I was only able to get the male but after I brought him home I searched Ebay for the female. It took awhile to find her but I was able to buy her off Ebay and now I have the set:

Using only scrap card stocks I die cut lots of them out and here some of them are:

Plan on using them for Thanksgiving embellishments and since I made the mini rosettes I put the Pilgrims on those to show the size of them:

The Pilgrims can fit both the mini and the regular sized rosettes for future embellishments. Happy to find another way to use the rosettes die set and to be able to adjust the size - both width and length - of them. Thanks to Karolinaskrafts for sharing her tips on her mini rosettes. Now I have a start for Thanksgiving embellishments....


Thursday, March 24, 2022

Bunny Bow Embellishments

 Had seen these embellishments on a few YouTube videos so I went to Etsy.com and was able to find this die set there. Happy me it took about 2 weeks to get this die set into the craft room. Here is a photo of the die set:

This die set has three different bunny ear dies as well as the die set for the bow so it is economical as far as having options to use it. Here is one of the embellishments I made:

For all the embellishments I used the #110 weight white card stock from Mikes so that they are sturdy and the dies cut the card stock nicely on one pass through the die cutting machine.  For the pinks for the ears and feet, as well as the prints for the bows, I used scrap card stocks. Here is a photo of more of the Bunny Bow Embellishments:

To show how to assemble these embellishments I die cut the bunny head/ears piece from purple card stock and the feet are the Mikes white card stock and pink scraps:

The curve on the feet piece fits over the curve on the bunny head/ears piece and lines up for placement:

Once these are adhered together you place your bow over the white part above the feet and you have your completed embellishment:

Very easy embellishment to put together and another good use of scraps.... This die is available in both small and large and I bought the large set and from the bottom of the bunny toes to the top of the ears it measures 3 1/2" high by 2 3/4" wide approx.  Another cute bunny project for upcoming Easter treat holders and projects.

Sunday, March 20, 2022

ScrapDiva Dies

 Erica, at Scrapdivadesigns.com has a channel on YouTube - Scrapdiva29. I have seen some of her videos here and there and she now has an online store for dies. Her recent Easter release was too cute not to shop.... so I bought her Easter Bunny Bag Topper die set:

This die set has a larger bag topper die set and a smaller bag topper die set:

Very economical for a shopper to have both the larger and smaller die set in the same set and not having to buy two die sets for the different sizes. Here are the Bunny Bag Toppers I made for this Easter:


And:

I used the smaller die set and die cut the topper piece out of solid white card stock and then die cut out the printed card stocks. I also used an eyelet doily die set from my stash and die cut a doily and cut that in half for my bag topper. Used hot glue for the pom pom tail and the feet were assembled and attached using liquid glue. Easy project to put together and too cute not to make for Easter. For my solid base I cut a piece of solid card stock larger than the bunny die piece and then used a scalloped edge die for the bottom edges on the solid piece and put the bunny bag topper pieces onto that. 

Erica has lots of really cute dies in her store and they are affordable dies and they die cut well - my bunny bag toppers are all cut out of #110 weight white card stocks and the dies cut beautifully the first pass through the die cutting machine. Also easy to assemble this set as well.  Fun holiday bag topper for Easter treats!

What is inside PIC's bag?

 Made an Easter gift bag for my PIC (Stamping Partner In Crime) - here is a photo of the bag:

Which I gave to her early as she will see everything on my blog anyways . . .  So what is inside this Easter treat bag? I always make treat holders for chocolates... but after they are gone you have now empty treat holders..... last year I made my PIC a decorated pokey tool:

Her craft room is decorated with her favorite colour purple so the purple pokey tool in the photo was for her. This year I wanted to give her a few things for her craft room but also for the holiday... but how to package them??? Decided to try making a Pocket Flip Book for her and here is that:

The Pocket Flip Book is mainly three envelopes I made using the envelope punch board and I also added two flat pockets inside for extra goodies for her. The attached photos are things I gave her in her flip book but I took photos of mine that are already out of the packaging for the most part. 

In the first envelope of the flip book is a set of the sticker gems from the Dollar Tree I picked up for both her and myself:

In one of the flat pockets is a new release die from IOStamps (Impression Obsession) and it is a sewing machine die. (I do not have a photo of that as I only bought the one for her). In the center envelope I have this bunny die set from AliExpress:


Due to the smaller dies in this set I did not cut apart the die pieces so I would not lose any of them. Since the dies from AliExpress do not have photo packaging I die cut the die when I get it from scrap card stocks and put a put-together die piece in with the die set so at a glance I will know what this die set makes. Here is a finished product using this die set on one of the Easter treat holders I made her:

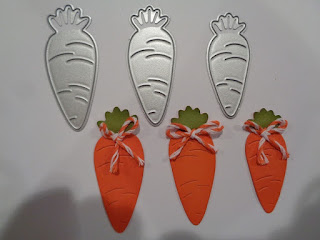
In the other flat pocket I die cut the bunny again so she could keep a sample with her die set if she wants when she stores her die set. The last pocket has a set of three chunky carrot dies and that is from Oriental Trading:


Their packaging also does not have a photo so I die cut her the three carrots using my die set and put it with hers so she would have the die cuts to store with the die set. Besides the pocket book I gave her twine from Hobby Lobby and also a mini scraper I had picked up for us at the Dollar Tree:


And lastly --- I had seen the video on glues by "Scrapbooking with ME Crafts" on Youtube. She talks about all the different glues available, what they work well on, how they work, etc.. She talked about the thicker glues -- Fabric-Tac, Fabric Fix, and other Beacon glues. I like the 3 in 1 glue by Beacon and I buy mine at Hobby Lobby but with it being a thicker glue the cap the bottle has is a bigger tip. When you use this glue in their bottle it can "glerk" out and I find I have to use a toothpick to get the finer line of glue I want to use on a project.  She spoke about using icing bottles to use with these thicker glues and so I bought a set of them with the silicone caps for my PIC and myself:

These plastic bottles are easier to squeeze than the Beacon bottles and the tips are fine so you get a smaller line of glue using them - I bought our sets off Amazon and here is part of the packaging:

The bottles with tips and the silicone caps are by Sugarbelle and the silicone caps fit easily over the silver tips for an air tight seal so your glue will not dry out. Happy to have seen her video on all the glues with all the tips and products she shared for them. Hoping my PIC is able to use some of the non chocolate Easter treats in her bag long after Easter is over. . .