Monday, April 17, 2017

DIY Post


This is a post about DIY -- no cards or papercrafting involved. . .

DH remodeled our kitchen when we moved to this house a few years back and once that work was done I decided I wanted an island in the kitchen.... but not just any island -- one that could be opened from either side so it could be my "baking central" for cookie sheets, baking pans, bundt pans, etc all in one place. . . .  One that had a stainless top . . .  But more importantly??? One that was affordable for me since it was my project.

Lucky me to find this on Craigs List and it was only $50.00 !! (Don't be jealous -- haha)


It came with a creamy white formica top that was very thick and very heavy. But I could see past all that and moved it into the kitchen. First I needed to decide what accent colour I would use in the kitchen and recently decided I am going to sew new valances for the kitchen windows. Finally found a fabric for those at Hobby Lobby so next I had to decide on a paint colour for this island. . .

I had asked DH if he could "beef" up the island with posts and trims and then I could paint it and maybe give it a new life?? DH rummaged through his big can of "extra parts" and he did have four posts left over from the stairs project, various trim pieces, and of course, quarter round. Knowing he had all of these pieces on hand helped to keep my costs down. But I wanted a stainless top for my kitchen island.

Not far from us a business that specializes in making stainless anything you need. DH measured the island and added to that since I wanted a larger top than what came with the island when I bought it. Off he went to talk to them about prices, time frames, etc.. He came home with a $500.00 quote for this island top I was wanting. Definitely out of my price range and why would I want to put a $500.00 top on a $50.00 island?

So we went to a used restaurant supply store thinking I could buy a stainless table for the kitchen island and just forget my Craigs List find  :0(    .... but I did not want a stainless table with open shelves. DH was talking to the guy there and they called me over to a small area of the store. They sold smaller brand new stainless tables -- the top of this brand new table is the size I needed for the island so we bought that new table. DH took the top from that table and that is now the top to my island -- for the bottom shelf and four legs he did not need from that new table he just built a wooden top (using left over wood from previous projects that he sanded and poly coated), for that table and sold that on Craigs List for more than what I had paid for the new stainless table so my stainless top was free for me.

With Spring Break last week I was home from work and decided I was going to finally finish my kitchen island -- We took it apart in the kitchen, moved it all out to the garage and I sanded it and primed it the first day. The second day I painted it all and the trim pieces and corner posts DH was going to put on for me.  The third day DH put everything on the island and then I covered it with Minwax Dark Walnut and here is my $50.00 kitchen island now:


And this photo shows the towel bar I had seen on the DIY Network that DH painted black for me:


This towel bar goes with this shelf unit DH built for me with oak shelves that he used a router on the edges and put clear poly on:


I used Software gray paint from Sherwin Williams for the paint and the Minwax Dark Maple for the stain. New handle hardware is from Lowes and Home Dept.  Also here is a photo of the island  to show I did paint the inside of the island -- the inside is just painted -- no stain was put inside. This photo looks turqouise but it is gray -- and it was outside on a sunny day when I took this photo:


I am very happy with this transformation of the island. I did not do any sanding for a distressed look after I painted it as I was going for a vintage look and not distressed. Plus this island is not made of a good wood that would distress well. A huge thanks to DH for the posts and molding on my island as well as the work he put into me getting a stainless top for my island!! HAPPY ME!!


Just finished putting things back in the island --- bought heavy duty drawer liner at Bed Bath and Beyond for the shelves and the drawers. Inside the doors of the island on the shelves is a heavy duty lid rack I bought to hold my specialty pans -- muffin tins, mini cupcake pan, mini loaf pans, mini bundt cake pan, brownie bites pan:


Also on that top shelf are the measuring cups. On the lower shelf is the cooling racks, the loaf pans, the round and bundt cake pans, as well as the cake pans with matching lids. Having all these items together will certainly help during holiday cooking/baking days:


For the two drawers I sorted my tools and have them all together now. In one drawer I have the tools I use the most. I bought white plastic baskets at the dollar store sold in sets of three for the smaller items. One basket has the pizza cutter and manual chopper and the other basket holds the vegetable peeler and the melon-ballers for summer fruit salad. Keep the metal "pancake turners" in the drawer ready for use:


The other drawer has all the measures for baking/cooking. Measuring cups, teaspoons, and scoops:


Happy the island is now loaded up and finished. Decided to keep the cookie sheets in the cabinet next to the stove rather than put them in the island. They are upright in that cabinet and easy to grab one where they are.  Onto the next project..... TFL

Tuesday, April 11, 2017

Whipper Snapper Designs Easter Cards


These are some of the Easter stamps from WhipperSnapperDesigns.com that I used for some of my Easter cards this year. Love their designs and esp their bunnies.

Card stock base is #110 weight by Mikes with various card stock and printed card stock from my stash. Used a stitched scallop die for the purple frames on the two cards. Stamped all images with Memento black ink and used Crayola colour pencils to add colour to the images. Once those were all done I added clear Wink of Stella to the centers of the flowers, on the bows, and on the eggs.

Whipper Snapper stamps stamp beautifully and each has a lot of detail so your image has dimension. TFL

Monday, April 10, 2017

Peek-A-Boo Bunny Card


Had seen this card made up by Kelly Acheson for Easter:

http://astampabove.typepad.com/my-blog/2016/02/bunny-time.html

Here are my two cards:


First of the problems I did not have this stamp set with matching punch. The stamp set the Stampin Up Friends and Flowers stamp set. Checked around for this stamp set, and even at a recent stampers sale, but could not find a set. Finally emailed a local Stampin Up demonstrator, Tracie, and she said she would sell me her copy. Happy me to have finally located it! Thanks Tracie!!

For my card stock base I used #110 weight white card stock from Mikes. Cut and scored this base with the scored fold line at the top. Set that aside. Used Stampin Up Crumb Cake ink for the front of the card. Used a dotted embossing folder by Darice to emboss the Crumb Cake piece. Once embossed I cut that to the size I needed for the card front. Used the 2 1/2" circle punch for the 'window' on the card front. Set this aside.

Stamped the bunny face and ear stamp from the stamp set onto scrap white/GP card stock.Using a 1 3/8" circle punch I punched out the bunny and then used the Stampin Up Festive Flower Builder punch for the ears. Put adhesive on the backside of the embossed Crumb Cake piece around part of the circle. Used a printed 3 x 3 piece of scrap card stock and put that on the back of the Crumb Cake piece over the punched circle. Used the ATG and put this onto the white card stock base.

Put the bunny ears on the bunny head using glue dots. Then used the ATG on the back of the bunny head and tucked that into the circle window on the card front. The greeting stamp "happy easter" is from the Stampin Up stamp set Delightful Dozen. Stamped that onto scrap white/GP card stock using Memento black ink. Used a banner die to cut that out and also the pink piece behind the greeting. Put the greeting piece onto the pink banner using the ATG. Cut the banner piece to the size I wanted using the trimmer and put this on the left lower front of the card using the ATG.

Used a petite flower punch for the flowers. Put those onto the card front using glue dots. Added small pearls to the center of the flowers. Easy card to put together with a cute bunny for Easter. Thanks to Kelly for sharing her Peek-A-Boo Bunny card. TFL

Saturday, April 8, 2017

Cadbury Creme Egg Holders


Had recently seen a video by Gosia MacKinnon on YouTube for these cute Cadbury Creme Egg Holders:

www.youtube.com/watch?v=P8GGp-a4H4Q

In the past I have made holders for the Cadbury Creme Eggs:


The above holders I made for BOO Day (Halloween) holds both the Cadbury Creme Eggs and the Ferrero Rocher chocolates. With Easter coming two favorites are always in the Easter basket -- a chocolate bunny and a Cadbury Creme Egg.  I did not want to make the same holder as above but something smaller that could easily be tucked into an Easter basket. Here is a photo of two of the Cadbury Creme Egg Holders that I made after watching Gosia's video:


Seriously it took me longer to make the bow than it took to cut, score, punch, and fold the holder! To begin with I used a piece of double sided 12 x 12 card stocks for my holders. Cut a 2" wide strip from each sheet of card stock. Took this 2" x 12" strip to the trimmer and cut it at 7 1/4" long and this gave me two pieces -- the longer strip is for the holder and the shorter piece is for the bow:


The printed piece on the left measures 2" x 7 1/4". Took this to the score board with the 7 1/4" edge at the top of the score board. Scored this at 3 1/4", 3 5/8", and 4". As shown in the video I folded the scored lines. Once that was done I used the Stampin Up Scallop Tab punch and the Stampin Up Bow Builder punch to complete my holder:


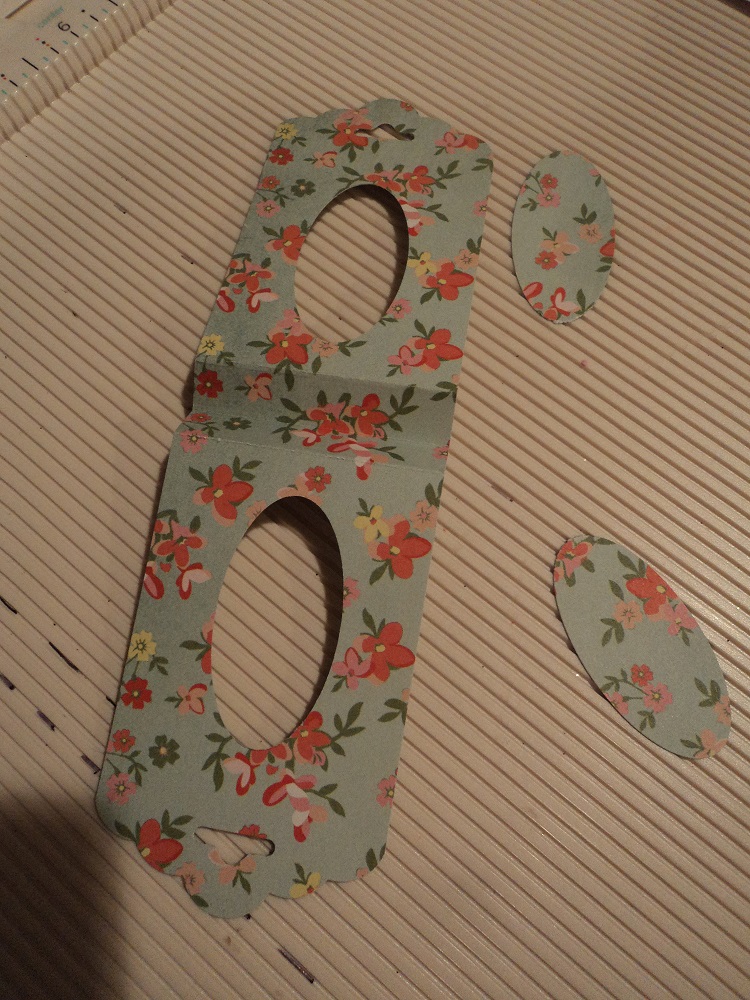
Took the scored piece and inserted one end in the Scallop Tag Topper punch and punched that - then punched the opposite end. As instructed in the video I used the Stampin Up Large Oval punch to make the "window" on the holder. This oval punch measures 1 3/4" x 7/8". Set this aside after I punched it out:


The smaller pieces from the original 2" strip are used to make the bow:


Punched out the bow pieces from these strips:


With the bow pieces punched out I used micro mini glue dots to assemble the bows. Here is one of the holders with the bow ready for assembly:


Put the Cadbury Creme Egg inside the holder and closed the holder around that using two glue dots. Then attached the bow to the front of the holder using glue dots. Added a crystal and a pearl to the centers of my bows and the holders are complete. Here are photos of the side and the front of these treat holders::


Thanks to Gosia for sharing this too cute Cadbury Creme Egg Holder in her detailed video. These holders are free standing and not only will be cute inside an Easter basket but could be holiday table markers or holiday favors. This treat holder goes together quickly and very easy to assemble. Another treat holder "keeper" for the Cadbury Creme Eggs. TFL

Thursday, April 6, 2017

Mini Bunny Card


Had seen a video on YouTube by Scrapdiva29 using the Mama Elephant Favor Bag Accessory - Bunny die set. I had made these bags using two of the Mama Elephant die sets together:


Using the accessory bunny die as seen on YouTube I made this mini bunny card:


To make this mini bunny card I scored and folded a piece of #110 weight white card stock from Mikes that was a standard card - 4 1/4" x 5 1/2". I placed the bunny face die onto this white card base with the one side off the fold of the card and I used washi tape to keep the die in place. With it being heavier card stock I ran this through the die cutting machine twice before I took the die off the white card stock. Even with using a heavier card stock this die easily cut the die shape.

I cut all the accessory dies for the eyes, ears, nose, and cheeks. Using liquid glue I put the ears, eyes, and nose pieces onto the mini card front. Cut out the bow and punched out a small flower to put onto the bow using a glue dot. Added a pink crystal to the center of the bow and put this on the front of the mini bunny card using a glue dot.

Inside the card I trimmed a scrap piece of pink card stock and stamped a greeting from Rubber Cottage:


This mini card would be good as a tuck-in greeting for an Easter basket or a place marker at the table. Thanks to Scrapdiva29 for her video and how-to's. Another cute use of the Mama Elephant accessory bunny die set.  TFL

Wednesday, April 5, 2017

Doesn't happen often . . . but . . .


It does not happen often that when new supplies arrive in the craft room I am opening them and using them right away . . . between time or choosing card stocks or such it does not work out that I am able to use my new "toys" right away .... until......

Had seen these cuter than cute Bunny Bags on the blog of Wanda Guess that she had made using the Mama Elephant Favor Bag - XL with the Favor Bag Accessory - Bunny dies sets. Here is a link to her blog and Bunny Bags:

http://www.ablogcalledwanda.com/.a/6a0120a7861a18970b01b7c8e509c6970b-800wi 

and her blog is: www.ablogcalledwanda.com

I follow her blog and had seen her Bunny Bags one morning before I left for work.  The link on her blog will send you to SimonSaysStamp.com for the bag and bunny face dies but I was not going to pay $57.00 for the bag die alone.... So I searched the web and found MamaElephant.com sells the dies -- $36.00 for the Favor Bag - XL die and $18.00 for the Favor Bag Accessory - Bunny.  For $54.00 you can buy both the bag and bunny face dies from them rather than pay $57.00 for the bag die and then another $21.00 for the bunny face dies from Simon.

It did not take long for me to receive my two die sets and the day they arrived by Mr. Mailman I was in the craft room. It has taken me a couple of days (working extra hours at work) but here are my Bunny Bags:


I made six of these bags -- one in kraft, yellow, pink, green, blue, and lavender. Here are other photos of the bags:


The Mama Elephant dies cut nicely -- no "hairs" or trimming or running through the die cutting machine a few times. Decided since I was making 6 bags that I would do this assembly line style. Since I would have to glue the eyes, nose, and ear lining pieces on the bunny face I would cut that all out first and glue the pieces on the face and set them aside to dry -- I did not add the circle pink cheek pieces until the bag was assembled with the bunny face on it.

With the bunny face pieces set aside to dry I cut out all the bags. This bag die uses one 8 1/2" x 11" piece of card stock for each bag -- front and back pieces. Once all the bag pieces were cut I used a bone folder and creased my scored lines. Then I used the ATG and added the bunny face to the front piece of the bag -- while the bag was flat and unassembled:


With the face on the bag fronts I put the bags together. As Wanda did on her treat bags I did not put adhesive behind the bunny ears and I gently bent those with my hand to give the bag front some dimension. Using the bow die in the die set I cut out bows using Doodlebug printed card stock. For the center of the bows I used scrap card stock and the Triple Flower punch from Stampin Up and punched out flowers. I put a flower in the center of the bow and added a pink crystal from the stash. Then put these onto the bunny face under the left ear using a glue dot:


Now to the Happy Easter greeting.... I either have too large stamps that say "Happy Easter" or the small SU stamp set Teeny Tiny Wishes....  So what to do??? Off to the computer with white/GP card stock and I put that in the printer. Then found a font I wanted to use and printed out "Happy Easter". Used the SU Classic Label punch to punch those out and put them on the top right corner of the bags using glue dots:


Another problem -- Wanda used shiny carrot stickers for her clothespin on her bags. I own none of those but.... I have two carrot dies that I combined for my carrots --- put the carrot tops on the carrots with a micro mini glue dot and then I spritzed them with Perfect Pearls Mist so my carrots have some shimmer and shine. The carrot top is from a carrot die set by Impression Obsession and the actual carrot is from a carrot die set by Taylored Expression. The Impression Obsession carrot die cuts a larger carrot and I wanted a smaller one for my clothespin but I really like the Impression Obsession carrot tops so I combined these two for my carrot:


Once I had ordered these dies for this Easter treat holder I checked around online and came across someone who had put a pom pom on the bag of her treat bag and so did I. I do not remember her name but it is too cute:


After I added pom pom tails to my bags I then added the circle pink bunny cheeks to the bunny face and I used pop dots for dimension. In the photo below you can see the bunny face on the yellow bag I had sponged the edges with gray ink. I did all the sponging before I put the bunny face together and on the bag front. That is the only bunny face I sponged the edges of:


I agree with Wanda -- the kraft card stock makes the bunny face "pop" but I am a traditional Easter colour crafter so I had to make some pastel Bunny Bags. With these finished I will now put in a little paper shred in each bag and some chocolate treats and then on top more paper shred. The die cuts the bag pieces with a gusset so once the treats are inside I will pinch it together and the carrot clothespin will hold it closed. A BIG THANK YOU to Wanda for sharing these Bunny Bags that still make me smile -- these dies cut so nicely and it did not take long to cut it all out and put them together. These are cute treat bags and would be cute for place markers at a holiday table. TFL

Sunday, March 26, 2017

Masked Heart Card


Awhile back had seen a video on Youtube by KWerner masking a heart shape and using distressed inks for her card. Decided I would try this out and here is my card:


Really liked how my card turned out for the first try. Again I used the watercolour card stock from Hobby Lobby --- next time will use the Mixed Media card stock by Strathmore but was not sure how this would work out so I used the other card stock instead. If you watch the video you will see with each step you use the heat tool to dry your inks and water. I will say this watercolour card stock did okay with the extra heating of it but am sure the Strathmore card stock will do better.

Cut my piece of watercolour card stock to the size I needed for my card front. For her heart shape she traced around a metal heart die she had on hand. I did the same using the largest heart die I had in a hearts die set. I put the heart die centered on my card stock and traced around that using a light pencil mark.

I had no masking fluid (Frisket) on hand so picked up a full kit at Hobby Lobby during my last visit to the store. Here is what I used:


As she used in her video I used a small paint brush to apply a thin coat of the masking fluid. She explains using a thin coat the mask will dry faster so you can work on your card in just a few minutes. Here is a photo of these hearts surrounded with the masking fluid (will be using the second heart piece for another card later):


With the masking fluid dry I used a clean paint brush dipped in clean water and covered the heart with water. Like she did I put my three distressed ink colours onto a large acrylic block and added a wet paint brush to the inks to put them onto my heart image.  As suggested in the video dab the ink colours onto the heart and do not brush them on. Let the water move the inks around. With the three inks covering the heart I used the heat tool to dry the inks. Once dried I used a mister and misted water onto my hand -- shook it over the heart piece so it would land onto the heart randomly. Used a clean paper towel to cover the heart and soak up the excess water. The water removes the distressed inks from the heart:


Back to the heat tool to dry the water splatters. Once dried I peeled off the masking fluid around the heart shape. Using a small clean paint brush I dipped that in clean water and then dipped it into the inks on the acrylic block I used for the heart. Lightly tapped and flicked the paint brush over my heart image piece. At first I had very little splatters but for these colours I wanted them to show up more so I just added more splatters of each ink colour. With all the colours splattered over the heart piece again I used the heat tool to dry the splatters:


For my greeting I used a stamp from a Fun Stampers Journey stamp set Thoughtful Greetings. First I used the embossing buddy over the heart piece. Used VersaMark ink and stamped the greeting onto the heart. Covered that with black embossing powder and heat set that.

With all steps completed I cut and scored a piece of turquoise card stock with the scored fold line at the top of the card. Put my heart piece onto this turquoise card stock base using the ATG. Added a clear crystal from the stash to the greeting on the heart:


This card was fun to put together and easier than it may sound but next time I will definitely use a better quality watercolour card stock that can take the water, heat, inks, heat, water, heat with no problems. This card stock did get wavy but it flattened down once all the liquid and heating was stopped. Thanks to KWerner for sharing her video and cute card using items she had on hand. TFL

Here is the video link:

www.youtube.com/watch?v=akpN55mm7jE

Poppies Birthday Card


Card stock base is #110 black card stock from Mikes. Used watercolour card stock from Hobby Lobby. Poppy stamp is from Technique Junkies. Used Memento black ink to stamp flowers onto the watercolour card stock.

To begin with I cut the watercolour card a bit larger than the background Poppy stamp. Used the MISTI with creative corners and stamped the poppy stamp. Wanted the black on the flowers to really stand out so I inked the stamp again and stamped it a second time.

Once that was dry I used distressed inks and went from lighter to darker inks for the poppies. The center of the poppies I used the darker red/orange distressed inks. Did not want this darker ink to have an edge to it so once this piece was all inked I used a paint brush and dipped it in clean water and went over the stamped image. This softened the edges of one colour meeting the next:


Set it aside to dry. Once dried I trimmed this stamped piece to the size I would need for my card front. The above photo shows the blending of the inks.

For the greeting I used a stamp from a set of stamps on clearance at Hobby Lobby by My Sentiments Exactly. Stamped that onto scrap white card stock and used ColorBox black ink for that. For the black card stock behind the image I used the Stampin Up Finishing Touches framelit with the decorated scalloped edge and cut out a piece of black card stock using the Big Shot. Trimmed my greeting piece to the size I needed and then put the die cut black piece behind it using the ATG. Once my stamped card front was dry I used the ATG to put the greeting piece across that. Trimmed off the sides even with the stamped piece.

To assemble the card I cut my black #110 weight card stock base to the size I needed with the score fold on the side. Used a bone folder to crease that. Cut a piece of white/GP for the card front. With the stamped image and greeting piece complete I put them onto the white/GP piece using the ATG. Used the ATG and put these onto the black card stock base. Added black crystals to the greeting piece. TFL

Saturday, March 11, 2017

St. Patty's Day Cards


Used the same layout using two different St. Patrick's Day printed card stocks from Hobby Lobby. Both cards are on a #110 weight white card stock from Mikes. Here is the first card:


Used a light green card stock for the card front. The white card front piece is GP white. Used a hexagon punch for the card front and the printed card stocks. Used a smaller hexagon punch for the small white hexagon the shamrock is on.

Cut and scored the white card stock base with the fold at the top. Cut the light green card stock for the card front. Put this piece onto the white card stock base using the ATG. For the white/GP card front I used the larger hexagon punch and just punched the card stock. Using that same punch I punched out five of the printed card stock pieces. Used the ATG for adhesive and put these onto the card front using the ATG.

Stamped the "Happy St. Patrick's Day" stamp in dark green above the printed hexagon pieces. Using pop dots I put this onto the green card front. Used a smaller hexagon punch and punched out a white hexagon and put that in the center of the hexagon on the card front using the ATG for adhesive. Used a small shamrock punch and punched out a dark green shamrock. Used clear Wink of Stella to add sparkle to that:


Put the glittery shamrock onto the white hexagon piece using a glue dot. Used a small flower punch for the three flowers on the card front. Added clear crystals to those. Used glue dots to put them on the card front.

Here is the other card using another shamrock printed card stock:


Easy card to put together and with the different prints the card have a totally different look. TFL

Sunday, February 26, 2017

Embossed Pistachio Card

Had seen a video by Kelly Acheson for this card so I made one for myself. I recently bought a few stamp sets from another stamper and for my card I used two of these Stampin Up stamp sets:

Corner Garden and Peaceful Petals


For my card base I used #110 weight white card stock from Mikes, cut and scored on the side. For the card front I used a piece of Emerald card stock from Stampin Up. Cut that to the size I needed for the card front. Using white/GP card stock I cut that piece larger than what I would need for the card front. Using the Corner Garden stamp I used the MISTI and inked that stamp with VersaMark. Stamped that and then used white embossing powder and heat set that.

For the greeting I used a stamp from the Stampin Up stamp set Peaceful Petals and the Cracked Pistachio ink and stamped that onto the embossed piece. Using a very light touch I sponged the distress ink Cracked Pistachio over the embossed flowers making some flowers darker than others. Once the flowers were all covered I trimmed this to the size I wanted for the card front. Once trimmed to size I sponged ink only on the edges that the flowers were on -- one side and bottom of the card front. Put the embossed card front onto the green piece using the ATG. Then put these two pieces onto the white card stock base.


Using scrap card stock and a small butterfly punch I punched out two butterflies and put them onto the card front using TomBow glue. Added pearls to them from the stash. Added three clear sequins to the embossed side of the card front.  Easy card to put together and thanks to Kelly for sharing her video. TFL