Saturday, November 25, 2017
Christmas Card - ACC09
This card features the Joyful Noel dies from Concord & 9th. This die cuts well and here is my card:
Used kraft card stock from Taylored Expressions for the card base. For the card front I used Very Vanilla from Stampin Up and I used an evergreen background stamp from Impressions Obsessions for the background on the front using Crumb Cake ink. Here is a better photo to show the stamped front of the card:
I used a doily die from my stash and cut that out of kraft card stock. Used the red foil card stock from Mikes and cut out the "JOY" die and wreath piece. Put the red wreath piece onto the kraft doily using a glue pen. Put the "J" and the "Y" on the card front using red sticky tape. Put the card front onto the card stock base using the ATG.
Cut out a few pieces from the SU Pines die set to decorate my wreath. Used a die for a couple of evergreen pieces. Put the red branch and evergreen pieces at the bottom of the wreath using glue dots. Added a red foil and a kraft card stock bow to the bottom of the wreath to finish it off. Very sparkly IRL but the camera does not really capture that. This die cuts out JOY and NOEL and also has a star die in the set. Went together quickly and like the doily behind the wreath for dimension. TFL
Christmas Card - ACC08
Cherry Cobbler card stock from Stampin Up for the card stock base. Holly print is from the stash. Used a greeting stamp from a Gina K Designs stamp set and stamped that in Cherry Cobbler ink on the white piece. I cut the white piece to put it against the edge of the holly printed card stock so the front of my card would not be stacked. I laid them on the craft table, face down, and used Scotch tape to keep them together for the card front. Put them onto the card stock base using the ATG.
Used the Stampin Up Good Tidings stamp set for the holly piece. I used one green ink for the holly piece and the "stamp off" method so the image still has detail. Used the Stampin Up Layering Squares die set to cut out the holly piece and scalloped square behind it. Put those pieces together using the ATG. Added glitter pen to the holly berries. Put this on the card front using pop dots and used a Tim Holtz bow punch for my bow. Added a clear crystal to that - here is a better photo of this:
The holly stamps in the Good Tiding stamp set really stamp well and have lots of detail. It is a two step stamp set and very easy to line up. TFL
Christmas Card - ACC07
This card uses the Memory Box Glowing Candles die:
Used #110 weight white card stock from Mikes for the card base. The gold foil piece for the card front is from the dollar store. Used white/GP for the card front. Cut out the candles die from shiny gold foil card stock. Then cut it out again using a gold glittered card stock and finally cut it out of red foil card stock. Pieced it all back together using a glue pen. Added two evergreen leaves pieces using a glue dot. For the bow I used the Stampin Up Pines die set and cut that out of red foil card stock.
I had originally used red Stickles on the berry pieces... Set it aside to dry... and dry it did before it FELL off.... grrrrrrrrrrr... So I decided to use small red crystals from my stash that have adhesive on the back of them and they are still on!! Happy me.... Here is a better photo of the detail:
For the Merry Christmas I used a die from my stash and cut it out of red foil backed with Stick It sheet by Ken Oliver. Easy card to put together and the two gold finishes sparkle and shine IRL. TFL
Christmas Card - ACC06
This card all came together quickly once I saw this die from Lil' Inker Designs -- this card will be for DH for Christmas since he is a hunter/fisherman:
Used kraft card stock from Taylored Expressions for the card stock base. Looked through my 6 x 6 card stock pads and found this plaid - reminds me of a flannel shirt so know DH will like that! I ordered this die the day I saw it and already knew what I was going to make with it.
Wanted my "NOEL" to be noticeable so I used red foil card stock and cut that out. For the antlers I cut out a second "NOEL" piece from kraft card stock scraps. Used scissors to trim around the "O" with the antlers and used a glue pen and put the kraft antlers over the red foil antlers -- here is a photo to better show how they are stacked on each other:
I added a red nose like Rudolph... and it was VERY hard not to put a bow or ribbon or even sequins on the antlers or card front haha.... I am sure DH will smile when he sees this card on Christmas Day!! TFL
Christmas Care - ACC05
Used the Memory Box Snowman Collage Craft die for this card:
Card stock base is #110 weight white card stock from Mikes cut and scored at the top. Here is a photo of this Memory Box Snowman die:
You need to cut your card front piece to the size you want and then center this die, cut side down, onto the white card stock front. Run it through your machine and remove the die and your snowman will be on the left side of your card stock piece. This die cuts and makes a frame for the snowman to be in. I used printed snowflake card stock from my stash behind the snowman/frame piece. Put that behind the frame piece using the ATG. I cut a piece of white craft foam to fit behind this card front piece.
Here is a closer photo to show the details on the snowman and to show the frame the die cuts with your printed card stock under this frame:
With the craft foam on the back of the snowman piece I put this onto the card stock base using double sided tape by Scotch I added three white glittered snowflakes with blue crystals to the card front. Easy card to put together and another cute snowman card. TFL
Christmas Card - ACC04
This card was inspired by Linda Callahan -- using the Lil' Inkers Jingle Bell die set:
Gray card stock base is cut and scored at the top. Stripe card stock is Stampin Up. White card front is Stampin Up Whisper White. First I wanted to use a glittered card stock for the bells but I wanted a smooth texture. Earlier this week I made a trip to Mikes and picked up a sheet of their sparkly foil card stock in red. This card stock feels like fabric rather than a paper and it is not stiff. To give my bells extra stability and not be so flimsy I used the ATG and put adhesive on a scrap piece of white/GP cut larger than the bells die. Also cut out a piece of the red sparkly foil card stock to the same size and stuck that onto the white/GP piece. Ran the die through the machine on this card stock and cut out the large and smaller bell. Ran it through the machine again for a second smaller bell.
Used a corner rounder on the corners of the striped card stock. Put this onto the gray card stock base using the ATG. For the white piece for the card front -- as Linda had done she used a background stamp to stamp beneath the bells. Sounded easy.... what could happen???? I decided I wanted the background stamp to have some sparkle so I used a stamp from the Stampin Up Night in Bethlehem stamp set and metallic silver ink from Delicata. Well... that ink with Whisper White.... not a good combo.. The ink makes the stamp slip and slide so the little stars and dots were not clear images. Had to try this again so this is my second attempt - being sure to stamp straight up and down each time.
Set that aside to dry. Made my silver twine bows for the bells. Stamped "Merry and Bright" in red ink using the MISTI. Again used a corner rounder for the corners of the white piece. Using the ATG I put the stamped white card stock onto the card base. Used the ATG to put the bells on the card front. Glue dots were used to put the bows on the top of the bells. Added three stars using glue dots:
The above photo shows the sparkly of this sparkly foil card stock and the shimmer of the silver stamped background. Easy card to put together -- a big thank you to Linda for sharing her cute holiday card with bells! TFL
Gray card stock base is cut and scored at the top. Stripe card stock is Stampin Up. White card front is Stampin Up Whisper White. First I wanted to use a glittered card stock for the bells but I wanted a smooth texture. Earlier this week I made a trip to Mikes and picked up a sheet of their sparkly foil card stock in red. This card stock feels like fabric rather than a paper and it is not stiff. To give my bells extra stability and not be so flimsy I used the ATG and put adhesive on a scrap piece of white/GP cut larger than the bells die. Also cut out a piece of the red sparkly foil card stock to the same size and stuck that onto the white/GP piece. Ran the die through the machine on this card stock and cut out the large and smaller bell. Ran it through the machine again for a second smaller bell.
Used a corner rounder on the corners of the striped card stock. Put this onto the gray card stock base using the ATG. For the white piece for the card front -- as Linda had done she used a background stamp to stamp beneath the bells. Sounded easy.... what could happen???? I decided I wanted the background stamp to have some sparkle so I used a stamp from the Stampin Up Night in Bethlehem stamp set and metallic silver ink from Delicata. Well... that ink with Whisper White.... not a good combo.. The ink makes the stamp slip and slide so the little stars and dots were not clear images. Had to try this again so this is my second attempt - being sure to stamp straight up and down each time.
Set that aside to dry. Made my silver twine bows for the bells. Stamped "Merry and Bright" in red ink using the MISTI. Again used a corner rounder for the corners of the white piece. Using the ATG I put the stamped white card stock onto the card base. Used the ATG to put the bells on the card front. Glue dots were used to put the bows on the top of the bells. Added three stars using glue dots:
The above photo shows the sparkly of this sparkly foil card stock and the shimmer of the silver stamped background. Easy card to put together -- a big thank you to Linda for sharing her cute holiday card with bells! TFL
Christmas Cards - ACC03
Have watched many of the videos by Connie Stewart on Youtube and her blog is the Simply Simple Stamping blog. She is an SU demonstrator and this card is soooo simple so I had to make one up for my Christmas cards this year.... but I could not leave well enough alone so I made a second card as well:
She used the longer die from the SU Swirly Scribbles die set. She cut it out of white card stock and again in green and again in red. With your die cut white piece laying face down on your work table you add the red and green pieces from the back and use Scotch tape to hold your pieces in place.
With my scribbles piece all taped together I cut and scored at the top a piece of white #110 weight card stock from Mikes. Cut a piece of matching red card stock for the card front. Then cut a piece of white/GP for the card front a big larger than I would need. Using red ink I stamped a greeting from the Sunny Studios Poinsettia stamp set. Using the ATG I put the pieced swirly piece onto the stamped white card front. Trimmed that to the size I needed for the card. Used the ATG and put the red and stamped white pieces onto the card stock base. Used glue dots to add three red sequins:
This is such a simple card and I thank Connie for sharing her card. . . . but... decided I wanted to made a card with golds and white.... so.... here is my card:
Used both a shiny gold card stock and a glittered gold card stock for my swirly pieces. For the gold foil piece for behind my stamped card front I used foiled sheets from the dollar tree so I am not wasting my foiled card stocks. Here is a closer photo to show the two gold card stocks I used for my pieced swirled piece:
For the sequins I put them on the card front using glue dots. The greeting stamp on this card was stamped using the metallic gold Delicata ink. The camera does not capture the sparkle and shine of this card but IRL it has "holiday" sparkle and shine. Thanks again to Connie Stewart. TFL -- Forgot to add these photos of the silver foil/glittered card stocks:
Christmas Cards - ACC02
Really love this holiday card stock in my stash from Graphic 45. Knew this was going to make a cute card for this holiday season - the card stock base is green from SU and I used SU Very Vanilla for the card front. The Graphic 45 print is directional so I was careful to be sure I was aware of that when I cut it out using a edge die from Pink & Main for the card front.
Cut and scored the card stock base - cut the Very Vanilla card stock for the front of the card. Wanted to use a stamp from the SU stamp set Christmas Punch but did not want to stamp it with the brackets on the image -- here is a stamped sample of what this stamp looks like:
So I used a red marker and the huff method for the greeting on my card front. Using the ATG I put the trimmed print piece on the left card front. Put these onto the green card stock base using the ATG. Using small scissors I fussy cut out one of the candy canes from the printed card stock. Added clear Wink of Stella to the holly leaves and bow on the candy cane. Put micro mini glue dots on the back of the candy cane double stacked and put this onto the card front. Added three green sequins from the stash:
The Wink of Stella adds a little sparkle and shine to the candy cane and IRL it shows up. TFL
Christmas Cards - ACC01
For Halloween this year I decided to make all different cards rather than one card to duplicate. This way I was able to use a lot of the Halloween products I keep stashed in the craft room plus it was fun to use different techniques for the cards. Although I enjoyed using lots of products the craft room became the chaos center for cards in no time.... here is a photo of some of the Halloween cards I had made:
Barely had time to dig out the craft room and Thanksgiving cards were needed -- so I made one card and sent out duplicates:
With the Thanksgiving cards made and mailed out first thing I did was get everything put away that did not have anything to do with Christmas.... then decided I would make all different Christmas cards but I had to have a "controlled chaos" this time.
Went through my stamp sets and decided which ones I would start with. Then went through my dies and decided on which of those I wanted to use. With these products chosen I wrote a list of what cards I wanted to make with the products and so it began. In one day I made 9 cards and that has to be a record for me... haha.... Definitely helped having a list and a plan before I began. I will post some of the cards I have made so far but am still making cards so will post those when they are complete.
First card -- This snowman is the Sam E. Snowman die by Jillian Vance:
Card stock base is SU Cherry Cobbler and the front of the card is SU Sahara Sand card stock. I put two different washi tape patterns across the lower part of the card front. I picked them up at Mikes earlier this week. I used a dotted stamp and SU white craft ink for the falling snow on the card front behind Sam E.:
Sam E. Snowman die also has the snowflake die so I cut out three snowflakes from white glittered card stock and put them on the card front using micro mini glue dots. "Merry Christmas" is stamped using Cherry Cobbler ink and that is a stamp from the SU stamp set Good Greetings. The only thing I changed on Sam E. is he does not have arms so I used a tree die and cut a tree out of kraft card stock and I used scissors to trim off branches for his arms. He is on the card front using pot dots. Fun little guy to make. TFL
Saturday, November 18, 2017
Thanksgiving Treat Holders
When I made my Thanksgiving cards this year I did all my die cutting and punching out acorns first for my assembly line card making:
Once all the parts were die cut or punched out and sponged I began the cards. With the cards finished I had some extra pieces left so I decided to use them on my Thanksgiving Treat Holders that I made using the Goodie Bag die from Lawn Fawn - here is a photo of some of the treat bags:
Here is a photo of one of the treat bags:
For these treat bags I used Kraft card stock from Taylored Expressions. Once I put the bags together I sponged the edges of the front of the bag using light brown ink. Again used corrugated card board at the bottom of the bag behind the greeting banner. Added two die cut leaves using a glue pen. Then put the punched acorn on top of the leaves. Added sequins using mini glue dots to the greeting banner and the front of the bag. These bags are free standing and would work well at a holiday table.
With all the products out in the craft room for my Thanksgiving crafting sometimes die pieces can get lost in the maze..... to be sure that does not happen I cut a small piece of magnetic sheet, (vent covers from Lowes home improvement stores), and I put that on the front of the cabinet above my die storage bins. I cut this magnetic sheet piece small so I do not get in the habit of putting all die pieces on it -- it is for "stray" dies or if I just grab one die piece out of a die set. This way when I use dies again from my die storage I can see I have a few pieces to put away first. Here is a photo of this sheet on the cabinet door -- I used double sided Scotch tape to put it on the door:
The leaf die is from the Seasonal die set from Stampin Up -- Sizzix makes their thin metal dies and all the Stampin Up die pieces have a product number on them so if I forgot which set the leaf die went with I could always check the product numbers on the die sets. I also keep my second magnet bar for my MISTI on this sheet.
** Packed some of the treat bags and decided they needed a 'little something' -- used a leaf die set I bought from Tessler Stamps at a stamp show and I cut the leaves out of bronze foil card stock. Put the die cut leaf on a mini clothespin from the stash and added a mini bow and a brown crystal. Now the top of the bag looks complete -- Here is a photo of some of the filled bags:
With a closer look at the clothespin/leaf:
Inside each bag is a three pack of Ferraro Rocher, Brach's Autumn Mix, two mini candy bars along with paper shred from the dollar store. Hoping everyone likes these small treat bags!
With all Thanksgiving cards and projects complete I will finish putting things away and getting ready for the big red and green holiday again --- CHRISTMAS! TFL
Sunday, November 12, 2017
Acorn Thanksgiving Cards
Happy me that my PIC (stamping partner in crime) bought a roll of corrugated card board on clearance at Mikes and I was lucky enough she gave me some! Knew I wanted to use it for Fall cards but then decided to use it on Thanksgiving cards instead. The card on the left I cut the corrugated card board in one direction and for the card on the right I cut the corrugated card board in the other direction.
Card stock base for the cards is Stampin Up Cajun Craze card stock cut and scored at the top. Used Stampin Up Very Vanilla for the card fronts. Cut those to the size I needed for the card fronts. Using Stampin Up Crumb Cake ink I covered the Stampin Up Canvas background stamp. Laid the Very Vanilla card stock pieces on top of the inked stamp and pressed my hand onto that to transfer the inked canvas pattern to the cream card stock. Cut my corrugated card board to the sizes I needed and put them across the cream background piece using double sided tape.
For the greeting stamp "Happy Thanksgiving" I used a stamp from 1990 by Embossing Arts Co. and stamped that onto scrap Very Vanilla card stock using Cajun Craze ink. Trimmed my greeting piece to the size I wanted and used the Stampin Up banner punch for the one end. Put the greeting banner piece on top of the corrugated card board pieces using red sticky tape. Here is photo of the acorns for the card front and you can see the inked canvas pattern on the background piece as well:
For the acorns I used kraft card stock from Mikes (doubled up) and the plaid print is Authentique card stock I bought at Hobby Lobby. I used the acorn punch from Stampin Up and punched out the kraft card stock acorns and the plaid print acorns and put the tops on different bottoms to give the acorns some interest. Used a small bow punch for the bows at the top of the acorns and added a small brown crystal to the center of the bows. Acorns are on the card front using glue dots.
Here is a photo of the Northwoods Rubber Stamps greeting stamped for the inside of this card. I used a square punch and punched out a square from the plaid card stock. Cut that in half from corner to corner and put these corners on the greeting piece:
For the two leaves -- used the Stampin Up Seasonal Layers detailed leaf die to cut them out. One leaf is cut of bronze foil card stock from Mikes and the glittered bronze card stock is from Hobby Lobby. I tucked the leaves behind the corrugated card board piece and used a small glue dot behind the leaf pieces. TFL
Gourd Goodness Thanksgiving Card
Used the Stampin Up Gourd Goodness stamp set for this card. Card base is green and the white card front is white/GP. For the leaves on the card front background piece I used Stampin Up Pumpkin Pie ink and stamped the detailed leaf stamp randomly over the white/GP piece after I inked the stamp and stamped it off onto scrap card stock. With that piece stamped I set that aside.
Using a pumpkin and white striped piece of card stock from Hobby Lobby I cut that piece to the size I wanted for the card front. Using the two pumpkin stamps from the Stampin Up Gourd Goodness stamp set I stamped the solid pumpkin stamp onto scrap white card stock using Stampin Up Crushed Curry ink. I inked that and stamped it off onto scrap paper and then stamped the white card stock. Using Stampin Up Pumpkin Pie ink I inked the detailed pumpkins stamp and stamped over the Crushed Curry pumpkins image. Then I stamped the stem stamps at the top of the pumpkins.
Using the Layering Squares die set from Stampin Up I cut out the pumpkins piece and also the Pumpkin Pie card stock behind the pumpkins piece. Put the pumpkins piece onto the Pumpkin Pie die cut piece using the ATG. Set this aside.
Cut and scored the green card base. Put the stamped white card stock piece onto the base using the ATG. Added the stripes piece on that. Used pop dots to put the die cut pumpkin pieces onto the card front. The greeting "Happy Thanksgiving" is a stamp from www.morningstarstamps.com and I stamped that onto scrap white card stock using Pumpkin Pie ink. Punched that out using a 1 1/8" circle punch. Using a 1 1/4" circle punch I punched out a circle from Pumpkin Pie card stock and put the stamped white circle onto that. Put the circle greeting on the pumpkins piece using glue dots.
The Gourds Goodness is a new 2 Step Stamping stamp set and has a lot of detail. Easy stamps to put together in the set with realistic details both on the pumpkins as well as the gourds in the set. TFL
Saturday, November 11, 2017
Patchwork Christmas Quilt Card
To begin with I had seen this video on YouTube by Betty Traciak and here is the link to that:
https://www.youtube.com/watch?v=hb-Md66awns&t=306s
I watched it once and then a second time to take notes for sizes and suggestions and such. She also has a written tutorial for this technique on Splitcoast that she did and here is the link to that:
www.splitcoaststampers.com/resources/tutorials/stackandcutquiltcards/
The written tutorial is nice since you can print it out and she also has photos of this process on her tutorial so that helps. Her cards are done in the portrait layout but since I used this pack of single sided holiday card stock from Hobby Lobby with the patterns having a direction I had to make my card in the landscape layout:
Here is the card I made following her pattern:
My card stock base is Stampin Up Crumb Cake with a piece of Mikes Kraft card stock for the card front. I will say even though my printed card stocks are single sided with having to cut 5 of them at one time my Genesis could not cut through that thickness. So to cut my patchwork pieces I used my Guillotine trimmer and that worked well. Since the front of the card has five pieces of printed card stock that is why you have to cut the five pieces of prints. This way you are not repeating a pattern on the card front. Here are the five card fronts I have from cutting out my printed pieces:
My concern with this pieced together card front was that it could be too heavy if I mounted all the patchwork pieces onto another piece of card stock for the base of the patchwork card front. For my cards I decided to used white printer copy paper cut to the size needed and I ran the ATG over that for adhesive and then put my patchwork pieces on that. Trimmed my edges and this is the back of the white copy paper backing the patchwork card front piece:
With the patchwork pieces on the white copy paper base I used the ATG and put this onto the Kraft card stock from Mikes. Then put these onto the Crumb Cake card stock base. Using the copy paper rather than thicker card stock the card front is not too heavy and does not "flop" shut from the weight of the thicker card stocks.
As she explains in her video she used the stitching stamp from the new Stampin Up Christmas Quilt stamp set for the stitching on her cards. I used the straight stitch stamp from that stamp set and stamped my stitching on my patchwork pieces using Stampin Up Early Expresso ink and when needed I used a Post It note so that my stitches do not overlap on the card front pieces. For the greeting "Merry Christmas" I used a greeting stamp from the Sunny Studio Poinsettia stamp set and red ink from Gina K Designs, Red Velvet. Cut that out using a stitched rectangle die. Cut a scrap piece of Crumb Cake a bit larger than the die cut piece and put that behind the greeting piece using the ATG. Used large pop dots to put this on the card front.
Die cut a small holly/berries piece for the holly on the greeting. Used the clear Wink of Stella over the red berries and sponged the edges of the holly leaves with Old Olive ink and a dauber:
Put the holly/berries piece on my greeting piece using mini glue dots. Both the video Betty made and her written tutorial take the guess work out of this card and using different printed card stocks for the card front changes up the way the card looks. A big thanks to her for sharing her patchwork card technique and samples. Easy card to make! TFL

Thursday, November 9, 2017
Never Ending - - Birthday Card
Wanted to make a birthday card for my PIC (stamping partner in crime) but since she and I always go to the stamp shows together, road trips together, and shopping together we basically have a lot of the same stamp sets . . . For her birthday card I decided to go through my older wood mounted stamp sets from Stampin Up to find a stamp set to use for her card and I am happy I found a set that was perfect for her birthday card. She is one of the "purple people" so I always try to make her treat holders, boxes, cards, etc using her favorite colour purple. Here is the birthday card I made for her:
Card base is Stampin Up Lovely Lilac card stock. Embossed white card front piece is white/GP and I used a woven We R Memory Keepers embossing folder that she had bought for me. Used the Stampin Up Never Ending Joy stamp set for the floral piece. Used Lovely Lilac and Old Olive ink for the floral piece. the SU Hostess stamp set Express Yourself for the Happy Birthday banner piece that I used the SU Bitty Banners die set to cut that out with.
For the floral piece I used square frame dies from the SU Layering Squares die set to cut that out with the purple scalloped piece. With those cut out I used a bow stamp from the stamp set and stamped the bow at the bottom of the flowers. Added a purple crystal to the center of that to give the card some sparkle and shine. Here is a closer photo of the flowers:
Inside the card I stamped a birthday greeting from my stash and used the stems/flower stamp to stamp a design on the lower left of the greeting piece:
For the inside of the card before I stamped the partial stems and flowers I stamped them off onto scrap paper so the image would be lighter than the stamped image on the front of the card. Easy card to put together and nice to visit an older Stampin Up stamp set from 2005. TFL
Sunday, November 5, 2017
Needed a wreath - - -
With Halloween over I brought home my BOO Day wreath I had taken to work to hang on our door:
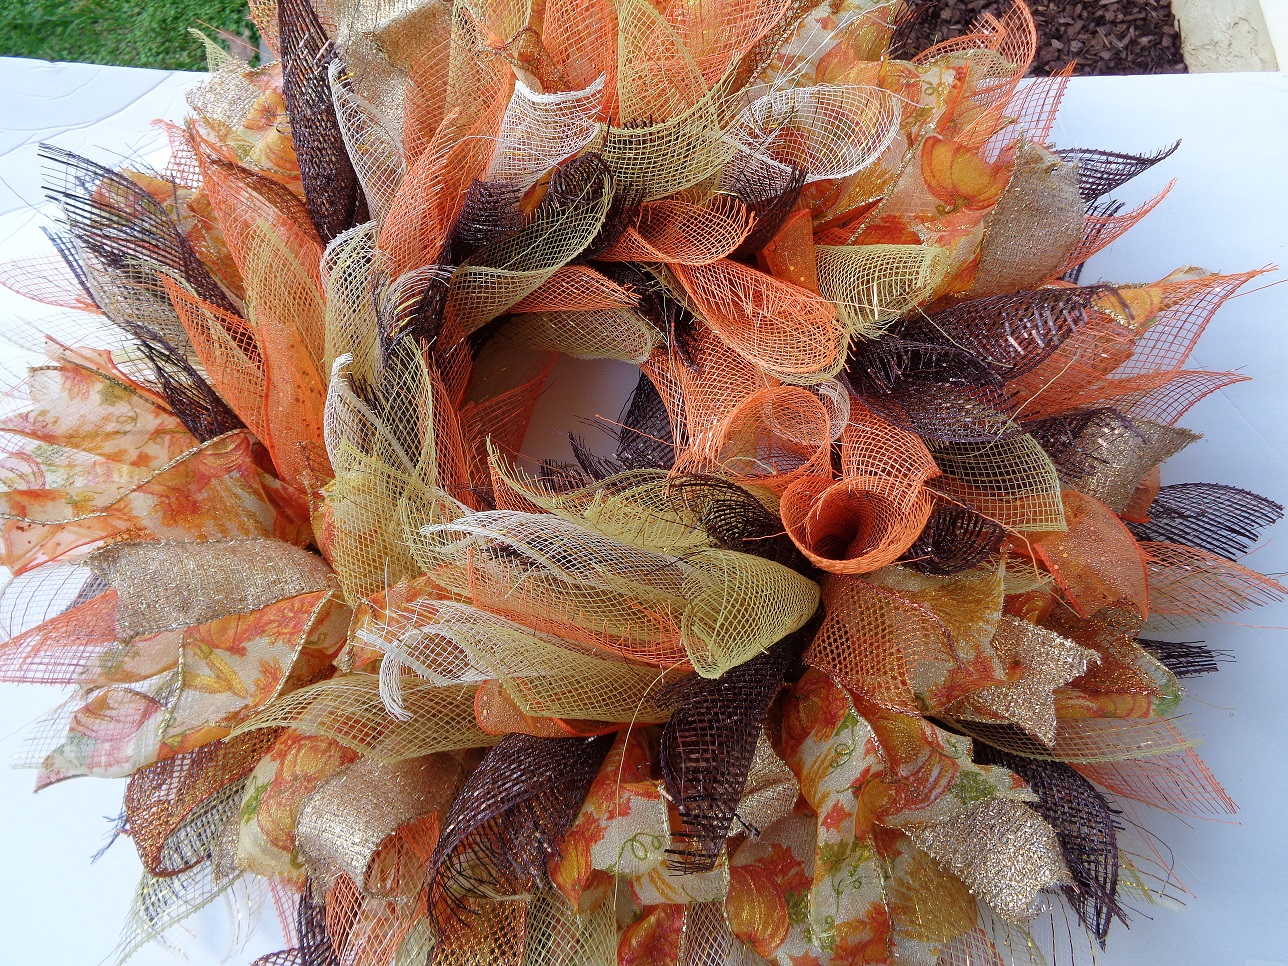
We needed another wreath for our door at work but I do not have an extra Fall themed wreath. Decided I wanted to make a mesh wreath but I have never worked with mesh before so decided I would check out a couple of videos on YouTube. I came across Laurie the Hard Working Mom who has a few how to videos for mesh wreaths. I wanted to make the Starburst wreath so I watched her video on it once and then watched it a second time writing down measurements and such. Here is my wreath -- and keep in mind this is my first attempt at mesh wreaths:
With it already being November not too many stores have Fall themed items left so I picked up a spool of mesh at the dollar store, other mesh is from Hobby Lobby, pumpkin ribbon and scarecrow is from Big Lots. The other wired ribbon for my wreath is from Michaels that was on sale for half price. I used a 12" wreath form because Michaels had no 14" or 16" forms in stock and the 18" form is too big for what I wanted to make.
As Laurie suggested I did all the cutting first -- cut my pipe cleaners in half, cut out all the mesh and the ribbons. Made all the mesh/ribbon bundles and set those aside. Once all the bundles were made - I used 25 of those for my wreath, I attached them to the wreath form. Laurie also said she sprays her wreaths using the E6000 spray to help keep fraying edges from getting out of hand. Here is a photo of my wreath outside before I sprayed it:
I had made a circle in the center of the mesh to put the scarecrow on the wreath once the spray was dried. I put him on the wreath using floral wire. I really would prefer to have a pumpkin or Fall words or something for the center of the wreath but I was lucky to find the scarecrow at all so my selection was slim. Here is a photo to show some of the various ribbons I used on the wreath:
And here is the wreath again:
While I was at Michaels I also picked up a garland wreath form and some holiday ornaments and picks and am working on putting that together now.... Sooner or later I WILL get back to making my cards again!! :0) TFL
Subscribe to:
Posts (Atom)