Sunday, August 28, 2022

Altered Wooden Dollar Tree Pumpkins

Had seen these Dollar Tree wooden signs altered on YouTube for Fall and Halloween so I decided to make my own. I bought 4 different colours of these "signs" for my altered projects. This is a photo to show what these look like from the store:

Each of these signs have a different saying on them and the words are covered in glitter. I brought mine home and using a piece of sand paper I sanded off the glitter on the fronts of the signs. On the backs of these are a large scan label so I peeled those off and used Goo Gone to get any residue from that sticker off the backs. Pulled off the rafia bows that were on the stems and threw those away. 

I picked out card stocks from my stash that I wanted to cover the fronts of these with. I turned the card stock over - printed side down - and laid the wooden pumpkin on the back of the card stock. Used a pencil to trace around the pumpkin and used scissors to cut that out. Covered the fronts of the signs with ModPodge and put the card stock prints on each sign. Once dried I lightly sanded the edges of these and sponged a brown ink on all the edges of the printed sides. With that done I again used ModPodge to cover the card stock front. Set that aside to dry. Here is a photo to show the sanded and then sponged edges and all the pumpkins covered in the card stock prints:


Wanted to decorate the fronts of these wooden pumpkins but I did not want them to match. Here is a photo of two of these pumpkins:

The one on the left has a felt Scarecrow embellishment I bought last year at HobbyLobby. Bow was made with ribbon in the stash. The one on the right I used the new Pumpkin Border die I just bought and die cut the pumpkins w leaves out. Used scissors to cut it down to the size I wanted for the front of the pumpkin. Used the 'popcorn tulle' from the Dollar Tree for my embellishment with the flower at the top. For both of these I added gems from the stash to add some sparkle. Here are the other two pumpkins I made:

These two pumpkins I used double sided card stocks from the stash. Made a rosette for the one on the left and added a button to the center of that using the glue gun. I cut the shank off the back of the button to have it be flat. For the pumpkin on the right I used wired ribbon from the Dollar Tree and cut off the wired edges for my embellishment with the flower. Here are photos to show the colours these are from the back:


Easy items to alter and another good use for stashed card stocks... and now onto another shopping item... My recent order from My-Creative-Time.com arrived this week and I bought two die sets:

The above photo is their Pocket Pillow die that I had seen a few projects made with and it will be cute for a treat holder for the holiday season ahead.... and of course HAD to add this die set for BOO Day:

This "Oct 31st" die set die cuts the front piece and the shadow piece. I rummaged through my scraps and glittered/foiled card stocks to make these:


Lots of detail on this die -- cute spider and bat and the 'drips' off the letters.... then DH is working on house projects - I ordered something he needed for a project off Amazon but it was just under the price I needed for Prime shipping... so I quickly looked and ordered this die for Halloween to bring my total up to free Prime shipping for my order. Here is the die:

Cute die with the haunted house, spider and webs, Oct 31, pumpkin and bat.. but I did not pay close attention when I put it in the cart.... as you know all die cut pieces have a right and a wrong side... this die cut piece is showing the right side of the die cut piece:

As you can see the "31" is backwards on the die so needless to say this will be returned to Amazon since it is unusable. So lesson learned... next time I will just order more TomBow glue to bring my total up for my order! 


Tuesday, August 23, 2022

Online Shopping

 Just received my order of the Pumpkins Border die from Pretty Pink Posh:

I die cut this out of scraps to show all the detail in this die:

This die has all the cut details but it is easy to piece together. I also bought two stencil sets from Pretty Pink Posh:


This stencil set has three layers and it is their Candy Corn stencil set. This next stencil set is the Layered Pumpkins set. Their stencils are a good weight and all their stencils have their logo on them in the lower right corner and if the stencil pattern is a set then each layered stencil has a letter so you would know which stencil to use first and so on for layering. It is also nice to have their logo on the stencil so you know which company you got it from and you will know which side is the front of the stencil and the direction to use it so things line up easily. Although I have not used the Candy Corn stencil set yet I did use the Layered Pumpkins stencil set for a sample. Here is the set of three stencils:


and a photo to show their logo and the letter on the stencil in this set:


For my sample I used a pumpkin ink and I used blender pens to add the ink over the stencil:


Once the stencil was complete I cleaned the ink off of it with a baby wipe and all the ink easily came off the stencil - here is the pumpkin pattern:


This three piece stencil set has a stencil for the pumpkins, one for the leaf/stem at the top of the pumpkins, and a third stencil to put Jack O Lantern faces on the pumpkins for BOO Day (Halloween). But this stencil set is not just for Halloween -- it would be nice on card fronts or tags for Fall as well as Thanksgiving without using the Jack O Lantern face stencil piece. Once I had all the stenciled layers complete I used a fan brush and splattered watered down white acrylic paint over the pumpkin piece:


Also in the mail was a small order from Jaded Blossoms and I had bought their Acorn Stencil set. This is a set of two stencils. The stencils have no markings - no logo and these stencils are not numbered or lettered so I marked my stencil set in the corner so I know which is the front of the stencil and how to place the stencils for easy layering. Here is that stencil set:


I stenciled a sample piece for this stencil set as well and here is that along with the Layered Pumpkins stenciled sample:

The Acorn stencils also cleaned up well using a clean baby wipe to remove the inks I used. Lots of possibilities for these stencils for the holiday projects ahead... When I use both of these stencil sets I will trim my white card stocks to the size I will be using and I will stencil each layer on my trimmed card stock, in an assembly line fashion. Once each layer is stenciled on the card front pieces then I will clean the ink off that stencil and go to the next layer in the stencil set until both designs are finished. Fun patterns for the Fall projects!


Sunday, August 21, 2022

KS Craft Ghost/Pumpkin Shaker

 Used this die set I just bought from KS Crafts:

I have made shaker projects in the past but was never happy with having to use the craft foam from the craft stores to make the shakers. Once the foam is cut it can be a bit wonky or the liquid glue gets all over so that when you put your shaker pieces inside the project they can adhere to the edges of the foam inside the shaker..... so I gave up.... until.....

Jen @ strawberrycream39 on YouTube showed what she uses for her shaker projects. She uses the foam board from the DollarTree for her shakers. Last trip to DT I picked up a sheet of the white and a sheet of the black foam board to try this out. With DT stocked up with school supplies there were two displays of this foam board - one in the school supply section and the other was in their office supply area by the teacher's supplies at my store. 

Knowing that all die cutting machines are different I knew the first cut may not be the best from my machine but happy to report it cut well and the foam board kept most of it's shape and did not totally flatten. Here is a photo of a piece of the foam board next to the piece I had cut out on my BigShot:

After my first cut piece I decided I would cut out a second piece and I would stack and glue these together for my shaker piece so it would be deeper for the shaker bits:

With the two foam pumpkins cut out I used TomBow liquid glue and stacked those two pumpkins and set them aside to dry. For the backing to my piece I cut a piece of #100 weight black card stock from Mikes for the base piece. Using glittered white card stock I cut out the ghost and added black glittered card stock eyes and mouth pieces to my ghost. I used liquid glue to adhere the ghost onto the black base.

Cut out the printed card stock for the backside of the pumpkin shaker. Glued that to the black base over the ghost piece. Cut a piece of pumpkin card stock for the front of the shaker pumpkin. Used plastic packaging for the clear sheet for the pumpkin shaker. Used liquid glue to put the pumpkin card stock pumpkin frame piece onto the die cut clear packaging pumpkin piece. Set that aside to dry. 

Wanted to use the shaker/confetti holiday dies from KS Craft to make pieces for my shaker. This is a die set of four different designs for shakers:


I cut out the skulls and ghosts using glittered white card stock, the witch hats are black foil card stock, the bats are from solid black card stock. Also used some shaker gems from the stash for my shaker bits. With everything dried I assembled the shaker pumpkin layers -- but first I ran the anti-static brush over the inside of the clear sheet for the shaker to cut down static for the shaker pieces. Used liquid glue to put the shaker pumpkin pieces together:


Here is the full project finished:


I used black glittered card stock for the 'hat' on the ghost that comes in the die set. Here is a photo of the side of the shaker part to show the two stacked foam sheet pieces:

Thanks to Jen for sharing this tip for her shakers as it went together easily and the foam board holds the shape of the die cut pieces well - no wonky shapes! Plus the shaker/confetti dies fit perfectly in the pumpkin shaker piece. Another easy project for BOO Day!

Pumpkins from KS Craft

In a previous post I showed the new holiday die sets that I ordered from KS Crafts. This post will show the pumpkins cut out and assembled.  Here is a photo of the dies in this die set:

For my pumpkins I used only scraps from my scrap Fall card stock envelope of solids and prints. First I cut all the dies apart and then cut out all the backer pieces for the pumpkins which have the stems on them. Then I picked out both solids and prints for the pumpkin fronts. Once all die cut I laid them out before I assembled them:

Using brown ink for the stem backer pieces I sponged the stems with that ink. Then for all the prints I sponged the edges of all pumpkin front pieces using a light rust ink. Using liquid TomBow glue I put all the pumpkins together. Since I used scraps all the backer pieces are a different brown card stock and for some of the pumpkin fronts I used printed card stocks or solid card stocks:

Here is a photo to show all the stem backer pieces for the pumpkins are one piece and that helps to make the pumpkins more sturdy:

It is easy to see which smaller pumpkins go with which larger pumpkins as each large pumpkin has a smaller pumpkin with it and they both have the same shaped stem. Here is a photo to show some of the printed card stocks used for the pumpkin fronts:

Since the stem backer pieces are one piece and the pumpkin front pieces are also one piece it is very easy to die cut these pumpkins out and assemble them. It is good all the larger pumpkins are different shapes and sizes with smaller pumpkins to match.... the pumpkins can be used for Fall or Thanksgiving projects or for BOO Day (Halloween) as is -- or for Halloween just stamp a Jack O Lantern face on the pumpkin fronts. Even with using card stock scraps that are different weights the dies cut all the pumpkins out easily and with one pass in the BigShot machine. This pumpkin die set will certainly get a lot of use for my upcoming holiday projects!!

Saturday, August 20, 2022

Witch Bow Die

Not often but today it happened.... I had ordered the Witch Bow die set from Ericka @ Scrapdiva Designs earlier this week and it arrived in the mail today and right in the craft room for me with this new die set.... Here is a photo of the two die sets I had ordered from her:

The Easter Bunny set on the left and the Witch Bow die set on the right. Knew I would be making the Witch right away --- pulled out the clear envelope I keep all Halloween scraps in for my witches:

Wanted to use the foil black card stock for her shoes so I picked out prints for her stockings that would go with the black shoes... Die cut the shoes, the stockings, and the glittered strips to go on her shoes and used liquid glue and assembled those. With those drying I picked out printed for her layered skirts. Many of the scrap prints I have are single sided card stocks and are not that thick so I decided to cut out the large skirt and the stocking dies using #110 black card stock from Mikes. Using the heavier card stock as the base of the die pieces will make this witch more sturdy. 

With the larger printed skirt pieces glued to the black solid base I then glued the top skirt layer on that. Set those aside and worked on the bows. I die cut the bow pieces. Using a bone folder I ran the pieces over the edge of that so the bow paper would easily fold and not crease when making the bow. I put the three bow layers together using 1/8" tear and tape. Added a crystal from the stash to the center of the bows to dress them up. 

Put the leg pieces behind the skirt piece using tear and tape. Added the bow to the skirt top using the ATG. Here are two of the witches done:

and each Witch Bow:


Fun witch to assemble -- will be cute with tulle added or a satin ribbon bow and maybe adding a spider or ghost to her or the bow. Thanks to Ericka for this cuter than cute die set -- love that her die sets have a larger and a smaller set of dies for these items so you do not have to buy multiple die sets just to get a smaller and larger die. For the two witches today I used the smaller die set so still have to play with the larger one! Another great use for holiday scraps too! Good for tags, bag toppers, card fronts, and other fun BOO Day projects! ALSO:

I wanted to die cut and assemble the larger Witch Bow Die Set from this set to show the difference between the larger and smaller Witches. Here is the larger Witch cut out and assembled:

Here is a photo of the larger Witch with the two smaller Witches I had made:

The height of the smaller Witches is approx 3 1/2" measured on the back from the top of the bow pieces to the bottom of her shoes. The larger Witch is approx 4 1/4" in height measured the same way. These would be cute on a bag topper, as a tag, or as a stand alone on a treat holder front. Easy to assemble and another good use of card stock scraps!


Friday, August 19, 2022

We R Memory Keepers Storage Project Cart

Another crafter told me about the We R Memory Keepers Storage Project Cart and once she sent me a photo of it I began the search -- many places sell this cart for well over $100.00 and other places sell it for about $99.00 then plus shipping and handling.... either way too pricey for this craft room... until.... 

Joann.com emailed me a coupon since I had not shopped their stores in forever... so I decided I would check their website to see if they sold this cart and they did... They had this cart on sale but again if I bought it from their web store I would have to pay shipping to get it... decided to check my local store and see if they had this cart in stock and happy me they had 4 at the store... plus it was on sale... so off to the coupon I went and the coupon included regular and sale items so I ordered one online and paid for it and picked it up curbside the next morning for $52.00 plus tax!! Here are photos of the box it come in:

Once the cart is assembled the trays sit on the tray holders and you can easily lift off a tray and take it to your work table.... Here is a photo of the back of the box:

DH assembled my cart for me and already my trays are full.... I have Halloween die cuts on one tray waiting to be assembled, Fall projects on other trays, and Christmas projects on the rest. This way if I am waiting for glue or Nuvo drops to dry or have die cut pieces to assemble I have a tray for each project and while those are drying or waiting my table top is cleared off for the next project...

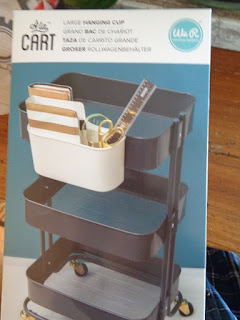
Also - recently went to the office supply store (Staples) and I found this We R Memory Keepers product for sale:


 Not a great photo but this is their Large Hanging Cup they sell and it fits my Raskog cart. It is heavy duty and I already have it holding my ATG and some other items. I just bought one as I have some of the smaller hanging cups that IKEA sells for their Raskog carts but I was happy to find a larger size hanging cup for bigger items I use all the time... So two more great additions for the craft room and all the holiday projects ahead...... 

More Foiling Friday --

 Used the Holly Background hot foil plate by Couture Creations for these card fronts. I used holographic gold foil from Spellbinders for hot foiling them:

Here are the card front pieces:

The white card stock was foiled the first pass through the BigShot and then using the waste from those card fronts I hot foiled again on white card stock and the pattern is the reverse - gold background and a white design. This photo shows the different colours better from the holographic foil:

Also foiled in many colours some of the greeting hot plates from Spellbinders for future Christmas projects:


Laid the hot foil plates on the machine and foiled different colours:


So of the greetings I used the banner die set from Pink&Main and other banners I just cut using the trimmer:

Also hot foiled an Autumn set using the holographic gold foil:

Happy to have more hot foiled items ready for use for holiday projects. The autumn hot foil plates have a matching die set so once I foiled them a few times I used the matching die set and cut out the pieces so when I need to use them they are already cut out and ready to be added to holiday projects.