
Sunday, August 7, 2016
Witching You Card
Another gate fold card made using the Scor-Pal scoreboard. This scoreboard has notches on it for the gate fold cards. This card is on a card stock base of Stampin Up orange card stock. The gray card stock is from Mikes. The holiday print is by Peebles in a 6 x 6 card stock pad.
To begin with I cut and scored the orange card stock into the gate fold card. Cut my printed card stock to the size I needed for both front flaps. Put those pieces onto the gate fold fronts using the ATG. Set this aside.
Using the Poppy stamps Brick Window Wall die I cut out a piece of Mikes gray card stock. Cut this die piece to the size I wanted for the card front. Using gray ink I sponged all the edges as well as put this ink over the bricks. Used a window with shutters die for the window and shutters. Used scrap black card stock for the shutters. Did not want the shutters on the window straight so I put them where I wanted them and then took them to the trimmer to be trimmed. Using double sided tape I put the shutters on the window sides being sure they were not straight or even.
For the witch and cauldron I used a die by Impression Obsession and cut that out of black card stock. For the white piece behind the witch -- I cut that larger than my gray piece with the shutters so I would be able to move the gray piece around to get the window over the witch where I wanted it to be. For the witch die cut I put that on the white card stock piece using a glue pen. Then I situated the gray window piece over this. Used the ATG to keep the gray piece in place. Used the trimmer to trim off all the edges of the white piece. One more time I sponged the edges with gray ink so that the white card stock was covered in gray on all the sides.
With the gray/witch piece together I wanted to add two very small bats for near the witch. Used scrap black card stock and a very small bat punch from the dollar bin. Once the bats were cut out I then put them near the witch using a glue pen. Used the ATG to attach this gray witch piece to the orange card stock base, angled:
For the greeting "Happy Halloween" I stamped that onto scrap orange card stock and trimmed that to the size I wanted and then gave that a fishtail end. That stamp is from Savvy Stamps. Put it on the card front using glue dots and then added a piece of torn washi tape to finish that off.
For the inside of the card:
Two more tiny bats added to the inside and more of the washi tape. The inside greeting is a stamp from Inkadinkado. With the card completed I then added the orange crystals from the stash for the bubbles above the cauldron:
Another easy gate fold card thanks to the Scor-Pal score board. TFL and YOLO
Thursday, August 4, 2016
BOO Goodie Bags
Recently I bought the Lawn Fawn Goodie Bag die from www.acherryontop.com for a treat holder for the upcoming holidays. Here are three of the Goodie Bag treat holders I made for BOO Day -- (Halloween):
For the above Goodie Bag I used Pumpkin Pie card stock. Cut out two Goodie Bag pieces to make the bag. Using a pumpkin face die I cut out scrap black card stock. Put the pumpkin face on the center of my bag front using a glue pen. For the two spider web pieces I used scrap black card stock and a glue pen. Those were made using this M Steawart spider punch:
Put the bag together using red sticky tape. Once the bag was assembled I sponged the edges of the bag, both front and back. The greeting "Treats for BOO!" is from the Stampin Up stamp set Mixed Medley. Used circle and scallop circle punches for that. Tied it onto the bag top using twine. Used a glue pen to put the two spider web pieces on the bag front.
This next Goodie Bag is purple and I used a holiday die from Cottage Cutz:
Cut out the Halloween circle die using scrap black card stock. Using purple card stock I cut out my two Goodie Bag pieces. Put the circle Halloween die cut piece on the bag front using a glue pen. For the three small bats I used a small punch from the dollar bin at the craft store. Put the bats on the bag front using a glue pen. Used red sticky tape to put the bag together. Sponged the edges, both front and back of the bag, using purple ink.
The "BOO!" is a greeting stamp from the Stampin Up Bitty Boos stamp set. Cut that out with circle and scallop circle punches and tied this onto the corner of the Goodie Bag using twine.
This third bag is more detailed:
Used Stampin Up black card stock for the Goodie Bag pieces. Once those were cut out I then used the M Stewart spider web window punch all over the page punch on the front of my Goodie Bag piece. Here is a photo of that punch:
To make the window on the front of the Goodie Bag die cut piece I centered the punch on that piece and used painter's tape to keep it in place. Then punched it out. Since this is a 'window' I did not want any treats to fall out of the Goodie Bag so I cut a piece of clear sheet 2" x 2" square. Put that on the backside of the bag front using thin red sticky tape. For this Goodie Bag I put white paper shred in the bag so that will show the punched window pattern. This photo shows the clear sheet on the window:
Once the clear sheet was behind the window I then used red sticky tape and put the Goodie Bag together. The orange spider web paper at the bottom of the holder is not card stock -- it is one of the shelf strips from Walgreens from their last year Halloween displays that I got for free. I trimmed it to the size I wanted for the Goodie Bag. I wrapped this around the front and back of my bag keeping it on with red sticky tape.
Once that was on I used a bug punch from the dollar bin at the craft store and punched that out of foil black card stock. Put that on the spider web paper using a small glue dot. For the tied on tag I stamped the spider web stamp from the Stampin Up Mixed Medley stamp set and again using circle and scalloped circle punches I punched that out. Tie it to the top of the Goodie Bag using twine.
Here is a photo of all three BOO Goodie Bags:
These Goodie Bags will be nice because they are free standing and will hold enough candy treats for your BOO Day treats. Just fill with paper shred from the dollar store and Halloween treats. TFL and YOLO
Wednesday, August 3, 2016
Turkey Tom Card
Mailman brought the new Frantic Stamper release Tom Turkey die set to me in today's mail. Here is what the die looks like:
Here is Tom Turkey dressed and ready for dinner --
To begin with the card stock base is More Mustard and I cut and scored that. Used a bone folder on the crease of the card base. For the cream on the card front I used cream card stock from Mikes for that -- 65 lb weight. Cut that to the size needed for the card front.
The embossed card front is Crumb Cake. Cut that piece larger than what I needed for the card front. Using printed card stock from the stash I cut two 1/2" strips and used the ATG to put those on the far left of the Crumb Cake piece. Used the We R Memory Keepers Woven embossing folder to emboss this piece. Once that was done I trimmed it to the size I needed for the card front. Used the ATG and put the embossed piece onto the cream piece. Then attached them to the card base. Set this aside.
Using the Cuttlebug I cut out my turkey pieces. Wanted to use kraft card stock from Mikes as it is darker than the Crumb Cake for the turkey body but that card stock is too thin to be a die cut piece. I cut two squares of kraft card stock larger than the turkey body die piece. Put the two pieces on top of each other and adhered them together using the ATG. Once that was done I cut the turkey body die out.
For the "turkey feathers/tail" I used the plaid Authenique card stock. Since this is a thinner card stock print once again I measured the tail die piece and cut the plaid card stock larger than that die piece. I also cut a piece of the Mikes kraft card stock and used the ATG to put the plaid on top of the kraft card stock. Cut the feathers/tail die out in the Cuttlebug. The extra pieces of card stock make the die cut pieces more sturdy. Once the feathers and turkey body were cut out I used Crumb Cake ink to sponge the edges of each piece. For the beak and the wattle I used single layers of card stock.
For the white eyes piece again I doubled up on the scrap white card stock using the ATG and cut that out in the Cuttlebug. For the black for his eyes I cut a piece of scrap black card stock using scissors and put that behind the eyes die cut piece using TomBow glue. Assembled Tom Turkey and set him aside:
For the greeting "Gobble Gobble" I used a stamp by Printworks and brown ink for that on scrap cream card stock. Cut this out using an oval punch. Used a scalloped oval punch on scrap kraft card stock. Sponged the edges of both of these pieces using Crumb Cake ink. Put them together using the ATG. Added a small twine bow using TomBow glue:
Assembled Tom Turkey using glue dots and put it on the card front using pop dots for dimension. The greeting also has pop dots behind that. Cute turkey die and he will come in handy at holiday time for fronts of treat holders as well as place markers and bet he would look good on the Berry Basket instead of the bows! TFL and YOLO
Blue Christmas Card
Christmas is sparkle and shine -- bling it on! While I had all the Wondrous Wreath stamp and die set pieces out I made another card and this one is non traditional in colour and all blues:
Card stock base is blue with the embossed card front a piece of Bordering Blue. White/GP was used for the wreath and the doily piece.
To begin with I stamped the Wondrous Wreath stamp onto white/GP using Bordering Blue ink -- inked it and lightly stamped it off and then stamped the wreath. For the second wreath stamp I inked it using Marine Mist ink and lightly stamped it off and then stamped it on my wreath. Cut the wreath out. Cut out a doily using the Cheery Lynn French doily die and white'GP card stock. Centered my wreath piece onto the cut doily and used a pencil to trace the middle of the wreath - this is for placement for my center wreath die:
Cut out the center wreath die piece and this is what it looked like:
Using large glue dots I put the blue wreath on the doily. Set this aside.
For the card stock base I used a darker blue card stock. Cut and scored that using a bone folder to crease the fold line. For the lighter blue card front I used a 'new-to-me' Stampin Up embossing folder I recently bought used, Filigree Frame. Once that was embossed I decided to turn the embossed piece over for the card front which will give me an indented embossed pattern rather than the raised embossed pattern. Trmmed it to the size I needed and put this embossed piece onto the card stock base.
For "very merry" I used the Stampin Up stamp set Short and Sweet and Marina Mist ink. Cut that out using the Stampin Up Classic Label punch. Using large glue dots I put the wreath/doily piece onto the card front being careful to have the glue dots behind the solid wreath piece and not behind the opened parts of the doily.
Wanted flowers for the wreath but also wanted to dress it up a bit -- so used the M Stewart sprig punch and punched out silver glittered card stock and dark blue card stock. Used the Stampin Up Triple Flower punch for the larger flowers and for the smaller flowers I used a floral border punch from M Stewart:
Stacked the blue and glittered sprigs and put the flowers on top of that using glue dots. Once I had those in the layout I wanted I then put this whole piece onto the wreath using mini glue dots. Using large glue dots I put the wreath piece on the card front. Put the greeting label below the wreath using glue dots.
For the bow I used a Fiskars bow punch for the blue bow and the silver glittered bow was made using a bow punch from M Stewart. Added clear crystals to the flowers and bows:
Card stock base is blue with the embossed card front a piece of Bordering Blue. White/GP was used for the wreath and the doily piece.
To begin with I stamped the Wondrous Wreath stamp onto white/GP using Bordering Blue ink -- inked it and lightly stamped it off and then stamped the wreath. For the second wreath stamp I inked it using Marine Mist ink and lightly stamped it off and then stamped it on my wreath. Cut the wreath out. Cut out a doily using the Cheery Lynn French doily die and white'GP card stock. Centered my wreath piece onto the cut doily and used a pencil to trace the middle of the wreath - this is for placement for my center wreath die:
Cut out the center wreath die piece and this is what it looked like:
Using large glue dots I put the blue wreath on the doily. Set this aside.
For the card stock base I used a darker blue card stock. Cut and scored that using a bone folder to crease the fold line. For the lighter blue card front I used a 'new-to-me' Stampin Up embossing folder I recently bought used, Filigree Frame. Once that was embossed I decided to turn the embossed piece over for the card front which will give me an indented embossed pattern rather than the raised embossed pattern. Trmmed it to the size I needed and put this embossed piece onto the card stock base.
For "very merry" I used the Stampin Up stamp set Short and Sweet and Marina Mist ink. Cut that out using the Stampin Up Classic Label punch. Using large glue dots I put the wreath/doily piece onto the card front being careful to have the glue dots behind the solid wreath piece and not behind the opened parts of the doily.
Wanted flowers for the wreath but also wanted to dress it up a bit -- so used the M Stewart sprig punch and punched out silver glittered card stock and dark blue card stock. Used the Stampin Up Triple Flower punch for the larger flowers and for the smaller flowers I used a floral border punch from M Stewart:
Stacked the blue and glittered sprigs and put the flowers on top of that using glue dots. Once I had those in the layout I wanted I then put this whole piece onto the wreath using mini glue dots. Using large glue dots I put the wreath piece on the card front. Put the greeting label below the wreath using glue dots.
For the bow I used a Fiskars bow punch for the blue bow and the silver glittered bow was made using a bow punch from M Stewart. Added clear crystals to the flowers and bows:
Non traditional Christmas colours but it works - the shimmer from the silver glittered card stock and the clear crystals on the flowers gives this card plenty of holiday sparkle. TFL and YOLO
Traditional Christmas Card
Used red card stock base and the front is Crumb Cake. For the wreath I used the Wondrous Wreath stamp and die set. Doily is white/GP and cut out using the Cheery Lynn French Doily die. Bow is a Fiskars punch.
To begin with I stamped the wreath stamps onto white/GP first with Old Olive and then the second wreath stamp with Mossy Meadow. Cut that out with the die. For the doily I cut out a piece of white/GP card stock using the Cheery Lynn French Doily die. Using my cut out wreath piece I placed that on top of the doily and centered it where I wanted it. Used a pencil for the inside wreath lines for placement of the die:
With the pencil lines I knew how to place my inside die piece to be sure to get the opening where I wanted it for the wreath center:
Using large glue dots I put the wreath piece centered onto the doily piece. This way the wreath is centered on the doily.
Cut and scored the red card stock base. Cut a piece of Crumb Cake for the card front. Using a stamp from the Stampin Up Christmas Greetings I stamped "Merry Christmas" in red ink at the bottom of the Crumb Cake card front. Using the ATG I put this piece onto the red card stock base.
For the wreath I used large glue dots to put the wreath/doily piece onto the card front. I was careful to be sure the glue dots are behind the wreath piece and not the opened white doily piece so that the glue dots would not show. For the flowers on the wreath I used the Stampin Up Triple Flower punch and also this M Stewart floral border punch for the smaller flowers:
Using a stylus on a padded stamp mat I pressed the stylus into the center of the flowers so that they are not flat. Added red crystals from the stash to the center of the flowers. Put the flowers onto the wreath using mini glue dots. For the bow I used a Fiskars bow punch. Added a crystal to that and put it at the bottom of the wreath:
Easy card to put together and the doily dresses up the wreath. Traditional red and green for Christmas. TFL and YOLO
Sunday, July 31, 2016
Wondrous Autumn Card
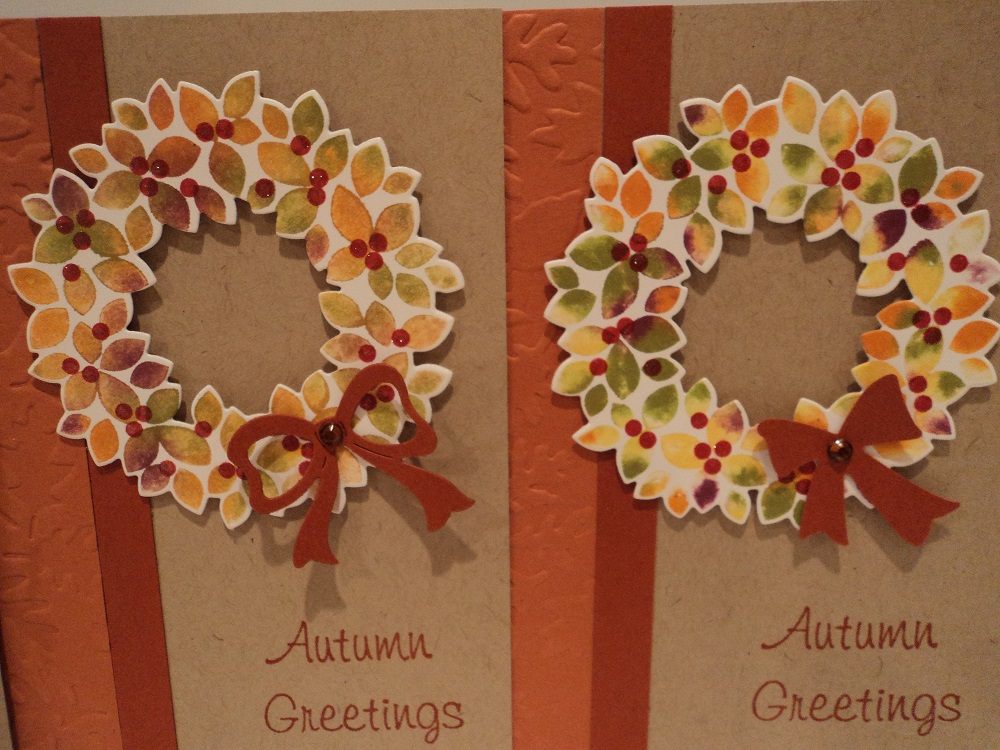
Had seen the video on YouTube by Sandi MacIver using the Baby Wipe Technique with the Stampin Up Wondrous Wreath stamp and die set. Listened to what she suggested and so I made cards using her technique. Using the Baby Wipe Technique each of the wreaths are different in colours:
To begin with I used the Baby Wipe Technique, following her colour suggestions, and stamped the wreath base stamp onto white/GP card stock. Using red ink I stamped the berries stamp onto all the wreaths. I cut the wreaths out using the matching die set in the Big Shot. Added clear Wink of Stella to the berries. Set these aside -- here is a photo to show the sparkle of the berries:
Using Kraft Paper Trey Ink card stock I cut and scored my four card stock bases. I used the bone folder to crease the fold line. For my card I wanted to use rust card stocks for the two pieces on the left front of the card. Cut my light and darker rust card stocks for the left front of my cards. For the lighter rust pieces I used a leaves embossing folder by Tim Holtz and embossed those in the Cuttlebug. The thinner, darker rust piece is not embossed. On some cards I put the embossed pieces with the embossing raised and other cards have the embossing indented:
These photos show each card:
"Autumn Greetings" is a stamp from Whipper Snapper and I used rust ink for that. Using the ATG I put the embossed and the darker rust pieces on the left front of my cards. The wreaths are on the cards using pop dots. For the solid rust bows I used a Fiskars punch and the open looped bow is a die. Put the bows on the wreaths using glue dots. Adding a brown crystal from the stash to the center of each bow.
Thanks to Sandi for a great video showing her technique and for her tips on getting the results you want. TFL and YOLO
Wednesday, June 15, 2016
The "Quints" have arrived. . .
So if you have followed my blog you may know the saga of DH building and hanging bird houses here and there in the yard. . . but as nice as those were nothing beats the top of the plug near the ceiling on our front porch. . . or so it seems as many generations have begun their lives on the plug. . .
As more and more Mommy birds nested on the plug the amount of kids they had also grew. We went from our first family having three little ones... to four... and now to five. Last year DH was concerned the babies would fall out of the nest as they grew so he built a "deck" around the plug/nest. Here is a photo of those babies and then as they grew:


But as DH worked on the porch remodel this Spring the plug was downsized so no bird could build another nest on it. It seems the porch is popular with the bird Mommies so where there is a will, there is a way... In the front corner of the porch, on top of a post, is a small area and a Mommy decided to build a new nest there. DH "flew" into action and built a new platform with a lip around the edge so no nest or babies would fall out -- both as babies or as they grew. He hung this platform near the ceiling of the porch as high as the old plug was as the birds like to be up high.
DH had to move the new, now in progress, nest to this platform without touching it so he used his drywall putty knife and scooped up the nest and into the platform it went. Within a day the bird Mommy located her nest and kept remodeling things until it was time for the little ones' arrivals...
We are now proud to show our new tenants on the platform, the "Quints":
Soin enough they will grow and be gone... just like our kids! :0) TFL and YOLO
Saturday, February 6, 2016
Ferrero Rocher Holder
Talk about dusting off the brain to figure these numbers out.... but after my second try I got it -- so here is a holder I made for Ferrero Rocher "chocolates" (as their label reads):
To begin with my sample in the "how to" photos is white/GP. Supplies for this treat holder:
Solid card stock
Printed card stock
Red foil card stock
1 3/8" circle punch
Scalloped Tag Topper punch
Heart punch
Greeting stamp
Scoreboard
Bone folder
Ribbon
Twine
Glue dots
Red sticky tape
ATG
For this sample holder I used a piece of white/GP card stock. Cut this 2" wide by 11" long. With the long edge at the top of the scoreboard, (I used my M Stewart scoreboard), I scored this piece at:
3 3/8, 5 1/2;, 6 1/4, 8 1/4, and again at 9.
Use a bone folder to crease all scored lines. This photo shows the scored lines:
On my holder I decided to use the printed card stock for the back to my holder so the print shows behind my piece of chocolate. I cut the printed piece 2" x 3 3/8". Put the printed card stock on the holder in the section by the first scored line of 3 3/8". Used the ATG for that and then I trimmed off the printed paper to equal the end of my white/GP. Once the printed card stock was on the scored piece I punched out the tag top:
Now for the circle for the candy to fit into -- I used scrap pink card stock to show better in my photo and punched out a 1 3/8" circle. Put a glue dot on the back of that and centered this circle on my holder so when I punched the hole it would be centered:
Then I used red sticky tape and put a couple of pieces on my holder to hold it together -- on my holders I used more tape but did not want to waste it for my sample photo -- :0) ....
Removed the red sticky strip and folded the holder into the shape following the scored lines:
And added the Ferrero Rocher chocolate:
Once the holder was made I stamped and cut out my greeting:
After the greeting was on my holder I added a red foil heart piece. Put a piece of red ribbon through the tag top piece and tied a piece of red and white twine on that. Decided to use a small piece of my printed card stock (from Mikes) and I used the ATG to put that on the front of my holder:
Off to make more holders ..... TFL and YOLO'
More Ferrero Rocher Holders:
Subscribe to:
Posts (Atom)


