Sunday, January 28, 2024

Up the Odd, Down the Even Basket

Picked up this basket die set from Gina Marie Designs at the stamp show I attended in Tennessee and am using it for future Easter projects:

This die set makes a woven basket perfect for Easter projects. I liked it because the woven pieces will give the basket some texture and dimension. I die cut the main basket die out of scrap coral card stock:

Using scrap white card stock I die cut the second basket die:

The main basket die cuts lines across the basket piece and the second basket die cuts the top and bottom strip pieces that you use to weave through the lines the basket die cut - I used a light and dark colour card stock to show these three die cut pieces put together to form the woven basket:

I worked up from the bottom of the basket weaving in my white pieces -- went up to the top of the basket with the odd numbers piece and then put the other piece at the top and then weaved that piece to the bottom of the basket. In my sample on the right you can see the woven basket and I have not used any adhesive for this sample piece and the woven pieces still stay in place. This die set will make a sturdy basket using kraft card stock or a coloured card stock or even the basket in one colour and each of the second die cut out of two different colours so your basket would have texture and colours. 

Was concerned when I bought the die set how well the strips on the basket die piece would cut the card stock while getting cut out or if I would have to use scissors or an Exacto knife to cut the strips better. This die cut both the heavier coral card stock and white card stock easily with one pass in the die cutting machine.  I have other Gina Marie Designs die sets and never have had a problem with them cutting my pieces but this die has lots of detail and with using a heavier card stock I was not sure if the die would cut well. Happy me no scissors needed and lots of projects ahead for this basket die set!


Things are tight????

Working on Valentine's Day projects.. .. had seen another crafter use the Fancy Love die on a project and so off I went to SimonSaysStamp.com to order this die for myself.... In the past when I have ordered dies from SimonSaysStamp the dies arrive in photo packaging:

Their dies come in a white envelope with a photo of the die on the front along with the name and product number of the die set under the photo. On the back of these envelopes are their little brand circle sticker that keeps the envelopes closed... 

Quite surprised when my Fancy Love Die Set arrived this week:

So I immediately die cut the die out so that I will have a sample of this die to keep with the die set so I will know at a glance what this die looks like and I will keep the little baggy with the die set so I will know that it is a SimonSaysStamp brand die....

I cut out the shadow die using vellum and the "Love" word die out of scrap red glittered card stock. I used liquid glue to put these together and I will keep this die cut piece with the dies when I store them so I will know not only what the die looks like cut out but also who is the product by/from? Hoping this new packaging is not what they are now going to.....


Thrift Store Storage

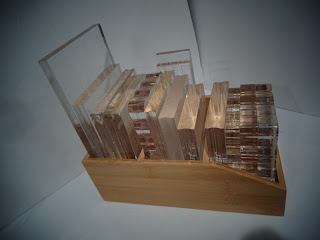
 Many times when making cards or projects I use liquid glue while assembling things and I use the larger acrylic blocks to set on them for drying. I had a few of the larger acrylic blocks we all used before the MISTI and other stamping platforms were released. Over time, at used stamp sales, I have picked up the larger acrylic blocks used just for projects I would be working on. I try not to spend more than $2.00 or $3.00 on these larger blocks at these sales and the cheaper the better.... 

Having multiples of these larger blocks really come in handy when I am working on BOO Day projects and Thanksgiving projects and then Christmas projects all at once in summer and early Fall. I usually have one holiday on a counter top drying and another holiday on my other counter drying with maybe a Christmas or two projects drying on the craft table..... My PIC (stamping Partner In Crime) and I recently went to the stamp show in Tennessee and I bought my largest block from the Too Much Fun Productions booth for $8.00 - which is a good price for the size this block is. You can put a whole card under it while drying and it covers the whole thing.... but how to store these blocks that I only use when assembling cards and projects???? Stacking them did not work.... putting them all in bin did not work as I could not see all the sizes at one time.... 

Off to the thrift store..... Ended up finding this wooden holder in a misc section at the store -- it either was made to hold recipe cards or maybe all the remotes for the TV, VCR, DVD player or what -- but happy I found it as it holds all my larger blocks in one place and I can see at a glance what sizes I have and I can take out the ones I want easily:

This is the side of this holder and here is the front:

I keep this holder on the counter where I would assemble things for cards/projects so it is not taking up space on my work table. I have a smaller block in the front section of the holder for smaller items I may be gluing but the rest of the blocks are the larger sizes. Happy I was able to come across this holder and for $2.00 it fits my budget. Better yet it holds items I use now for assembly that were once used for larger stamps... plus this holder gives these needed larger items a "home" in the craft room..... yay..... 

In the Pink Valentine's Day Card

This year most of my Valentine's Day projects and cards I used pink as the base. For the cards I made on Valentine's Day I used the Falling Hearts card front die from The Greetery:

For my card base I used a light pink card stock from my stash. For the card front I used a coral card stock. Here is the card:

Using the Falling Hearts die I wanted the card front to have an ombre look going from the reds at the top to the light pinks at the bottom. When I made the cards first I die cut the Falling Hearts die out of white card stock that was 4 1/4" x 5 1/2".  I also cut another piece of white card stock this same size and this would be the piece I added the inks to. Using blending brushes I added red ink at the top, a coral ink to the center, and the light pink at the bottom. I added my inks diagonally so that the fronts of the cards do not have stripes of the different ink colours showing through the cut out hearts. Once the inked pieces were covered with inks I set those aside to dry.

Cut and scored all my light pink card stock bases with the scored line at the top. Cut all the card front coral card stock pieces to the size I would need. With all the white die cut card fronts done I trimmed those to the size I would need for the card front. Using liquid glue I added these die cut card fronts to the inked pieces. Once those were glued I used the trimmer and trimmed all my edges even to the die cut card front piece. Used liquid glue and added the coral card front to the light pink card base. Then again using liquid glue I put the inked/die cut card front pieces onto the card base. Set these aside to dry.  Here is a photo of the card pieces I used before I had glued them altogether:

Dug through the stash for a "Love" die and I found one with a shadow piece. I die cut the shadow die out of vellum. Then die cut the "Love" die out of a coral/pink piece of glittered card stock. Used a small heart punch and punched out a heart from the same glittered card stock to put on the front of the card. I glued all the glittered "Love" die cuts to the vellum shadow pieces and set those aside to dry. Once dried I added the "Love" piece to the card front using liquid glue and I also added the small punched heart piece to the card front above the "e" in "Love". 

For the inside of the card I again went to the Valentine's Day stamp stash and found two stamps to use. I decided to use this heart die as it was a scribbled image and using markers I could use the same three colours of ink to mimic the ombre look on the card front. I had bought this heart stamp from a used stamp sale long ago - someone named Suzy had written her name on the wooden base this stamp is on and the name of the stamp is Scribble Heart (B3032) by Uptown Rubber Stamps. I also used a Valentine's stamp from the dollar bin (that is how old this stamp is - haha) from Michaels. Here is a photo of the card and the inside greeting piece:


Easy card to make with some ink blending for the card front. Happy I had the scribbled heart stamp to add to the inside of the card. Sometimes it is a challenge as to what to do for the inside of the card that would compliment the card fronts we make.... 


Sunday, January 21, 2024

Library Pocket/ATC Card Ghirardelli Holder

Have the Eileen Hull Library Pocket/ATC Card die set in the stash and wanted to use it to hold one Ghirardelli candy bar for Valentine's Day. So I die cut a sample out using thinner card stock before I used my pink card stock for my holder to see where I could add a couple of score lines to make this a "box". I ended up making an extra score line on the two sides as well as at the bottom fold and here is my holder:

Used pink card stock for the base and the printed card stock is from Prima. Stamped a small holiday greeting stamp on scrap white card stock and die cut that out using banner dies from Pink & Main. Here is the side of the pocket to see how it now has room for the candy bar:

This photo shows the extra scored line on the side tabs and the bottom:

Used tear and tape to assemble this and wrapped crinkled seam binding around the pocket on the treat holder:

Happy to be able to use the die set in a different way. Here is a photo of this die set:

Very easy die set to assemble and with a couple more score lines now a box for a chocolate treat!


Nail File/Pencil Box

Picked up Valentine's Day nail files for my treat bags and wanted to make a box/holder to put the nail files in. Remembered I had bought the Pencil Favor Box from Impression Obsession - IOStamps.com - when I went to their Warehouse Sale this past April. Their dies were 50% off at this sale. Here is a photo of the die set:


I used pink card stock from my stash for the box and the printed card stock for the front and back of my holder is from Hobby Lobby. Anna Wight, on YouTube, designed this die to hold pencils but I wanted to use it to hold my Valentine's Day themed nail files:


Since I only have one nail file in the box I wrapped tissue wrap around the bottom of the file to hold it in the center of the box. Here is the empty box with the file:

The die cuts a "v" pattern in the card stock and you can put this in the back or in the front of your box. For this project I have the "v" in the front of my holder. The pattern paper is on the front and back of this box. I used directional pattern card stock for my printed panels so I had to be sure when I was die cutting these pieces that I die cut the paper with the pattern going in the right direction both on front and back.

Anna Wight is a designer for IOStamps//Impression Obsession and all her dies have nice details -- the front and back panel pieces have stitched lines on them and she shows samples of these pencil boxes on her YouTube channel and her blog.  Easy box pattern to assemble and I decorated mine with red ribbon and a red heart gem.

Ebay find --

Had seen a project made with the XOXO Border die from SimonSaysStamp only to discover that die has been retired - headed over to Ebay and was able to pick it up cheap and the seller had that die in with a second die Medium Dot Line. So a good price for two dies.... 

I pulled out my scrap glittered red card stock and die cut as many as I could from these scraps:

The length of the die will cover a card front as it is 5 1/2" long x 7/8" high. Lots of projects I can add these to -- for my smaller scraps I have smaller "XO" pieces but they will work for smaller items or I can just tie them on something like an embellishment. The die cut the glittered card stocks, no matter their thickness, with no problems with one pass through the die cutting machine. Here are more pieces:

Happy to find this die on Ebay and just in time for Valentine's Day!

Thursday, January 18, 2024

KSCrafts January 2024 Release

 In the past I have ordered a KSCraft die set off of Amazon here and there but their January 2024 release is just too cute and it is for Easter projects ahead. Once I saw these dies made into projects I decided I would buy the whole release -- this bundled price is approx. $45.00 vs the individual prices that will be on Amazon when they get it all in; I went to the KSCrafts store on Aliexpress and ordered the bundle. I rarely buy off of Aliexpress due to the delivery time so I always check Amazon first. Happy me this bundle arrived today for my craft room:


Opened up all the sets, separated the pieces, and onto magnet sheets (vent covers from Lowes) they all are:

and this bundle also includes a small stamp set:

This bundle has word dies, lots of bunnies, a few bow die sets, shaker pieces, a chick and a little lamb, bunny memorydex die, bag toppers, garland pieces and best yet it is designed by Nicole Silhouette who also designs dies for Scrap Diva Designs. Happy me it took only 12 days to get to me from the day I ordered it so happy it was not a few weeks or a month later... Fun bundle to work with for Easter projects ahead.... but first I have to finish up my Valentine's Day projects...

Hidden Paperclips

Have made embellishments before with ways to make items with "hidden paperclips" - here is a photo of one of the embellishments I made:

Pretty from the front but here is a photo of the back:


Even with using layers of tear and tape on this embellishment eventually the outline of the back of my paperclip shows.. .. ..  Recently saw a video on YouTube from "Papercraft Crystal" showing how she makes her completely hidden paperclip for embellishments. Thought I would give her way a try as it certainly makes sense -- she uses thin foam tape and that is about the height of the metal paperclip so you will not see the paperclip in the front or the back of your embellishment. She made her hidden paperclips for Valentine's Day and so did I:

In the above photo I have the paperclip embellish on the edge of folded pink card stock. This paperclip will also easily slide over thicker items - in this photo I have the paperclip on the closed packaging of a Honey Bee Stamps product:

Here are photos of how I made one of these following her directions:

White card stock strip for the paperclip to clip on to is 1 1/2" x 8 1/2". Fold in half and put the paper clip on that. Fold each end of the strip over the paperclip front and back:

Cut a printed card stock 1 1/2" by 4 1/2" approx. for the piece that is the front and back of your paperclip holder. Cut four strips of thin foam tape approx. 2" long, as seen in above photo. Put these foam strips onto the white paperclip holder next to the paperclip but be sure to put your foam strips close to the edge of the white card stock piece:

Both the front and back of the paperclip:

On the front of the paperclip peel off the backing to the foam tape and press the white card stock piece over this to adhere it. Do the same to the back:

This photo shows the paperclip embellishment closed from the side view. Using a glue stick for adhesive, as was done in the video, I adhered the printed card stock to the holder--starting at the bottom of the holder -- if you use directional printed card stock beware that the back of your embellishment will have the pattern upside down. I used card stock prints that had no directional pattern to work with. Wrap the printed card stock around to the back. If this printed card stock is too long to cover your embellishment piece just use scissors to cut off the excess.

In the video she used a heart punch for the top of her embellishment - punched out the hearts and cut them with scissors to the size she needed. She used many punched hearts and a glue stick to stack these hearts to the height she would need for her embellishment -- then she punched out her full red hearts for the top of her embellishment -- after I had made my first embellishment from then on I did this step first so I could set my stacked heart pieces aside to dry:

Here is assembly photos to follow:

The above photo shows the hidden paperclip embellishment made and butted up against the top of the heart stacked pieces. I again used glue stick on the top heart piece and then used liquid glue to adhere my red glittered card stock heart onto the embellishment piece:

I adhered the front and then the back glittered red hearts to the paperclip embellishment. Here is a photo of other hidden paperclip embellishments I made for Valentine's Day:

These are good for journals, bag toppers, maybe at the top of a gift bag, to hold a larger tag on something or just to hold items together. This way of making a hidden paperclip really does keep the paperclip hidden and the back of the embellishment is as smooth as the front. The video on YouTube shows the how-to's of this project as she is assembling it and it is very easy to follow. Thanks to Papercraft Crystal for posting her video! Now I can make more of the hidden paperclips using her method and my paperclips really will be hidden on my embellishments .  .  .


Faux Shutter Card

Had seen the video for the Faux Shutter Card on Cardz TV with Mary on YouTube and she explains everything clearly. Once I saw that I knew I would use this card layout for my thank you card for my PIC (stamping Partner In Crime) for all the fabulous crafty items/supplies she gifted me for Christmas! Here is the card I made her -- again she loves purple and the camera seems to have problems with purple.... :0( but here is the card:

This card looks difficult to make but goes together quickly once all pieces are cut. First I went through my wooden stamps and decided to use the "thanks a bunch!" stamp from Penny Black. I stamped that and used a square die to cut that out - I knew when I cut this square out that I would be putting flowers above my stamped image so when I die cut this out I knew to keep my stamped image at the bottom to allow for space for my flowers. 

With that stamped and die cut out I set that aside. For the card I used purple card stock for the card base so I cut and scored that at the top. Cut out my white card stock piece for the front of the card. Then I cut out two double sided (that is all I had in purple) prints for the card front using the measurements from the video. Cut my four purple strips for the front of the card. Set these aside.

As she used in her video I cut a white card stock base to "build" the card front on - once that was cut I used a ruler and made a light pencil line across the width of this piece as well as a pencil line on the length of this piece. These lines make it easier to know I was in the center when I put my stamped die cut square piece at an angle on this base:

With the square adhered on the white base I then put each purple strip up against my stamped piece using liquid glue to adhere all pieces to this white card stock base. Here is a photo of the added printed card stock pieces:


With all prints glued on this base piece I turned it over and used scissors to cut around the base piece and this gave me the card front:

Using liquid glue again I adhered this to the white card stock piece I had cut for the card front:

Again used liquid glue and put this on the purple card stock base for the card:


Used flowers from the stash for my flowers and die cut some sprigs and leaves from glittered card stock to frame the flowers. Added some purple gems to the stamped square to dress up the flowers. 

This card layout is a lot easier to assemble than you would think -- no hard measurements or trying to cut angles or anything - just be sure that your stamped square piece is adhered to the center of your card well. Then as you add your solid strips and printed card stock pieces that you have them butted up against each other for a good finish. That is where using liquid glue and not a tape runner will help with the finished look to this card. Thanks again to Cardz TV with Mary for a pretty card layout and certainly this would a good card layout to help use up printed card stock scraps! 


Dollar Tree Doily Envelope w Rosette

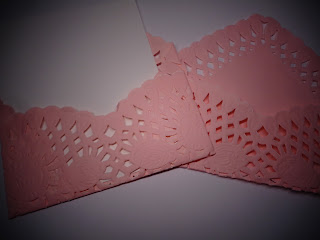
 Many crafters have made videos using the Valentine heart shaped paper doilies for projects and turning them into envelopes. For my project I made pink doily envelopes:

Basically you work on the doily with it being upside down as shown in this photo of a sample:

Fold the two heart scallops up towards the top point:

Crease your fold and then open it flat again and this time fold in the two sides:

Again crease your folds and fold up your first part the two heart scallops and this forms your envelope. These doilies are very thin so use liquid glue and not tear and tape:

You need to use little dots of liquid glue to close your envelope. As you can see in this photo you can see the folded pieces behind the front of your envelope flaps --

I put a scrap piece of pink card stock to help this show in the photo. The first pink doily envelope I made I made it as explained above but although I was careful to use dots of glue they still showed through the cut out parts of my doily envelope front - the shiny parts in the photo is the glue:

To eliminate that problem once I folded the doily into the envelope shape I opened it up again and trimmed off some of the doily from the side pieces so you do not see the folded pieces or glue from the front of my envelope:

I put in a piece of white card stock inside the envelope so you can see that and not the folded sides of the doily inside. Wanted to have a decoration for the front of my envelope and I wanted to use the  Pretty Scallop Rosette die set from My-Creative-Time for my rosette as that set has a larger rosette die and the smaller one I used. 

I keep all my rosette dies and supplies in a box together near the craft table so everything is together when I want to make a rosette:

All rosette dies are in this box. I also have a clear bag with circles I have punched out of 110# card stock scraps and I write the size of the circle on these. I use this circles to cut out my tulle when I put them on rosettes -- I cut a piece of tulle and fold that and then lay the card stock circle on that and cut the circle out using scissors. I put my tulle on the top of my rosettes so once I form the rosette I measure to see what size tulle circle I would want for it and then cut that out. Also in this box is an applicator for inks that I use for forming rosettes. I took the foam pad off of the handle and cut out a circle of the brown non stick craft mat for the bottom of the handle. I used heavy duty glue to adhere this to the handle and now when I make my rosettes I do not burn my fingers with the hot glue.

Here are the items I used for these rosettes:

I used a white card stock base for the scalloped base piece, a printed card stock rosette, circle to cut out the glittered tulle, the tulle, the pink thread, and the non stick tool to form the rosettes:

The glittered heart sticker for the center of my rosettes is from the stash. This photo shows the assembly of the rosettes. First the white scalloped base, the printed rosette, the tulle circles, the pink thread. All layers are adhered using hot glue:

Then added the glittered heart sticker to the front of the rosettes:


The doilies from the Dollar Tree are very thin if you use just one of them to make your envelope. I wanted some weight to mine so when I started I glued two of them together, wrong sides together using liquid glue, so both the inside and outside of my envelope are pink:


Even with the two layers of the doilies these envelopes are not overly sturdy. Also the other problem was how to hide the glue/adhesive used to attach to the rosette embellishment to the front of my doily envelope? I decided to cut out another white scalloped base piece and put this on the inside of the envelope behind my rosette -- this makes it heavier to hold the weight of the rosette as well as it hides my adhesive:


Happy it worked!


This second white scalloped base piece not only holds the rosette but it also keeps the inside of the envelope more finished looking so whatever you put inside will not get caught on glues from the back of my rosette and the weight of the rosette should not tear the front of the envelope. Here is a photo showing a couple of the envelopes I had made again:


Easy project to put together now that I know to cut off some of the side pieces before adhering the doily into the envelope shape. Also will use two doilies for my envelopes to add weight to the doilies but also it looks more finished having the pink side show on the outside and inside of the envelope.  The envelopes can hold stickers, a small die set, holiday tags, maybe small candy treats, embellishments, etc.. Cute project to make using cheap paper doilies from the Dollar Tree!