Tuesday, October 4, 2016
Stormy Night Halloween Card
Had seen this video by Shelly Godby featuring the new Stampin Up bundle "Spooky Fun". I wanted to buy this bundle and when I saw her card featuring it I decided to take the plunge. Here is the link to her video on YouTube:
https://www.youtube.com/watch?v=GAnhADLeYTI
As she suggested I used the curved die piece from the Stampin Up bundle Floral Phrases to make the stormy clouds on the card front.. I was happy I had bought that set before -- here is the die piece and the heavier black card stock I cut out as she suggests to use for a template for clouds on my card front:
I used a heavier weight card stock for my template so that it is more sturdy and will stand up to multiple projects I am going to use it on. Here is a photo of the stamp set this die piece matches:
Thanks to Shelly for her tip using this die piece for a stormy clouds background and here is a Halloween card I made with the tips she offers in her video:
I used Stampin Up black card stock for the card base. White is GP and the gray is from Mikes. I cut and scored the black card stock base. Then cut the white/GP to the size I wanted for the card front. Set these aside.
For the gray piece I cut that a bit larger than I would need and used my template and sponged gray ink onto the gray card stock for the clouds. I was careful to turn over the template as Shelly suggests while sponging the clouds on so it looked natural and did not make a stripe look or anything. With the stormy clouds done I next cut out the tree die from Stampin Up black card stock:
For the moon, like Shelly suggested, I used a 2" circle punch and sponged the edges of that with a light ink and then sponged Stampin Up Pumpkin Pie over that on one side of the circle to give it dimension. Used the ATG and a glue pen to put the tree piece and the moon onto the gray card piece. Trimmed this gray piece to the size I wanted for the card front. Using the ATG I put the white/GP piece onto the black card stock base. Then put the gray piece onto that also with the ATG.
Stamped the greeting "happy halloween!" with Memento black ink on the lower left side of the card. Using the fence die in that bundle I cut out a piece of Mikes kraft card stock and sponged that with a light brown ink. Cut it to the size I wanted and tucked it under the tree piece using a glue pen. Using a punch from the dollar bin at the craft store I punched out a black cat from scrap card stock and put that on the card front in front of the fence piece:
The tombstones were stamped with black ink and cut them out using the matching die. Did that again for a second piece and I cut that set of three tombstones apart with scissors and put them onto the card front using glue dots.
The small bats are punched out of scrap black card stock using a dollar bin bat punch. Put the bats onto the card front using a glue pen:
Thanks to Shelly for "thinking out of the box" for using the Floral Phrases die set piece to make the stormy clouds on her Halloween card. Her video also shows you how to cut a wider piece for your trees and grassy ground on the card front. BOO to you! TFL
Sunday, October 2, 2016
BOO Candy Tin Treat Holder
Picked up a pack of two metal circle treat holders at the dollar store yesterday. Used the Steampunk BOO stamp from Inkadinkado for the top of the tin. Stamped it onto white/GP card stock with VersaMark ink and used black embossing powder to emboss it. Once that was done I sponged the edge of this circle using black ink:
For the top of the tin I used the new-to-me Stampin Up Starburst dies and cut out black SU card stock using one of those dies. Used a circle punch for the purple circle behind the white stamped piece. After I had heat embossed the greeting I used the Stampin Up Circles die set to cut those out. Put these three circles together using the ATG.
Used Tear Tape to put the greeting circles onto the metal lid. Using the EK Success Bats punch I punched out three small bats from black glittered card stock. Put the bats onto the circles using TomBow glue. For the stars I used a star punch from the dollar bin at the craft store and scraps of glittered card stocks. Mini glue dots were used to add the stars to the lids. For the sides of the tin I used double sided red sticky tape and added the ribbon:
Inside each of these is black paper shred from the dollar store and I put in four of the dark chocolate candies from Dove chocolates:
Easy treat holder to put together and each tin cost 50 cents so a good deal for a Halloween treat holder. TFL
Saturday, October 1, 2016
Hat assembly
More of the Witch Hat Clips following the tutorial on SCS from Janet Baker done by Kelly Acheson. Decided to make a white card stock pattern so I could cut out more hat pieces at one time and not waste the glittered black card stock:
Made this hat pattern following the directions on the tutorial and I used a heavier white card stock for this piece. Cut it out with the trimmer and then laid it on the backside of the glittered card stock alternating it to get more pieces from the glittered card stock and used a pencil to trace around the pattern piece:
:
Using the trimmer I cut out all my triangle hat pieces for stacking them in sets of two for the hats:
Used circle dies to cut out all my hat brims. Using glue dots I put the black clothespins from Mikes onto the triangle pieces and then folded over the hat brims for the hat. Used glue dots to attach the brim to the clothespins. Added bows to each hat that I had punched out using the Stampin Up Bow Builder punch. Added a bug to each bow center with a crystal and the hats are done:
Making all these witch hats at one time went quickly and an easy project for Halloween treat bags and such. Making a triangle pattern piece saved time and also glittered card stock as there was very little waste of that after cutting out all six hats. TFL
Friday, September 30, 2016
Semi - BOO Made Treat Bag
Awhile back I did a lot of die cutting and punching out items for my Halloween tags/bags/and such. Put all these pieces into a clear clam shell box with a lid and as I have worked on Halloween items I have used shapes from this box.
Today I went to the dollar store for more black paper shred and I came across these Halloween paper treat bags -- decided to buy them as they can hold some of the smaller treat holders I have made. But could not leave well enough alone. . .
Recently read the Witch Hat Clip tutorial on Splitcoaststampers.com by Janet Baker. She made a cute Witch Hat pattern that uses a clothespin to clip onto tags/bags/etc.. No punches are used for the witch hat -- just circle dies. Here is my bag with hat:
The paper treat bags are sold in a package of 25. Here is a photo of my treat bag open and standing upright:
Wanted to make the bottom of this paper bag more sturdy so cut a piece of scrap white card stock to fit inside the bag:
Put a handful of black paper shred in the bottom of the bag:
Now I can fill this bag with treats and some of my smaller treat holders I have made.
For my witch hat I have black clothespins that I have bought at Mikes so I wanted to use a black clothespin for my hat since it is black. I used the Circle die set from Stampin Up and here is a photo of those dies:
Starting with the smallest circle die as #1 I used die #2 and die #6 to cut out the black glittered card stock from Hobby Lobby for the hat brim. Then followed the tutorial directions to cut the points of the hat. As the tutorial suggests I put the hat together and on the clothespin using glue dots.
Since I had so many bows made for Halloween in the "parts box" that I had used the Stampin Up Bow Builder punch for, I just grabbed a bow and put that on the witch hat using glue dots. Punched out a glittered bug and put that on the bow on the hat with a micro mini glue dot. (If you look at the bow you see the orange spider web printed paper -- that is more of the shelf strips I picked up for free last Fall from Walgreens when they took down their Halloween displays and candy aisle).
Here are photos to show the black clothespin and the back of the hat from the back of the bag view:
Thanks to Janet Baker for sharing a very simple pattern for this witch hat -- very easy and quick to put together. TFL
Thursday, September 29, 2016
Gratitude Thanksgiving Card
Have seen this card layout recently so thought I would use it for a Thanksgiving card. Used Chocolate Chip card stock from Stampin Up for the card base with a piece of Stampin Up Really Rust card stock is behind the front of the card. Kraft card stock from Mikes is the front of the card and I stamped a stamp from the Close To My Heart stamp set "Blessed Beyond Measure" on that. This stamp set is a "Stamp of the Month" stamp set from Close To My Heart -- a customer places a qualifying order and then can buy their Stamp of the Month stamp set for $5.00. Good deal for customers!
For the leaves/acorn printed card stock I used for this card I have scraps only of this card stock left. It has always been a favorite for my fall cards with the colours and leaves so I use it sparingly. This card layout was perfect to use this printed card stock. But how to cut the print and to what size?
Here are photos to show how I did this -- I used scrap white card stock for my photos. First cut the printed card stock to the length you need. Then using a ruler I made a pencil mark at the lower left corner:
That pencil mark is 5/8" inches from the lower left side of this piece. At the top of this piece I measured in 1 3/8" from the left edge:
With both pencil marks on my sample piece I then used a ruler and a pencil to connect the pencil marks:
Of course my pencil marks are dark on the sample to show this better but when I made my pencil lines on my printed card stock they are very light. I used the trimmer to trim my print. Used the ATG to put the print onto the Kraft card stock front. Using brown ink I stamped my stamp onto the card front.
With the stamping done I used the ATG to put the rust card stock onto the brown card stock base. Then put the stamped kraft piece onto the card base. Wanted to use leaves for the card front so I fussy cut two leaves from the scrap printed card stock. To add shimmer to those two leaves I used Pearls Shimmer Mist and spritzed the leaves. Cut out gold twine and made a bow. Put the leaves onto the card front using glue dots and used a micro mini glue dot for the gold twine bow. Here is a photo to show this shimmer:
Easy card to make and a different layout than I have made in the past. This layout is perfect though for scrap card stocks or if you want a print on your card front but don't want it to be "too busy". TFL
Sunday, September 25, 2016
Does the Easter Bunny know???
First we had Peeps for Easter... yellow, pink, green, and blue...
Peeps are now available for Halloween.... ghosts and pumpkins...
For Christmas they have Peep Christmas trees.....
Recent trip to Walgreens I came across Cadbury Scream Eggs for Halloween.... Decided to pick some up for the treat bags I am putting together but what to put them in???
Decided to try the holder pattern I use for the Ferrero Rocher candies that I have made for Halloween. Knowing the Cadbury eggs are heavier than the Rocher candies I decided to change out my card stock to use a thicker weight. Here is my Cadbury Scream Egg in my Rocher pattern treat holder using Stampin Up black card stock:
Used the pattern the same way but the heavier card stock seems to be fine to hold this egg. Here is a photo of the side of the holder showing how the egg sits in it:
Used the SU black card stock for the treat holder base and used a Halloween print for the back of the holder. Put the printed card stock onto the holder using the ATG before I folded the holder closed. For the pumpkin trim I used a dollar spool of trim from Walmart. Cut the pumpkin length to the size I needed for the holder front and I put the pumpkin strip onto the holder using thin red sticky tape:
Again used the Stampin Up Scalloped Tag Topper punch for the top of the holder and I tied black tulle on that using orange satin ribbon:
Here is a photo of the Cadbury Scream Egg next to the two holders I have made for the Ferrero Rocher candies:
These holders go together quickly and make good use of scrap printed card stocks and trims. They are free standing holders so would be nice on a table or desk. TFL
BOO Treat Bags and Tags
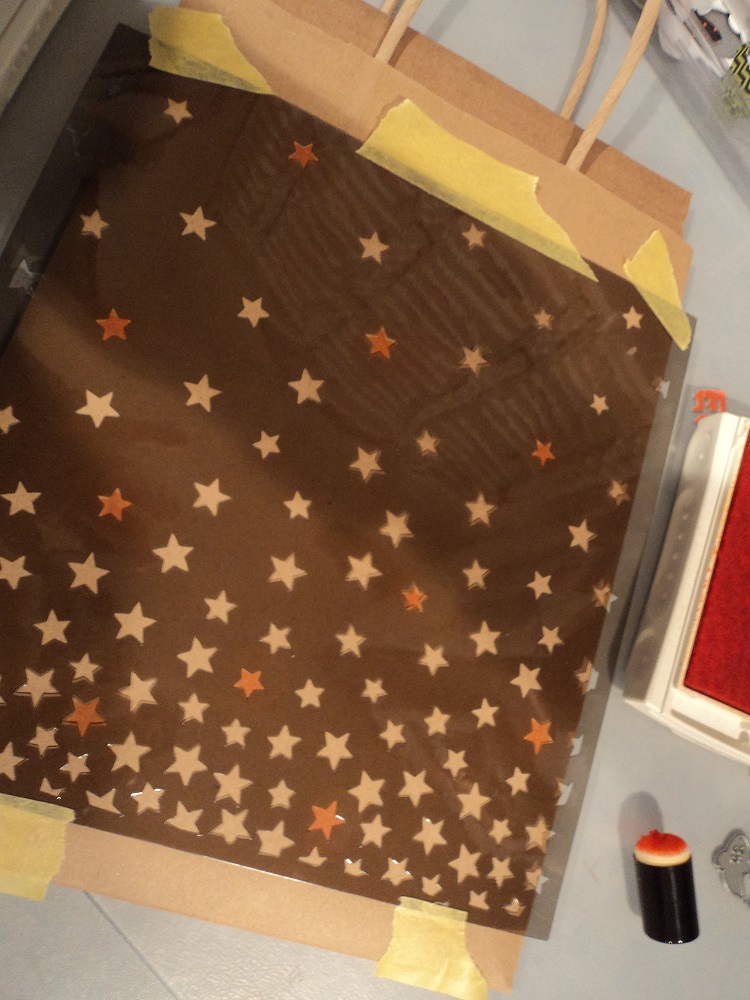
Here are four of the treat bags I have put together with the tags I just made. I started with kraft gift bags from the dollar store. Used the Stars stencil from Stampin Up and various inks to stencil the stars design on the bags. To be sure the bag was flat while I stenciled it first I cut a piece of card board from a box to slide inside the bag which gives you a firm surface to stencil on:
Using painter's tape I taped the stencil onto each bag -- used inks and a dauber to stencil the colour on:
Once I had all the colours on the bag I carefully peeled off the painter's tape and lifted up the stencil being careful not to smear the stars design. Using a baby wipe I cleaned off the stencil. Onto the next bag being sure to turn the stencil so the stars design is not the same on all the bags. With the stenciling done on some of the bags you can see a mark from the dauber at the top and the bottom of the stars design. Covered those marks up with washi tapes across the top and bottom of the bags:
With all the bags stenciled I then cut pieces of tulle and put those on one of the bag handles. Used pom pom trim from the clearance section at Mikes and tied that on. Added ribbon to that. Using black clothespins from Mikes I put the Boo Bag Tags I just made onto the bags -- here is a photo of each bag with the tag:
Inside the bags is paper shred from the dollar store and closer to Halloween I will fill the treat holders I have made recently and pack them inside. TFL
Saturday, September 24, 2016
BOO Bag Tag #4
Here is a fourth BOO Day tag for treat bags I am making for Halloween:
This tag is a kraft tag sold in a package at Mikes. For the hole at the tag top I used two circle punches to punch out the black ring I put over the hole. Put the ring onto the tag using a glue pen. Sponged edges of the tag using black ink.
For the "Boo" stamp -- this is the Steampunk Boo stamp from Inkadinkado -- could not find it in any stores so bought it off Ebay brand new. I stamped this onto white card stock using VersaMark. Then covered it with Stampendous black embossing powder. Heat set that and it is very shiny:
Once that was cooled I used the SU Circle dies and cut that out. Used the next larger circle die and cut out a solid pumpkin coloured card stock to put behind the embossed piece. For the black die cut piece I used the SU Starburst die set for that. Put all these die cut circles together using the ATG.
Wanted a banner/flag across the tag so I cut out black card stock from Mikes, dotted card stock from Hobby Lobby and put those together using the ATG. Then I ran them through the crimper to give it some dimension:
Put the banner/flag piece on the tag using tear tape. Put the circles piece over that banner/flag and used pop dots for that. Added three black crystals from the stash to the embossed piece:
Used shiny black card stock and the mini bat EK Success punch for the small bats. Put them onto the tag using TomBow glue. TFL
BOO Bag Tag #3
This is the third Halloween tag I have made for treat bags for BOO Day:
Tag base is a kraft tag from a package of tags from Mikes. Cut a piece of black card stock for the tag top and then orange card stock for the bottom of the tag. Put these onto the kraft tag using the ATG. Turned it over and trimmed these pieces to the tag shape using scissors. Once done I turned it back over and sponged all edges using black ink.
For the hole at the top of the tag I used two circle punches to make the orange ring around the hole. Then used a glue pen to put the ring onto the tag top. Using an orange mesh bag from the grocery store that held onions I cut a piece for the tag top and tied black satin ribbon around that:
For the ghost I used white craft foam (from Mikes in the kids craft aisle) and cut that out using a Sizzix ghost die. Splattered gray ink onto that. Using a M Stewart bat punch I punched out a bat from black glittered card stock and put the bat onto the ghost using a glue pen:
For the stars I used a star punch from the dollar bin @ Mikes. "boo" is a die cut and black glittered card stock for that. Once the "boo" was cut out I cut out another "boo" from a kleenex box and glued that to the back of the black glittered "boo" -- this makes that stronger as well as gives it dimension on the tag:
Used a decorative edge die and cut a piece from black card stock. Trimmed it to the size I wanted for the tag with scissors and put that onto the tag using a glue pen.
Using a doily die I cut out a black doily and put the ghost onto that using large glue dots. For the front of the tag where the black meets the orange card stock I used black glittered washi tape to cover that up. Trimmed the sides with scissors. Put the doily/ghost piece onto the tag having part of the doily hang off the right side of the tag. Stars put on the tag with glue dots.
The "TRICK or TREAT" banner is a stamp from Stampin Up Toxic Treats. Stamped that onto scrap white card stock and used a ruler and the SU banner punch to make it into a banner. Put that onto the tag using glue dots:
The glittered black card stock adds sparkle to this Halloween tag. With the ghost being cut out of craft foam that also gives the tag dimension. TFL
Subscribe to:
Posts (Atom)