Tuesday, July 25, 2017

BOO Boxes 2017


Stumbled across a video on Youtube by Debra Rogers where she had made her own boxes and then decorated them for Halloween (BOO Day). She also decorated some of her boxes into houses for Halloween which is another cute idea. Here is a link to her video:

www.youtube.com/watch?v=JoiIwDCErsE

She said she found this box template, a Happy Meal box, from Bona - on LiveLoveScrap. Here is a link to her box template video:

www.youtube.com/watch?v=LRzGkC_2cTE

A BIG thank you to both ladies for such a fun project. To begin with I had seen Debra's video first and that inspired me to watch the video by Bona for her Happy Meal box template. I have many box die sets on hand but this box is a larger size and too cute not to make up. After making this first box I have decided this will be the BOO Boxes I make for Halloween this year for the gals at work:


Whenever I watch a how-to video I usually watch the video and take notes -- write down sizes or maybe tips or other info I will need to make the project. For Bona's box I watched her video from start to finish and then watched it a second time and made a drawing to work from. Whenever you use the score board to make a box you have to know what pieces to cut off for your box or what pieces you need to just clip the scored lines. In Bona's video you will see she makes the two pieces for her box and then she works on the front piece followed by the back piece. Once I had taken notes I decided to use scrap card stock and make a box front and a box back piece with the trimming on each piece for folding into the box shape. I used two different colour card stocks so I could easy see how these two pieces go together for the box. Here is my sample box front piece:


The blue piece is the front of the box sample piece to show what I need to trim away and also where the scored lines are at the top of the box for folding it closed. Used the Punch board for the center top with the SU Word Window punch for the handle. This green piece is the back of the box piece:


I will keep these sample pieces so I will have them on hand when I make more of these boxes. (Also I cut out a smaller sized box using this pattern for other projects). Here is the photo of the front sample and actual front box piece and then the back pieces:


I used tear and tape to put my box together. I taped the sides together and left this flat. Using black ink I sponged the edges of the box and all scored lines. With the box flat I decorated the front, sides, and back using older Sizzix Halloween dies -- yellow and green dies. Once all decorated I then formed the box and used tear and tape for the bottom of the box.

I cut the fence die out of black glittered card stock. For the two fences on the sides of the box I left those one layer and used a glue pen to put them on the box sides near the bottom. For the fence piece on the front of the box I wanted that to have dimension so I made a fence klipboard piece - klipboard is what I call this -- I cut out a fence piece from the tear off tab from the top of a kleenex box. Then cut out a second fence piece from the glittered card stock. Put that onto the kleenex box fence piece using a glue pen - here is a photo to show this fence piece is a bit thicker with the card board behind it:


For the "Trick or Treat" signs on the front of the fence - I printed those onto white/GP card stock on the computer and cut them to the size I wanted. Sponged the edges of those with the black ink. Put them onto the glittered fence piece using red sticky tape. Used a spider web die to cut out a black spider web. Used scissors to cut that to the size I wanted for the box front. Put this onto the box using a glue pen. Added a 3" circle of green print to the box front. Cut a strip of that card stock for the lower front of the box front. Put these onto the box front using the ATG. Put the fence onto the box front using red sticky tape.

For the pumpkins on the box front and sides I used two punches -- the pumpkin punch is M Stewart and the pumpkin face is a small punch I bought used:


Rather than punch out the tiny pumpkin face pieces and then try to use glue to get them onto the pumpkin I decided to do this the easier way -- punched out the face punch from orange card stock. Used scissors to cut that into a square and then used the pumpkin punch and punched over the face. Used the pumpkin punch and punched out a black pumpkin -- now these two pieces can easily be layered for an easy pumpkin face:


Used the glue pen on the orange pumpkin to put this onto the black pumpkin piece. Sponged the edges of the pumpkin with ink for shading. Here is the decorated fence piece on the front of the box:


The Tim Holtz Rosette die was used for the rosette behind the glittery bat. Used the hot glue gun to form the rosette. Put this onto a black scalloped card stock piece using glue dots. Die cut the bat from black glittered card stock. Cut this die out again using the kleenex box. Wanted the bat to have green eyes so punched out a small circle of green card stock and used the glue pen to put this on the backside of the glittered bat. Using craft glue I put this bat piece onto the kleenex box cardboard bat piece. Using large glue dots I put the bat onto the front of the rosette:


Put the bat/rosette piece on the edge of the printed green circle piece on the box front using glue dots. Used the Sizzix ghosts die for the white glittered ghosts. Behind their eyes and mouth I used a small oval punch and punched out a piece of black card stock. Used the glue pen to put these black ovals on the back of the ghost faces. Put one ghost next to the fence piece on the front of the box. Used mini glue dots for the black flocked bugs and the foil spider by the web. Added sequins from the dollar store using glue dots:


For the top edge of the box I added a printed card stock panel and used black trim from Hobby Lobby at the top. Put that onto the box using red sticky tape. Added a strip of green crystals to the black trim piece. For "BOO to you" I printed that off my computer onto white/GP card stock and used a banner punch for that. Sponged the edges of this with black ink. Ran this strip over the bone folder to give this piece a "wave" look and put this onto the box top section using glue dots. Added two green crystals from the stash. Put a ghost at one end of the banner using glue dots:


Here is what the sides of the box look like:


Used two prints of card stock for the back of my box:


To keep my box closed I used black velcro dots at the top of my box. I did not want to use white velcro as I think the black looks better since it is for Halloween and I have both black and white velcro circles in the stash box. Here is a photo of my BOO Box next to the SU Berry Basket I had made for last fall to show the size of this Happy Meal Box from Bona:


This BOO Box will hold lots of treats and other treat holders -- Coffin box, pillow box, nugget holders, etc for Halloween. Each box will be a different colour and decorated differently. Will post them as they are made. Debra had decorated her first Halloween box using plastic skulls and a plastic hand from Mikes and they are too cute but Mikes is just beginning to put out their Halloween decorations and craft supplies so I will have to stop back later this week to pick up some cute accessories for my BOO Boxes.

BIG THANKS to Debra and Bona for such a fun project!!  TFL

Sunday, July 23, 2017

Tissue??? I hardly know you . . .


Had seen a card by Loll Thompson she recently made from a technique by Karen from Karen's Kreative Kards. Loll made a few cards using this technique and she made a video with all the how-to's of the technique for Youtube:

www.youtube.com/watch?v=WYNnouzX6RU&feature=youtu.be

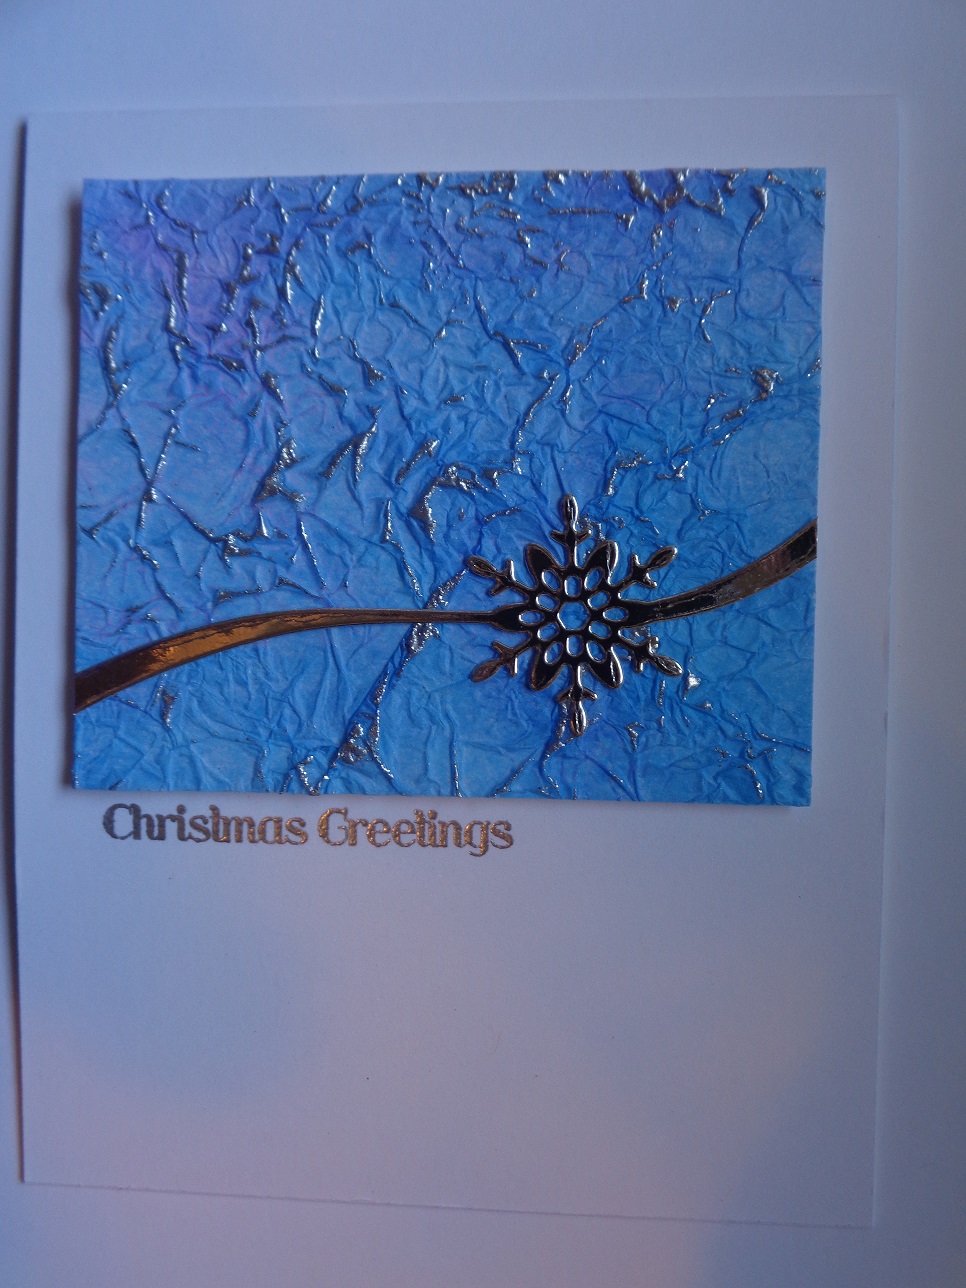
The video is very informative and easy to follow. When I first saw this card Loll Thompson had made and posted on Splitcoast Stampers I thought it would be very difficult to put together. Clicked on her video and then I made my card:


For my card I followed what Loll instructed on her video. I was happy I already had white tissue on hand, the same snowflake sash die she used, as well as the Stampin Up stamp Hostess stamp set Warmth and Wonder. I had decided since I was trying a new technique that I would make up a few of them rather than just the one for my card. I cut a piece of white card stock into four pieces 4 1/4" x 5 1/2". Set those aside. Cut four pieces of white tissue paper 6" x 6" and set those aside. Pulled out the craft mats and decided for my card I would use these colours of distress inks:


As instructed on the video I swiped my three colours onto the craft mat and then spritzed them with water. Used a palette knife to mix the colours together in a swirl. Laid one white tissue in the ink. Tapped it down to absorb the inks. Carefully pulled up the inked tissue and laid it onto a cookie cooling rack I have for the craft room that I picked up at the thrift store to dry. Cleaned off the mat and continued the ink process until all four tissue pieces were inked:


The tissue pieces did not take long to dry. Once totally dried I crumpled them up. Used craft glue to cover my four white card stock pieces and opened each tissue piece and put them on the white card stock being careful to leave the hills and valleys of the creases in the tissue paper. (Be sure to use craft glue that dries clear)  Set these aside for the glue to dry.

With that dried I used the VersaMark ink and rubbed it over the tissue pieces and I used silver embossing powder from Stampendous on the tissues:


Did one piece at a time -- once the embossing powder was on the tissue I put this onto my foil covered small clip board and heat set the embossing powder. (I use the clip board to help keep the piece being embossed flat and it also helps not to burn the fingers). As you can see in the next photo all four tissues look different:


Now to the card -- cut and scored at the top a piece of #110 weight white card stock from Mikes. I had to decide which of the tissue pieces I would use for my card and with that decided I trimmed the tissue piece to this size:

3 5/8" wide by 3" high

Using a white craft foam sheet I cut a piece of foam smaller than the tissue piece. Put the foam piece on the back of the tissue piece using double sided tape. Set this aside. For the greeting "Christmas Greetings" I used the MISTI. Put the folded white card stock base into the MISTI and tapped the embossing buddy over the front of the card. I laid the embossed tissue piece onto the card front so I would know where to position the greeting stamp. With that decided I removed the tissue piece and used VersaMark ink for the greeting. For the greeting stamp I used the silver embossing powder from Stampin Up and heat embossed that.

Cut out one of the snowflake sash die pieces from silver foil card stock lined with Stick It sheet from Ken Oliver. Peeled off the backing and put the snowflake die cut piece across the embossed tissue piece. Then put this piece onto the card front and the card is done.

A BIG thank you to Loll Thompson for sharing her pretty card and for making an easy and very informative video to follow. A BIGGER thank you to Karen for sharing her technique to begin with. This card is very pretty and sparkly IRL -- A good start for holiday cards!


Friday, July 21, 2017

Rummaging.. . .


Sooner or later it will happen and for me it was earlier this week... :0(  

Distressed inks... love the way they look but sometimes getting the sponges off the velcro on the bottom of the 'blending tool' can be a battle.... of which I lost.... Took off the sponge (AKA foam piece) from the velcro applicator and the velcro was not having any of that... so both the sponge and the velcro came off the blending tool as one. . .

All good stampers have a bottle of rubber cement on hand to put older wood mount stamps back on the wood when they fall off so first thought was I would separate the velcro from the sponge and use the rubber cement to put the velcro back onto the blending tool. Did just that, being careful to keep the rubber cement on the blending tool where the velcro should be. Put the velcro back on the blending tool, pressing it down to stick to the rubber cement, and stood it upright overnight letting it set.

Next morning I checked the blending tool and when I lifted it up the velcro was still sitting on the counter where I had put it -- :0(   .....  So what to do?? Off to the garage I went to rummage the coveted workbench of DH that is off limits.... and there it was --  Gorilla Glue ... a small bottle but I only needed a small amount so into the craft room it went...

Got the blending tool and the velcro piece and put the Gorilla Glue on the bottom of the blending tool and then put the velcro on top of that -- once again I stood it upright overnight to set. Next morning I checked it and the velcro is evenly stuck onto the blending tool -- happy me.


So when the staples on my other blending tools come off and the velcro falls off I will be able to re-attach them using the Gorilla Glue -- here is a photo of the glued/repaired blending tool on the right and the other blending tool showing the staple they come with that holds the velcro on:


Put back DH's bottle of Gorilla Glue and I bought a small bottle for the craft room from Hobby Lobby. Here is a photo of what it looks like:


It does not take much of this glue to cover the bottom of the blending tool so I am sure this small bottle will last me quite awhile. Thought I would share what worked for me if anyone else has had had the velcro come off their blending tools.... TFL and thanks to DH for his bottle of Gorilla Glue so I could 'try before you buy'... ;0)  

Thursday, July 20, 2017

BOO Day Lollie


Had seen the lollies made in the past and wanted to make one for Halloween so here is my BOO Day lollie:


Basically the lollies are rosettes on a stick or a straw for whatever holiday or occasion you want to make them for. Had not made one of these in the past so decided for my lollie that I had to have whatever I was using for the base decided first. For my base I used orange glittered card stock and cut out the Spellbinders Pumpkins circle die -- I used the largest circle in that die set. With the orange glittered card stock piece cut out I also cut out a second piece from printed card stock for the back of the lollie. Put the back piece onto the back of the glittered piece using the ATG and set this aside.

For my larger rosette I used a piece of black dotted card stock and I cut my strip 1 1/2" wide by 12". I cut a second piece 1 1/2" wide by 6". I scored these strips every 1/4" on the M Stewart scoreboard. Once they were scored I folded them on the scored lines and then attached the shorter piece to my longer piece using red sticky tape. Using a hot glue gun I put the rosette onto a 1" black card stock circle. Set this aside.

For the smaller rosette for the front I cut a piece of card stock 1" wide by 11" long. Scored this every 1/4" on the score board. Folded and hot glued this to a 1" black card stock circle. Used a decorative die and cut out a piece of purple card stock for behind the smaller rosette. Put the smaller rosette onto the purple die cut piece using the hot glue gun. Set this aside.

For the ghost I used a ghost die and cut out a ghost from white glittered card stock. Used an small oval punch and punched out a piece of black card stock and used a glue pen to glue this to the back of the ghost so his eye and mouth holes are black. For the "boo" --  this is another piece of "klipboard" I made using  the tear tab to the top of a kleenex box. This photo shows my black die cut piece cut out of shiny black card stock that has the Ken Oliver Stick It sheet behind it. This way my die cut piece already has adhesive on it. With the kleenex box cardboard "boo" cut out all I need to do is peel off the backing of the Stick It sheet behind the black "boo" and put it on top of the cardboard "boo". This makes the letters raised and gives them dimension on a project:


Also cut out "trick or treat" for the back of the lollie -- this photo shows that the thinner, more detailed dies, also cut out well from the cardboard:


With my greetings cut out all I needed to do was assemble the lollie. To begin with I put the "trick or treat" greeting on the backside of the lollie using a glue pen:


Added orange glittered stars and purple foil stars to the back and that is done. Flipped this over and used the glue gun and put the larger black rosette onto the pumpkin edged circle. Then used the glue gun and put the purple and smaller rosette piece onto the front of the black one. Using a holiday straw from the dollar store I put the straw onto the circle, under the black rosette, using the glue gun. Used glue dots and tucked the ghost under the smaller rosette but in front of the purple die cut piece.

For the "boo" I cut a piece of scrap white card stock and used a banner punch for the ends. Used a glue pen and put the "boo" onto the banner piece. Used red sticky tape to put this onto the lollie under the black rosette and onto the glittered card stock base. Added glittered shapes using a M Stewart border punch. For the center of the smaller rosette I punched out a smaller glittered circle and I put crystal effects over that. Then cut out a purple circle to put that onto once it dried. With it dried I put it onto the center of the rosette using the glue gun.

Added a dotted ribbon, yarn, and black bias tape to the lower front of the lollie using glue dots to hold them in place. Used the glue gun and added the tulle bow piece I made. Added a gem from the stash to the center of that.

The lollie can be used to decorate a holiday table, or be tucked into a treat holder/bag, or just be a greeting for someone for Halloween. The lollies make good use of card stocks you may not like or bits and pieces you have to use for decorations on them. Here is a photo to show the layers of the lollie:


Another use of rosettes. Lots of ideas for lollies on the internet and many videos to watch for the how to's of this project. TFL

Wednesday, July 12, 2017

Avery BOO Tags


Recently went to a stamp show in Chantilly, VA and I bought two Halloween stamps from the Rubbernecker Stamps booth. They had used these stamps on shipping tags on their sample board and I wanted to try this out so here are my two sample tags -- they are not decorated or anything but I like the way they turned out:


I had left over shipping tags left over from other projects by Avery.  These tags are manila in colour and they measure 3 1/8" x 6 1/4". Here is what I began with:


For this first tag I used a circle punch and punched out a scrap card stock circle and put this circle onto the tag using removable adhesive. Once that was on the tag I used various distress inks and covered the tag. Used a distressed black ink for the edges:


Once the distressed inks were dry I used the MISTI and stamped the image with VersaMark ink twice and then heat embossed it using black embossing powder:


The above photo shows the shine of the embossing against the dull finish of the distress inked tag. This next tag:


I used different distressed inks to cover the tag and again used the black ink for the tag edges. Once dried I used the MISTI and stamped the image twice using VersaFine black ink. Then covered that with clear embossing powder and heat set that. Once that was done and cooled I covered the whole tag with VersaMark ink and covered it with clear embossing powder and heat set that -- this tag is shiny all over and it gives it a totally different look than the first tag with just the image embossed:


Both tags are cute and will make fun BOO Day bag tags or even a tag on a front of a card. Avery tags are not that expensive and fun to take a shipping tag and make it something SPOOKTACULAR!! Nice stamps from Rubbernecker. TFL

Tuesday, July 11, 2017

Double BOO to You Post


Working on house projects this week so while paint is drying decided to post two more BOO Day cards for Halloween. Here is the first card:


Went to a local stamp show last weekend and made a stop at the Just For Fun booth. I bought the trick or treaters stamp there and made one Halloween card using that stamp. This is a second card layout from their card sample board using that same stamp. For my card I used #110 weight black card stock from Mikes for the card base. Used a purple card stock for both front pieces to the card.

For the card front I cut a piece of white/GP card stock larger than what I would need for the card front. Covered that with distressed inks. Using the Paint Scratches background stamp from Technique Junkies I stamped that on the distressed piece using black ink. Set this aside.

For the smaller front piece I cut a piece of white/GP to the size I would need. Punched out a circle from scrap card stock for the moon and put that on the white/GP using removable adhesive.  Covered this piece with distressed inks. Removed the circle for the moon. Stamped the trick or treaters near the bottom of this piece using black ink. I wanted them to be really dark so I inked and stamped them twice. For the "happy halloween" stamp over the moon I used a stamp from Impression Obsession. With that stamped I then used a black distress ink and sponged the edges of this piece. Put it on a piece of purple card stock using the ATG. Set it aside.

For the Paint Scratches card front piece I trimmed it to the size I needed for the card front. Sponged the edges with the black distress ink. Stamped a Just For Fun black cat stamp in the lower right corner and used a white gel pen for the eyes on the cat. Put this front piece onto a piece of purple card stock using the ATG and then put these onto the black card stock base. The smaller trick or treaters stamped piece has a small black craft foam sheet behind it to give this piece dimension on the card front. Just For Fun has nice sample boards at their booth and you can't leave there without being inspired for sure!

The second card:


Had picked up the Halloween trees stamp during a recent trip to Enchanted Cottage and never made a card with it until . . .   This card stock base is purple with a piece of black card stock from Mikes for the front. I cut a piece of white/GP card stock larger than what I needed for the card front. Using a circle punch I punched out a circle from scrap card stock and put it on my card stock for the moon using removable adhesive. Covered that white/GP piece with the distressed inks. Once that was covered I removed the circle piece for the moon.

For this card positioning the trees was key. The trees stamp is Batty Trees from Great Impression Stamps. I used the stamp positioner to be sure I would have the trees where I wanted them. I wanted some of the spider webs to be over the white moon so for this card front I stamped right to left to fill the card front using black ink. Once the trees were stamped I trimmed this piece to the size I needed for the card front and then sponged the edges using black distressed ink. Using the ATG I put the card front onto the black card stock from Mikes. Then put these onto the purple card stock base.

For the greeting "Happy Halloween!" I used a stamp from Endless Creations and stamped that onto scrap black card stock with VersaMark ink. Embossed this using white embossing powder. Cut this to the size I wanted using the trimmer. Put this greeting piece onto a piece of black craft foam and put it on the lower left front of the card. Simple card to make but it has enough of the Spook Factor for Halloween. TFL

Sunday, July 9, 2017

Stamp show in Raleigh


Went to the stamp show in Raleigh yesterday and bought very little. Approx 20 vendors were there -- from the Close To My Heart booth I bought 2 older stamp sets and got a third one free. Also bought a new pouncer tool for distress inks, a clear box to store my daubers in, two stamp sets from Paper Sweeties, sequins from Pink and Main, and two wood mount stamps. Here is the card I made using these two wood mount stamps:


Both the trees stamp and the trick or treaters stamp are from Just For Fun Stamps (www.jffstamps.com). They had a sample card on their display board for these stamps used on the same card using this layout.

For my card I used white/GP card stock for the white card front and sponged various distressed inks on that:


I started at the bottom and added the different inks up to the top. For the moon circle I used a 1 1/2" circle punch and punched out a circle from scrap card stock and used temporary adhesive to hold that in place. Once this piece was covered with ink I removed the scrap circle. With no stamped image on this distressed piece it looks splotchy but once the stamps were stamped on it it was fine.

Since the trees stamp is large I inked that with black ink and laid the distressed piece on top of the stamp. Put a piece of printer paper over this and rubbed over the stamp and card stock to transfer the inked trees stamp image to the distressed piece. Once that was done I carefully removed this piece from the trees stamp.

For the trick or treaters stamp I inked it with black ink and stamped it above the bottom of the trees image so they look like they are walking in the woods. Set this piece aside. Cut and scored a piece of #110 black card stock from Mikes with the scored line at the top of the card. Trimmed a piece of turquoise card stock for my card front. Trimmed my stamped piece to the size I needed for the card front. Using the ATG I put the stamped image onto the turquoise piece. Used craft foam behind this and put that onto the black card stock base.

The greeting "happy halloween" is from Impression Obsession and I used black ink for that. Cut it to the size I wanted for the card front and used a banner punch to make the fishtail end. Used double sided tape to put the banner piece on the card front. Cute and easy card to make for Halloween. Last year I made this card using stamps from Just For Fun stamps for Halloween:


Both cards are non conventional Halloween colours but both are easy cards to put together. They have stamps for all the holidays and occasions but Halloween is a favorite.... TFL

Tuesday, July 4, 2017

Happy 4th of July


Happy 4th of July to all -- Enjoy whatever you have planned for today!

ALSO -- www.joann.com  is having FREE shipping for today -- the code is: FIREWORKSH

Always nice when the online stores have free shipping as many times the shipping charges can make a shopper change their minds about ordering...  Wished more online stores would have it... :0)


Friday, June 30, 2017

4th of July Double Tote Treat Holder


Had picked up this Sizzix Thinlits die set on clearance and wanted to make a treat holder for the 4th of July with it:


There is a video on Youtube for assembling this double tote holder that I had seen so putting this little tote together went quickly. I used kraft card stock from Taylored Expressions for the tote with a gingham print from the stash. The white is GP.

To begin with I cut all the pieces I needed to make the double tote. In the video they used glue to put their holder together and for mine I used red sticky tape. Less mess and no drying time. With the tote put together I cut out the two gingham pieces for the front and back of the holder. Put those onto the holder using the ATG. Cut the tags out from scrap card stock using the tag die in this set. To the bottom of the white tag I added a small piece of the gingham printed card stock:


I used the "Stars & Stripes" stamp from a summer stamp set by PaperSweeties.com. It is a long stamp and to fit it on my tag I inked half of the stamp and stamped it onto the tag and then inked the other half of the stamp and stamped that on the tag below the first stamped image. Added stars to the tag using a stars border punch from M Stewart. Offset the tags using the ATG and put them onto the tote using red and white twine.

Used a scallop border die and cut out white/GP for that to put around the bottom of my tote. Wrapped that around the front and back of the holder. Added more of the blue stars to the front scallops on the holder using TomBow glue.  The "celebrate" is a die from the double tote set and I cut that out of the blue card stock and put that on the front of the holder. Used the small pinwheel die from Lil' Inker Designs and cut out a double sided card stock for the pinwheel. Used a red brad to hold the pinwheel together. Added glue dots to the back and put this on the front of the double tote treat holder. On one side of the tote I have miniature candy bars and the other side holds a Fun Sized candy bar and a miniature candy bar:


This is a photo looking down at this treat holder to show the paper shred and the candies inside:


A nice sized treat holder without being too big. It is also free standing so it will make a cute place marker at a table or for favors. TFL

Stenciled Smile Card


Had to make my own stencil for this card using a metal die as the pattern -- here is a photo of the two dies I used for this card:


To begin with using the patterned die I cut out a piece of white/GP card stock large enough to cut this die out. Cut a piece of white/GP larger than what I would need for my card front. I taped this card front piece down on the craft mat. Over this I taped the die cut piece and using four of the distressed inks I used this as a stencil:


Here are the inks I used:


From the bottom of the stenciled piece to the top: Worn Lipstick, Spun Sugar, Squeezed Lemonade, and a new colour for me Twisted Citron. Once I had the pattern covered in ink I carefully removed my stencil:


Decided I wanted to add this pattern to the top right of the stenciled piece so I moved the stencil over to that corner and added more colour:


Set this piece aside to work on my "smile" die piece. Wanted this to be raised up and a little thicker than just cutting out the word from black foil card stock so decided to use the kleenex box idea -- would this be Klipboard??? (instead of Chipboard...)  since I was using the pull tab off a box of tissues:


From this cardboard piece I cut out the "smile" die:


Using a scrap piece of Ken Oliver's Stick It sheet I put that behind the black foil card stock and cut out the "smile" die again. Once that was cut out I carefully pulled the Stick It backing off one of the black foil die cut letters and put this on top of the kleenex cardboard die cut piece one letter at a time -- AKA Klipboard:


This thinner cardboard gives the die cut piece some dimension without being too thick. With that done I cut out three of the hearts over the "i" "smile" using scrap coral card stock.  Used TomBow glue to stack those together -- used three hearts to get the same height as the die cut piece. With the hearts glued and stacked I used clear Wink Of Stella and went over the top of the hearts to add a little sparkle and shine.

Using a pierced frame die I cut out a white frame using white/GP.    With all card parts done I was ready for assembly. Cut and scored at the top a piece of coral pink card stock for the card base. I had cut my stenciled piece larger than what I needed for my card so I trimmed that to the size I needed to fit the white frame piece on. Used the ATG to put the frame over the stenciled piece. Wanted this framed stencil piece to be raised on the card front but did not want to use pop dots -- decided to use the white craft foam and I cut that a bit smaller than my frame stenciled front piece. Put the craft foam on the back of the frame stenciled front and put this onto the card stock base.

For the die cut "smile" I used a thin paint brush and added TomBom glue to the back of the letters. Put this on the lower right of the card front and pressed down to be sure all letters stuck to the card front. Then used the paint brush to add glue behind the hearts piece and put that on the card.:


With the greeting on the card front all that was left to do was add three clear sequins to the card front for some sparkle and shine. Put these on using the paint brush and the glue. Easy card to put together and have other dies I will also use for stencils... TFL and here is the card again:


Thursday, June 29, 2017

Stitched 4th of July Card


Had picked up the MFTstamps.coms Stitched Cover-Up Diagonal die at the stamp show in Chantilly on clearance for 50% off and I wanted to use it for the 4th of July cards. Here is a card I made using this new die:


The camera has the red look really bright but it is darker IRL -- I used the Real Red card stock from Stampin Up for the red base and the red piece at the top.

To make this card I cut and scored a red card stock base. Using white/GP I cut out the diagonal frame for the card front. For the red section I used the red card stock and cut out the red panel using that die. For the blue I used blue card stock from Mikes and cut out the larger lower panel using the die. All die cut pieces have the stitching which gives the pieces more dimension.

For the "Happy 4th of July" I used a stamp from the Taylored Expressions 4th of July Wreath stamp set and stamped that onto the white die cut piece using the MISTI. Once that was stamped I used the ATG and put the white frame piece onto the red card stock base. Then used the ATG and added the red and then the blue panels to the card front.

Used two different sized star punches for the solid blue stars and the various glittered card stock stars:


Put the glittered stars onto the solid stars using mini glue dots. Then put these stars onto the white panel on the card using glue dots. Inside the card is white/GP card stock that I stamped and I used some stars washi tape I had in the stash:


As usual the die from MFTstamps.com easily cut the thicker and thinner card stocks without any problems including the stitching around each piece. Happy me to get that half price!  TFL